
Halloween
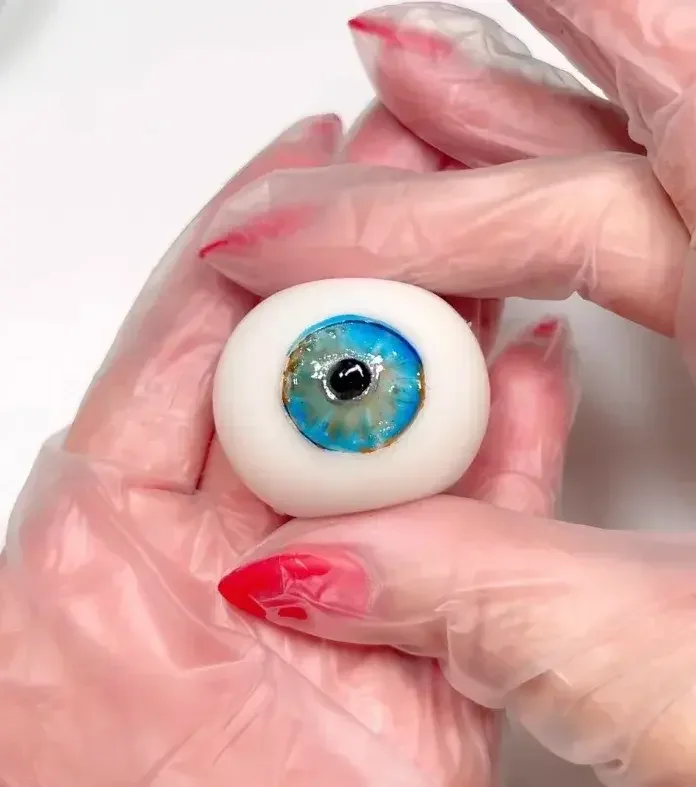
These look so realistic, you’ll have so much fun watching your guests try them! 👻 They’re creamy, boozy, creepy, and perfect for a Halloween party.
Serves 16
Ingredients
🥥 ¾ cup coconut milk
👻 2 envelopes Knox unflavored gelatin
🥥 ¾ cup cream of coconut
🍹 1 cup Malibu coconut rum
🎨 Food coloring: black, brown, blue, and green
Sphere Mold: https://a.co/d/0i5Jrc8D
Directions
Add the coconut milk and gelatin to a small saucepan and whisk to combine.
Let sit for 5 minutes to allow the gelatin to bloom.
Place the saucepan over low heat and gently warm, stirring until the gelatin is completely dissolved. Do not boil.
Remove from the heat and stir in the cream of coconut and Malibu coconut rum until smooth.
Pour the mixture into your eyeball molds, reserving about ½ cup of the mixture for decorating the irises and pupils.
Refrigerate for at least 5 hours, or until completely set.
To unmold, dip the bottom of the mold in hot water for about 30 seconds to help loosen the gelatin.
Gently pull the gelatin eyeballs away from the sides of the mold, then carefully push them out from the bottom.
Gently warm the reserved ½ cup of gelatin mixture over low heat just until melted.
Divide the mixture between several small bowls and tint with your desired food coloring. I like to use black, green, brown, and blue. 🎨
To create the irises, use a piping tip as a guide and brush the colored mixture inward toward the center of each eyeball.
Add a small black dot in the center for the pupil. I like to use a metal straw as my guide.
Refrigerate until ready to serve. These can be made up to 3 days ahead of time.
Non-Coconut Version
Bloom 2 envelopes gelatin in ¾ cup water for 5 minutes. Heat gently, then add ½ cup cream cheese and ½ cup marshmallow fluff, stirring until smooth and melted. Remove from the heat and stir in ¾ cup milk.
Alcohol-Free Version
Bloom 2 envelopes gelatin in ¾ cup coconut milk for 5 minutes. Melt gently over low heat, then stir in ¾ cup cream of coconut. Remove from the heat and stir in ¾ cup water.
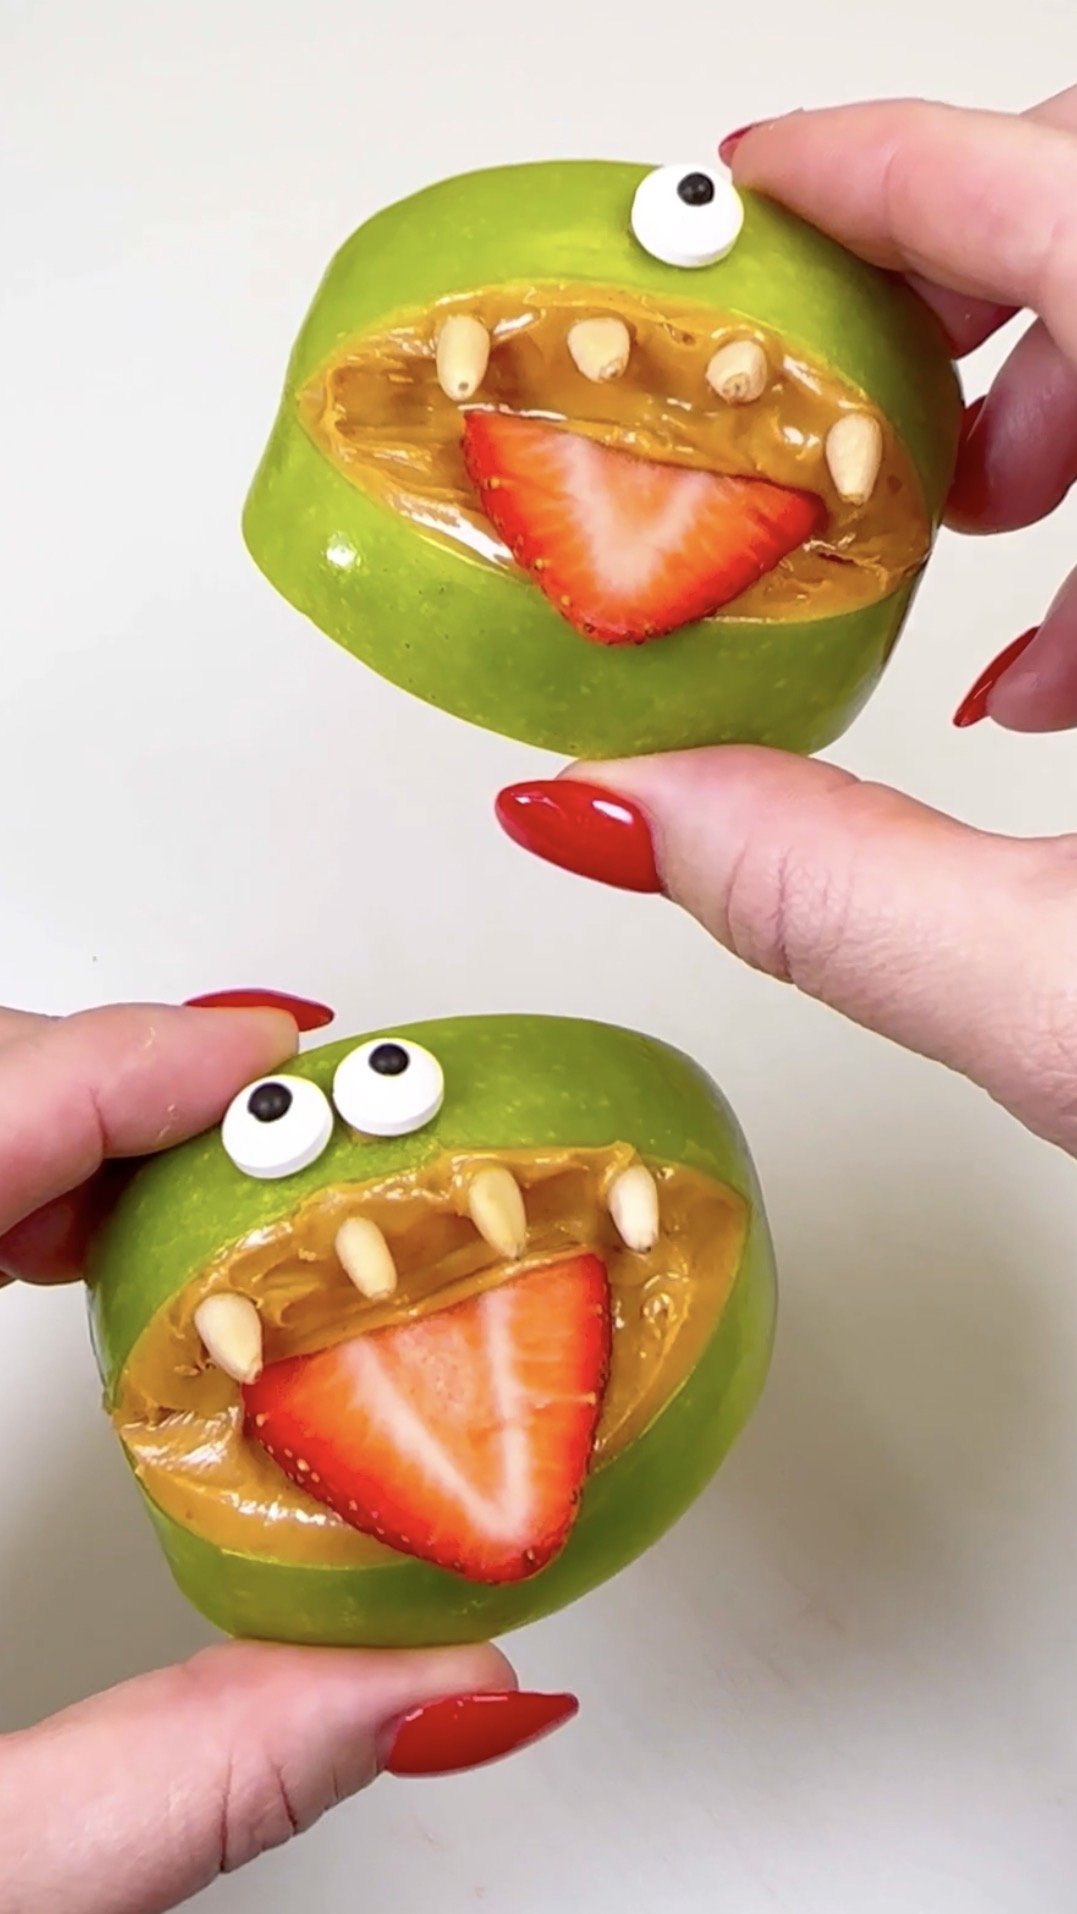
These Monster Apples are the cutest spooky snack for Halloween! 👻🍏 Crisp green apples, creamy peanut butter, strawberry tongues, and silly candy eyes make them fun, easy, and perfect for an after-school treat or Halloween party.
Ingredients
🍏 1 green apple
🥜 2 tbsp peanut butter, or any nut or seed butter
🍓 1 strawberry, top removed and thinly sliced
🦷 16 pine nuts or sunflower seeds
👀 8 candy eyeballs
🥜 Extra peanut butter, for attaching the eyeballs
Directions
Slice the apple into quarters, then carefully cut a wedge out of each piece to create the monster’s mouth.
Spread about ½ tablespoon peanut butter inside each mouth.
Add a thin strawberry slice for the tongue. 🍓
Press 4 pine nuts or sunflower seeds into each mouth to create the monster teeth. 🦷
Use a tiny dab of peanut butter to attach the candy eyeballs. 👀
Enjoy! 👻
1 hr 15 min
Ingredients
1 cup salted butter, room temperature
1 cup white granulated sugar
1 cup brown sugar, packed
2 large eggs
1 tsp vanilla extract
3 cups all purpose flour
1 tsp baking soda
½ tsp baking powder
1 tsp salt
10 oz mini chocolate chips
1 10oz bag mini marshmallows
1 tube red gel glaze (can substitute with seedless raspberry jam)
1 small bag slivered almonds
Directions
1. Preheat oven to 375°F.
2. Line a baking sheet with parchment paper and set aside.
3. Cream together butter and sugars until combined.
4. Beat in eggs and vanilla until fluffy.
5. In a separate bowl mix flour, baking soda, salt, baking powder.
6. Mix the dry ingredients into the wet ingredients until combined.
7. Fold in 10oz of mini chocolate chips.
8. Roll 2oz (3 Tbsp) of dough at a time into balls and place them evenly spaced on your prepared cookie sheets.
9. Bake for 12 minutes then transfer to a rack to cool.
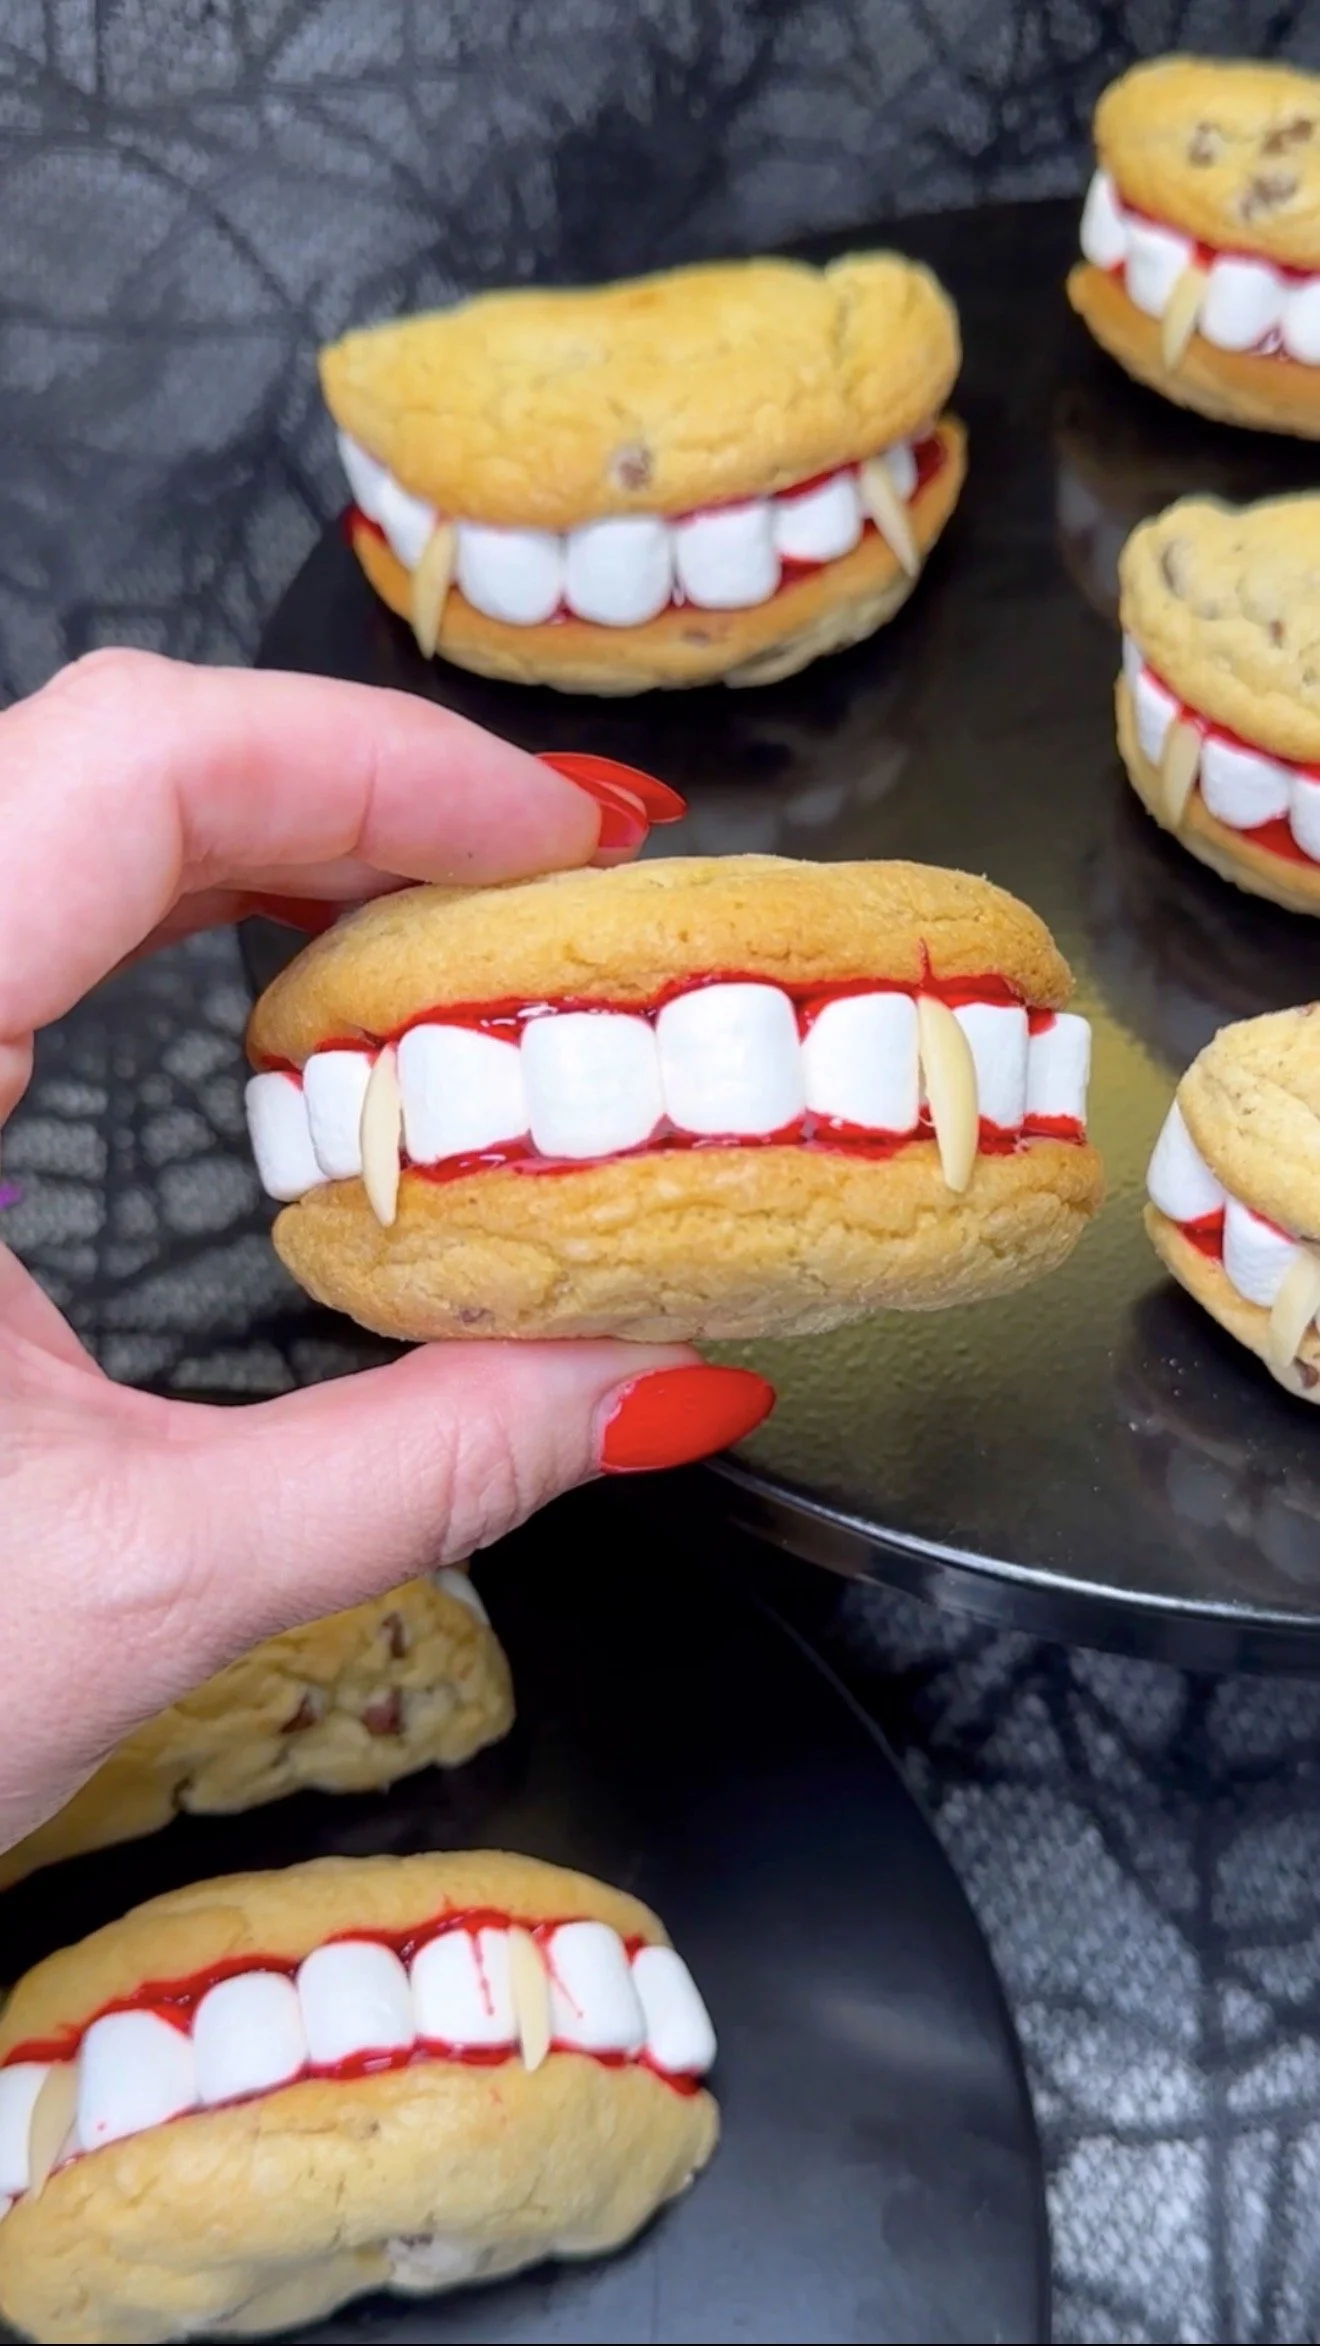
10. Once cooled, cut cookies in half.
11. Spread gel glaze (or raspberry jam) around the edges of the bottoms of the cookies.
12. Add 8 mini marshmallows to one half of each cookie then fold the other half on top.
13. Add 2 slivered almonds to each cookie for the fangs.
Cookies 24
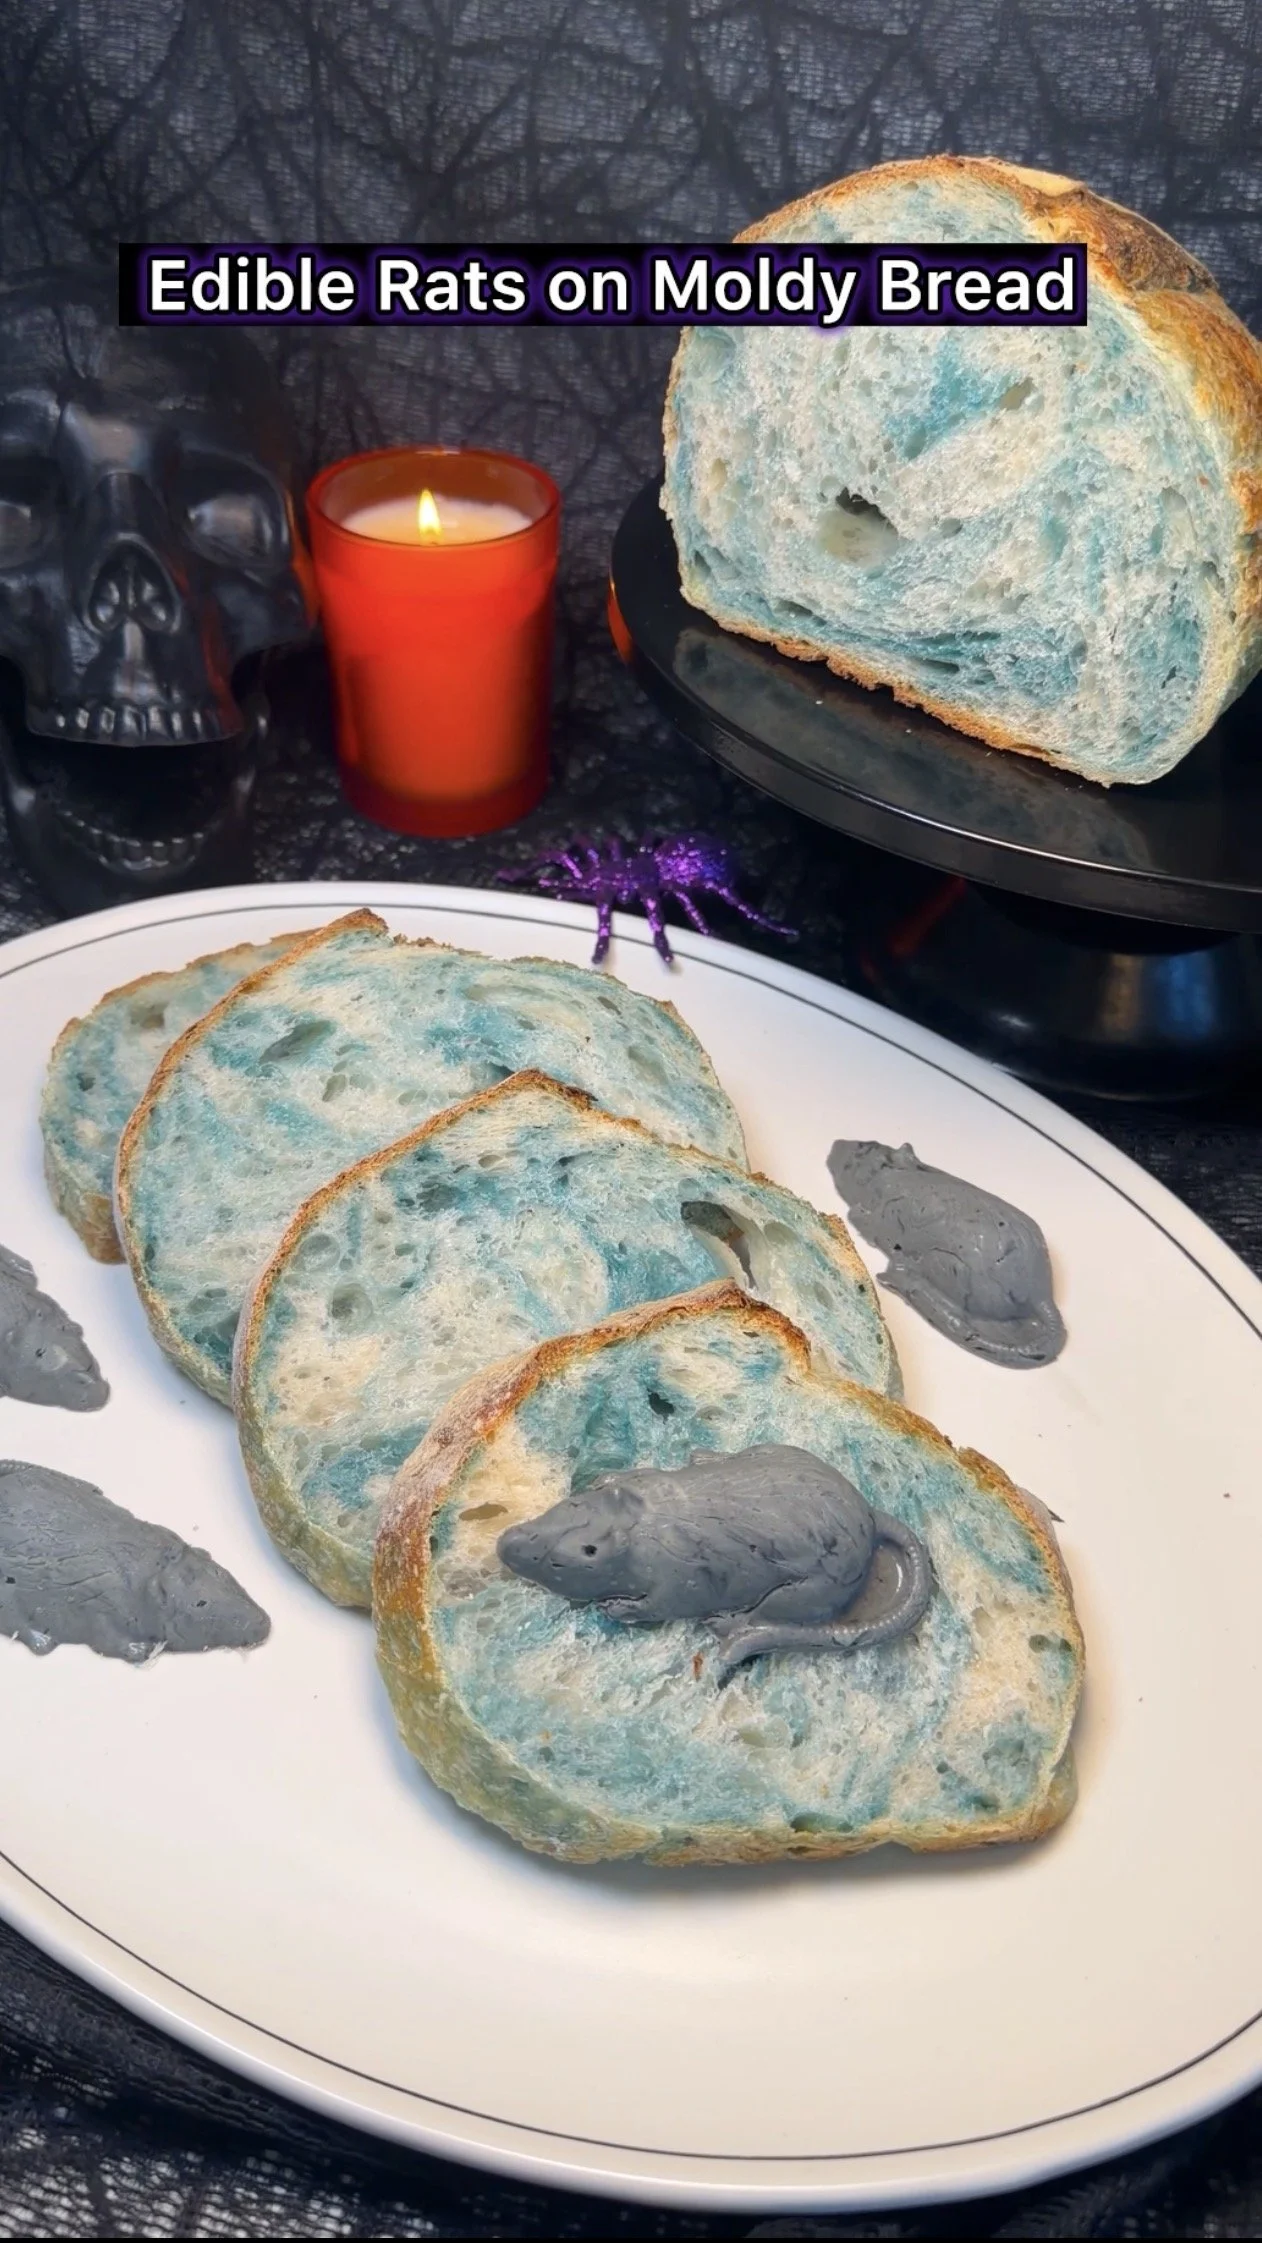
This creepy Halloween sourdough gets its moldy look from blue spirulina and is served with edible rat-shaped butter made with activated charcoal. For the full sourdough method, use my [Basic Sourdough Bread Recipe] and make the adjustments below.
Ingredients
For the moldy sourdough
1 batch of my Basic Sourdough Bread Recipe
Blue spirulina powder, as needed
For the rat butter
1 stick butter
¼ tsp activated charcoal
Rat-shaped mold
Directions
1. Make the sourdough
Prepare your sourdough according to my [Basic Sourdough Bread Recipe] through the folding process.
2. Add the blue spirulina
Just before your final coil fold, lightly sprinkle blue spirulina over the surface of the dough.
Perform the final coil fold, then sprinkle another light layer of blue spirulina over the top of the dough.
Cover and allow the dough to continue its final bulk ferment according to the original sourdough recipe.
A little spirulina goes a long way. You want irregular blue-green streaks and patches rather than completely coloring the dough.
3. Shape and add the final spirulina
Once the bulk ferment is complete, shape the dough according to the original sourdough recipe.
After the loaf is fully shaped, sprinkle one final light layer of blue spirulina over the outside of the dough.
Transfer the loaf to your prepared banneton and continue with the cold ferment according to the original recipe.
4. Make the rat butter
Melt 1 stick of butter and stir in ¼ teaspoon activated charcoal until fully combined.
Pour the butter into a rat-shaped mold and freeze until completely firm.
When ready to use, allow the mold to sit at room temperature for about 30 minutes, just until the butter softens slightly.
Turn the mold over and tap it firmly against the counter to release the rats.
Keep refrigerated until ready to serve.
5. Bake the moldy sourdough
Preheat your Dutch oven according to the original sourdough recipe.
Transfer the cold dough onto parchment paper and score the loaf as desired.
Carefully place the dough into the preheated Dutch oven and cover with the lid.
Place it on the middle rack of the oven, immediately reduce the temperature to 400°F, and bake for 40 minutes with the lid on for the entire baking time.
Keeping the loaf covered helps prevent excessive browning so the blue spirulina remains visible and gives the bread its creepy moldy appearance.
6. Cool and serve
Remove the bread from the Dutch oven and allow it to cool at room temperature for at least 1 hour before slicing.
Serve with the chilled rat-shaped charcoal butter.
Storage
Store the sourdough at room temperature in a paper bag or bread bag.
For the best texture, lightly toast individual slices before serving.
Keep the rat butter refrigerated until ready to use.
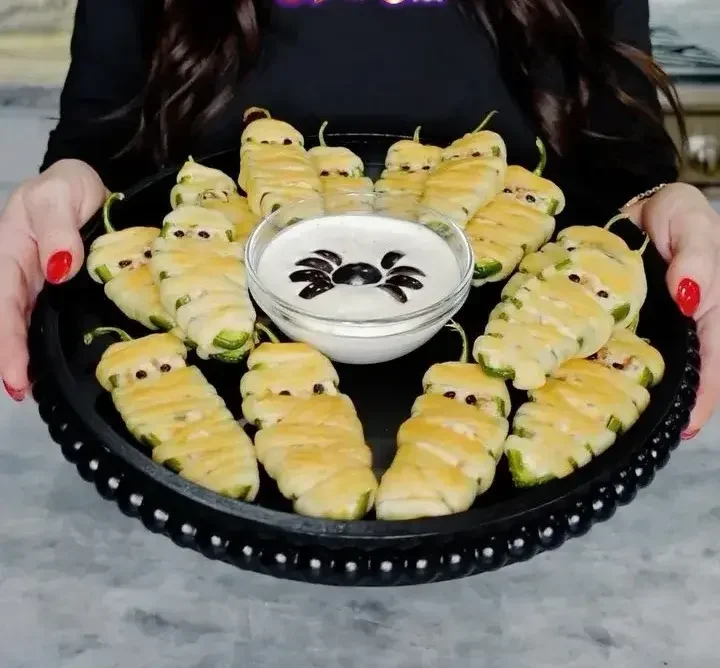
Ingredients
8 jalepenos
8 oz cream cheese (room temperature)
1 cup shredded Mexican blend cheese
¼ cup sliced green onion
4 slices bacon, cooked and chopped small
¼ tsp garlic salt
4 large black olives (for the eyes)
Ranch
Directions
1. To a bowl combine cream cheese, shredded Mexican blend cheese, green onions, bacon and garlic salt. Mix a set aside.
2. Slice 8 jalepenos in half lengthwise then scoop out the seeds.
3. Fill the jalepenos with your cheese mixture and level off any excess so the cheese blend lays flat in the jalepeno.
4. For the olive eyes: use a straw or piping tip to punch out 32 holes from the olives. Push 2 eyes in each filled jalepeno.
5. Roll out a sheet of crescent dough and cut into 16 long strips.
6. Use each strip to wrap around the mummy making sure not to cover the eyes.
7. Bake in a 375°F oven until golden (15-18 minutes)
8. Serve with a side of ranch.
Pieces 16
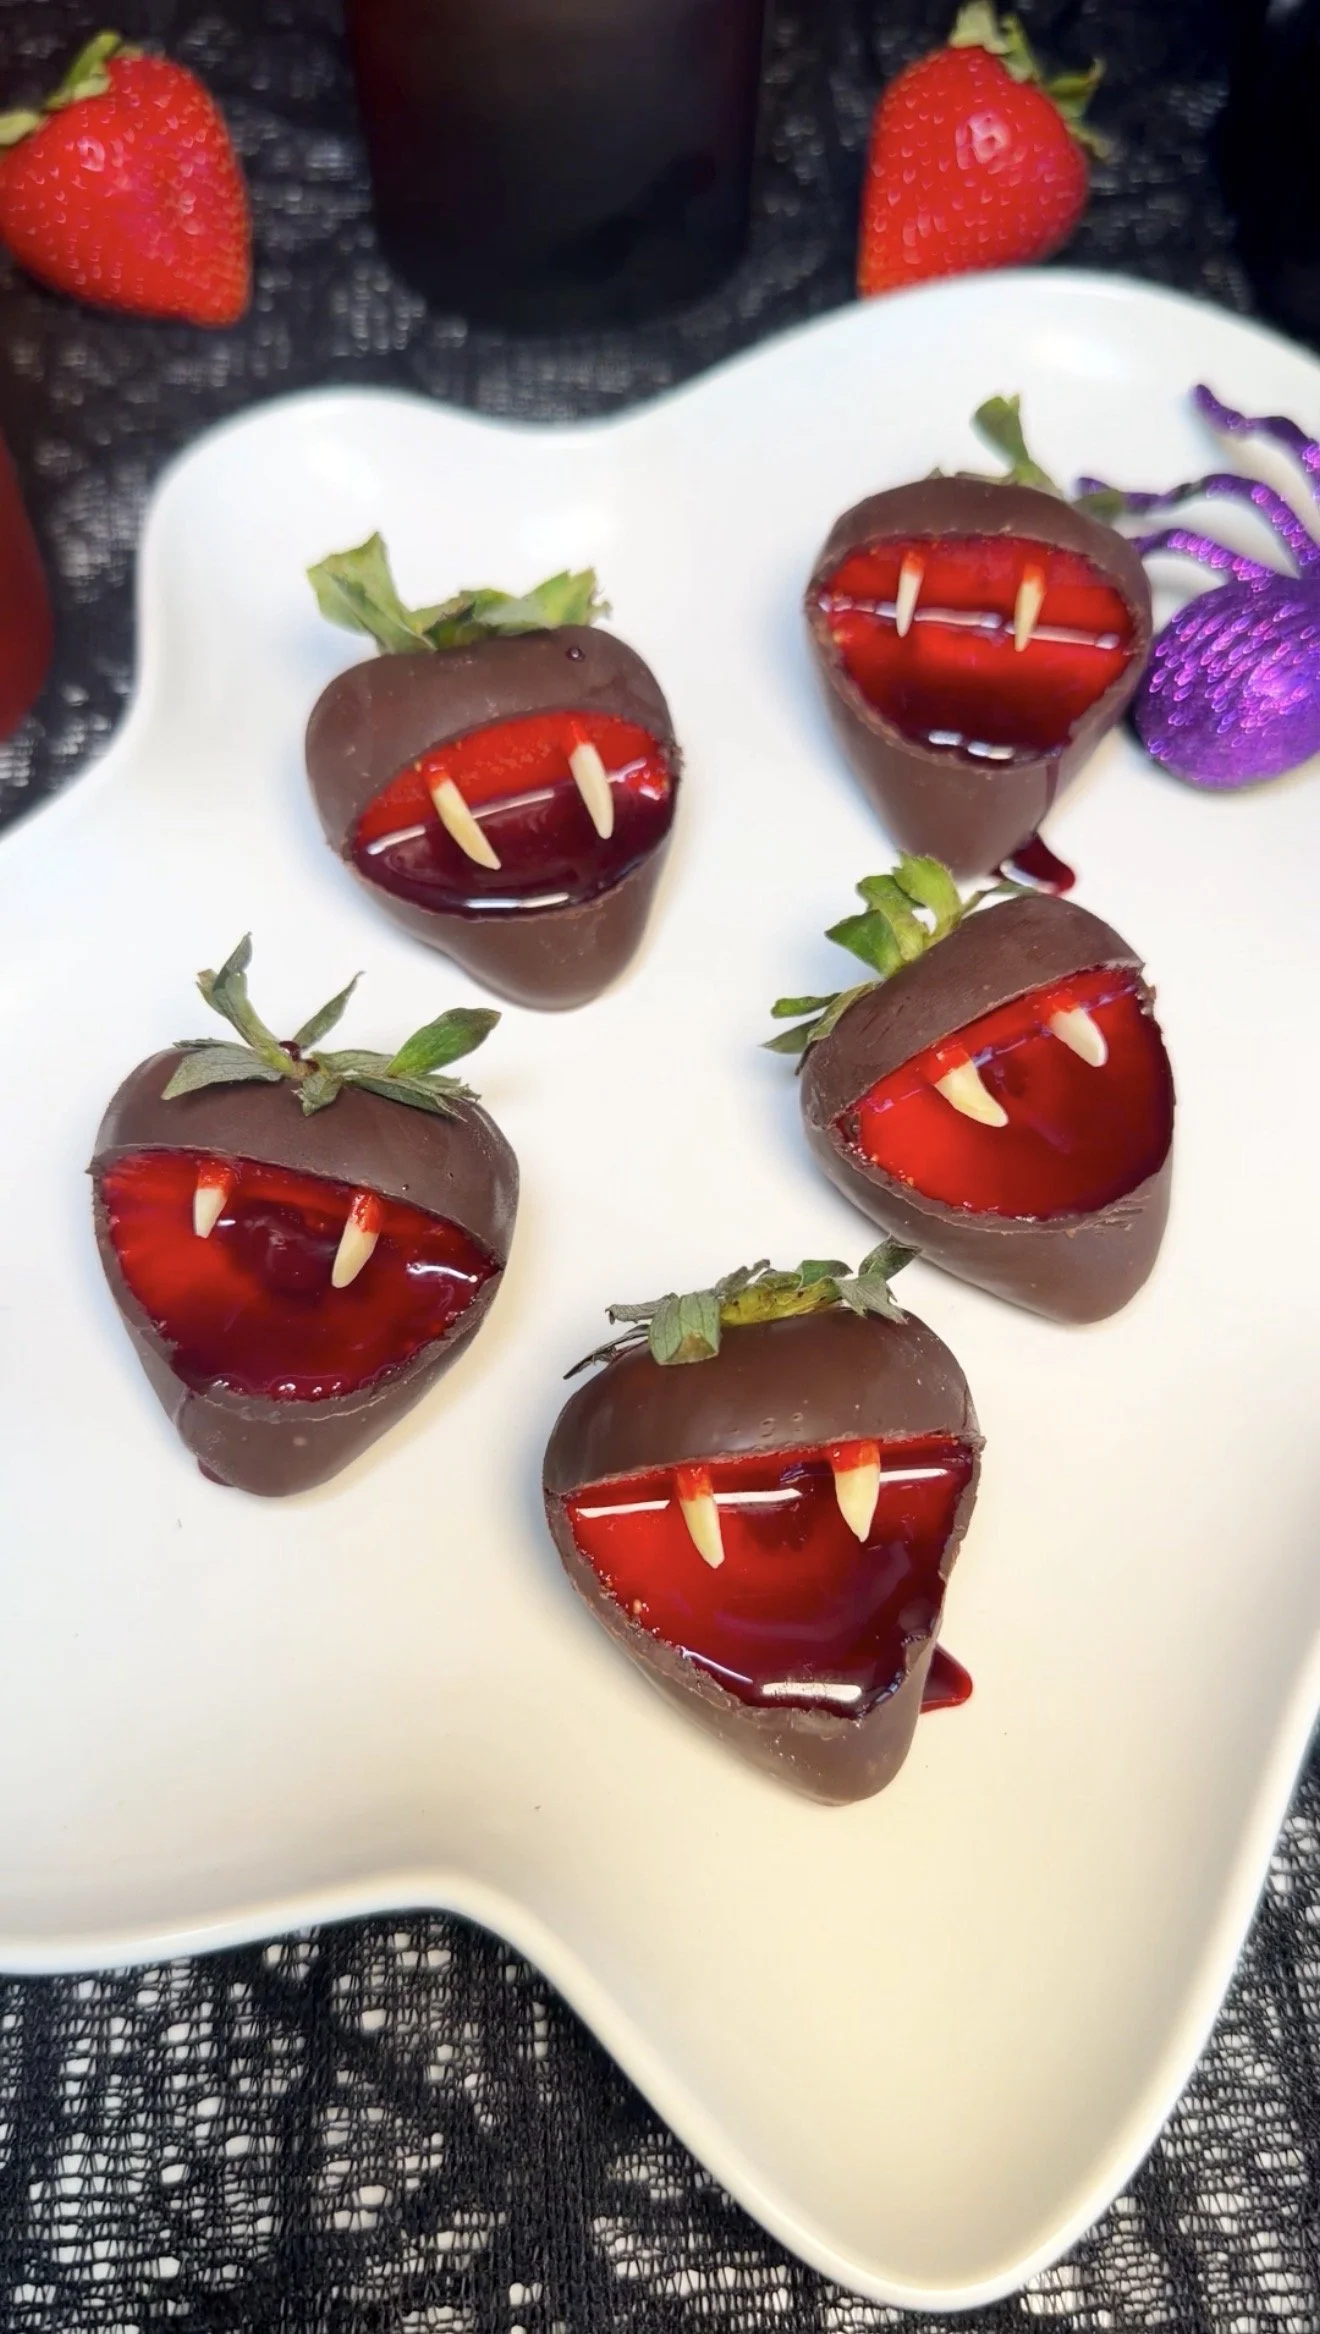
Ingredients
8 large strawberries, washed and thoroughly dried
Ghirardelli Dark Chocolate Flavored Melting Wafers
1 tbsp chocolate syrup
1 tbsp corn syrup
2 drops deep red gel food coloring
Slivered almonds
Directions
Wash and thoroughly dry the strawberries. Insert two toothpicks into the top of each strawberry to make dipping easier.
Melt the chocolate coating wafers according to the package directions. Dip each strawberry into the melted chocolate until completely coated, then place on parchment paper and allow the chocolate to fully set.
To create the mouth, cut a slit vertically into the front of each strawberry, stopping about halfway through. Make a second cut into the strawberry at roughly a 90° angle to remove a small wedge and create an open mouth.
Make the edible blood by combining the chocolate syrup, corn syrup, and deep red gel food coloring. Transfer to a piping bag and snip a very small opening from the tip.
Insert two slivered almonds into the top of the mouth to create the fangs.
Pipe the edible blood inside the mouth and around the fangs, allowing a little to drip out for an extra bloody effect.
Let set slightly, then serve and watch these berries bite back. 🩸🍓
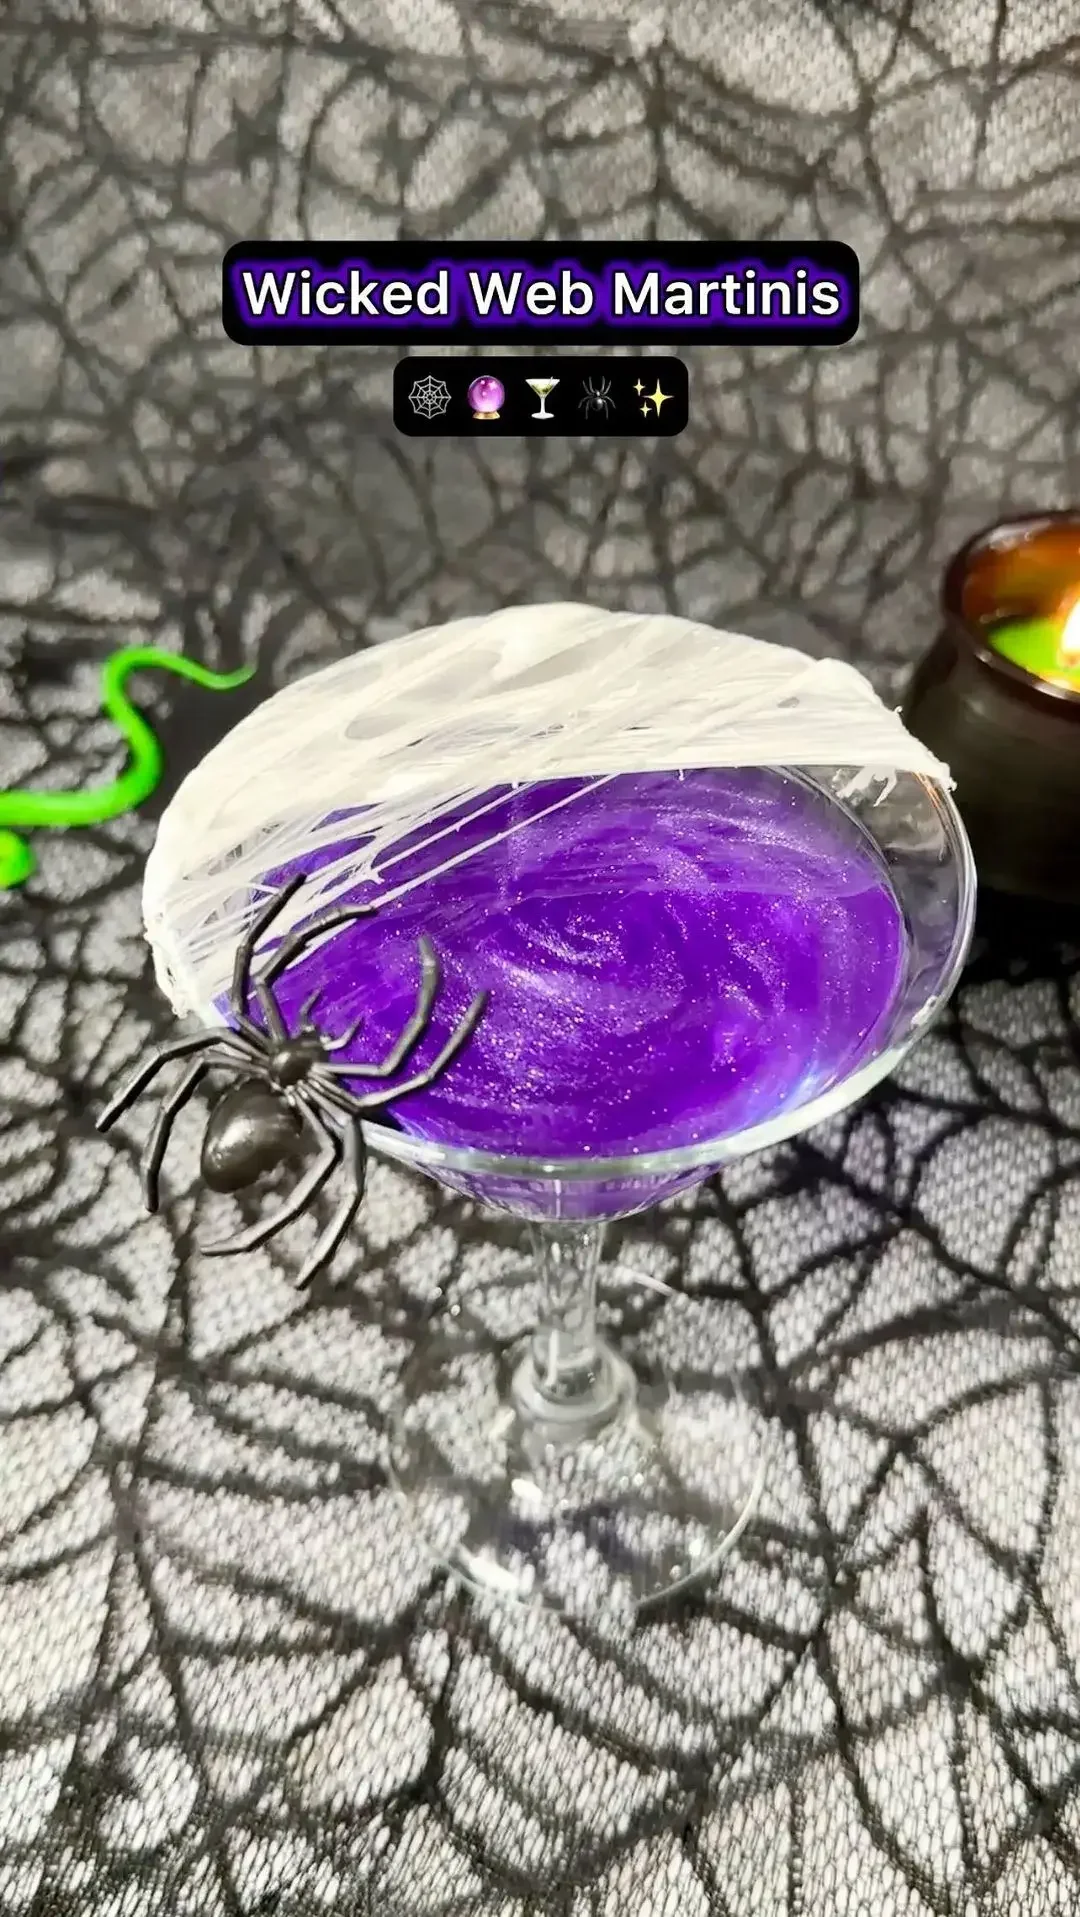
Ingredients
1 ½ oz vodka
1 oz apple juice
½ oz simple syrup
½ oz lemon juice
1 tsp grenadine
1 dash purple prism powder
1 large marshmallow
Directions
1. Melt marshmallow in the microwave for 10 seconds. Once, cool enough to touch, rub marshmallow in your hands together then spread apart creating a web on the martini glass. Refrigerate glass until ready to use.
2. For the cocktail: add vodka, apple juice, simple syrup, lemon juice, grenadine and a sprinkle in purple prism powder into an iced filled shaker. Shake for 10 seconds then pour into the martini glass .
3. Add a spider ring for an extra decorative touch that the guest can also wear afterwards
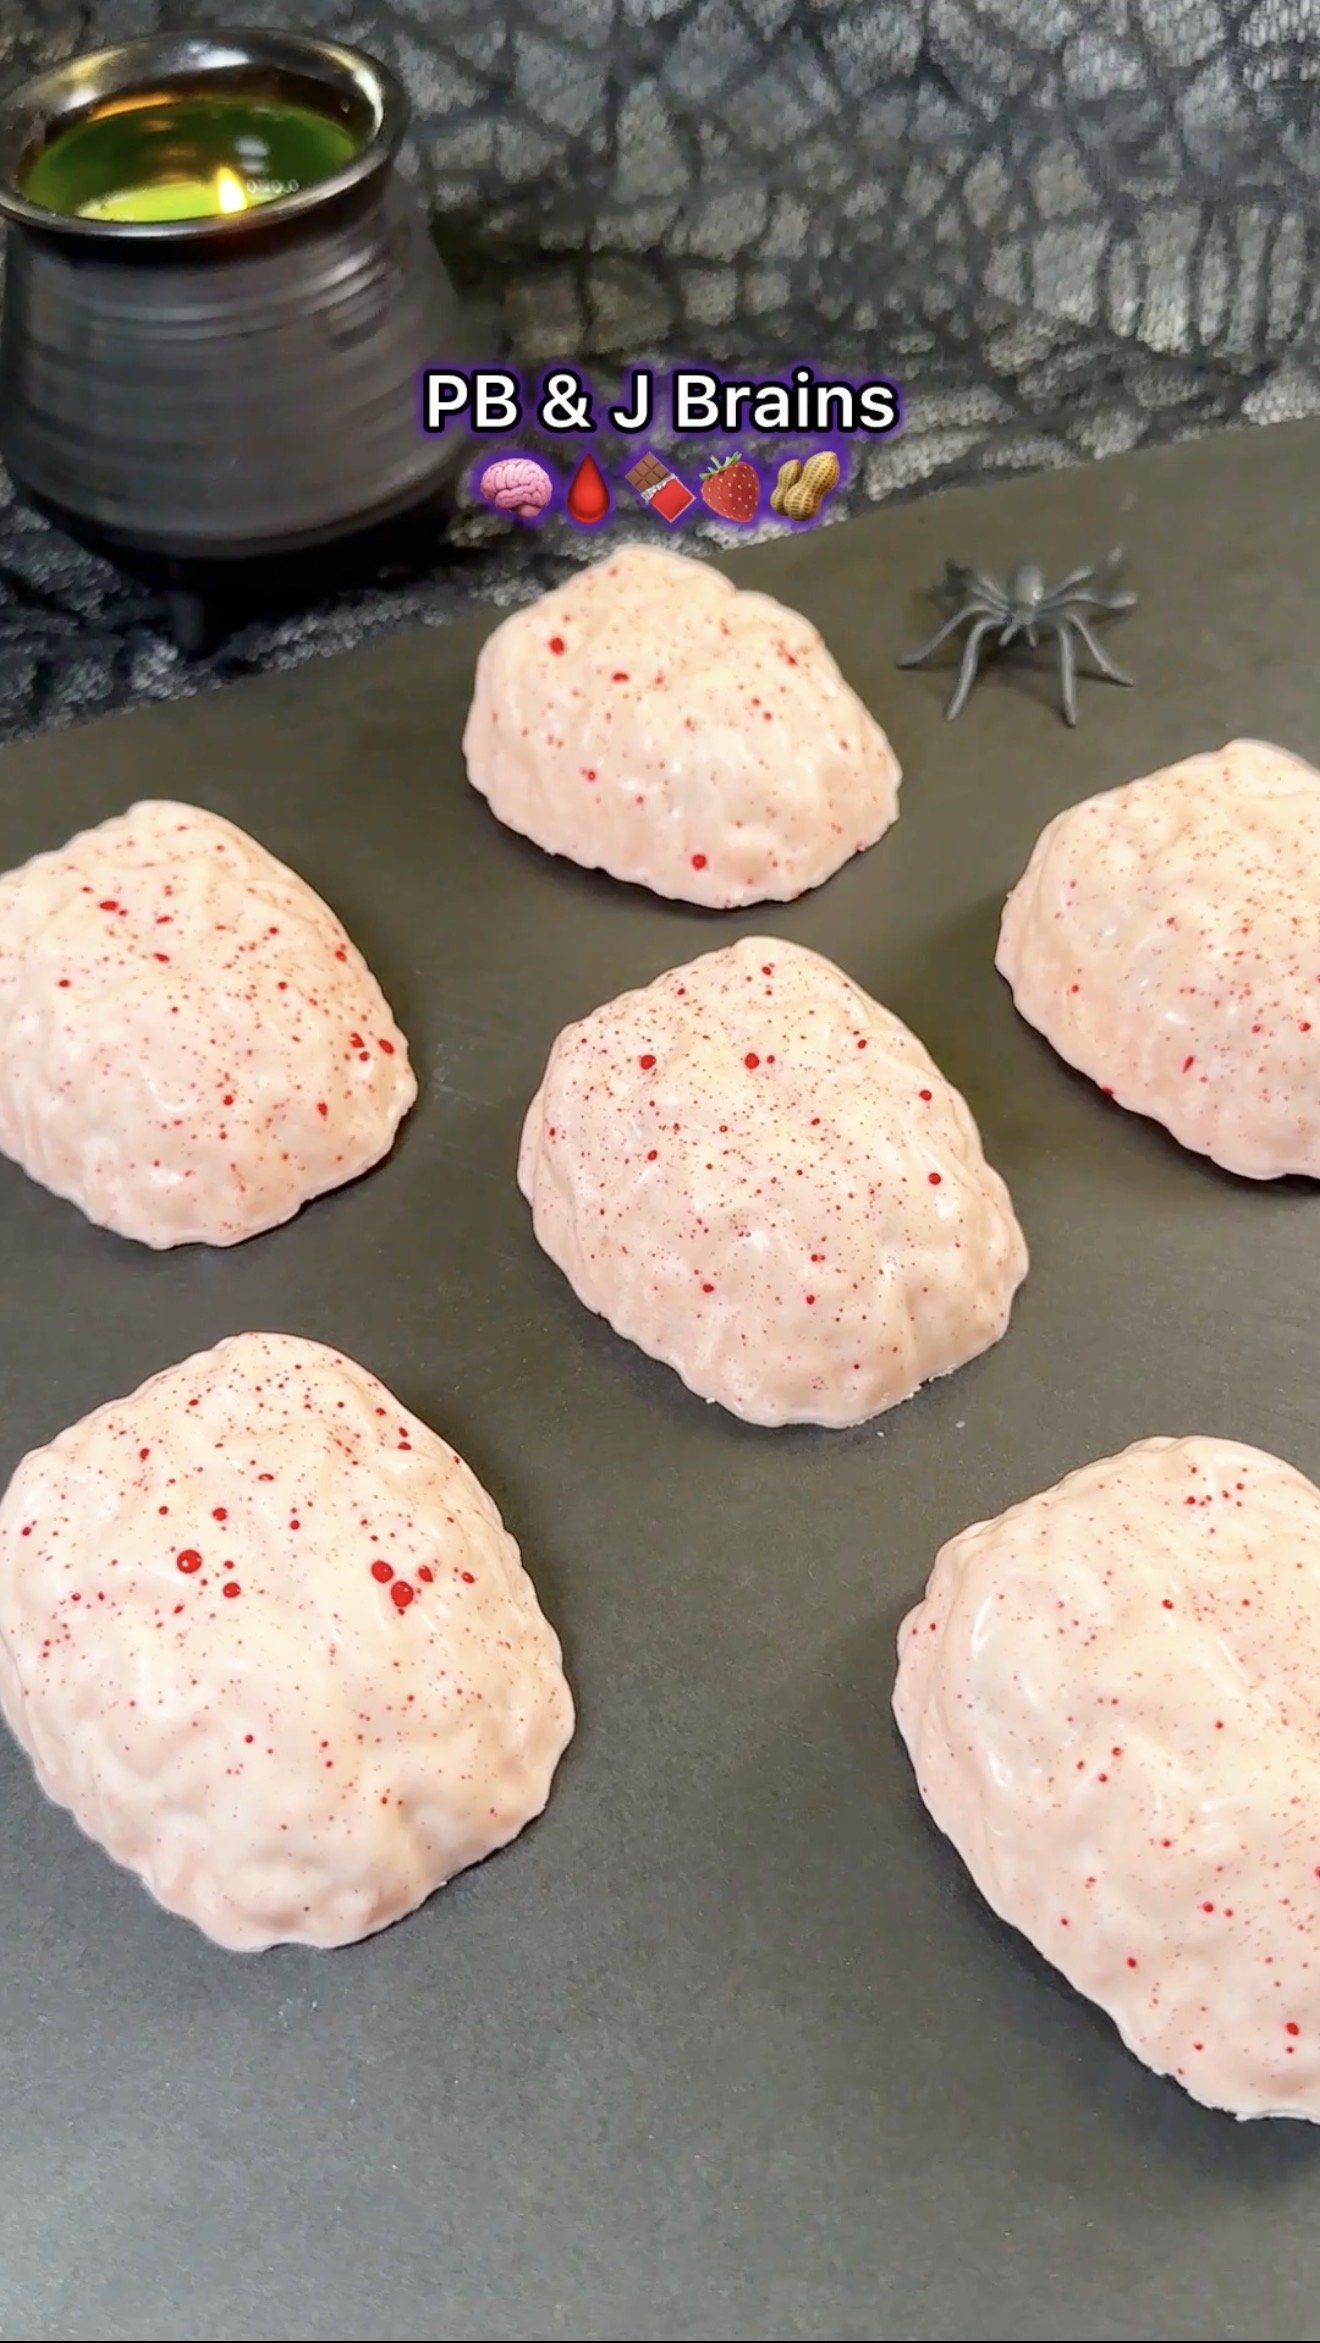
These creepy little brains have a crunchy white-chocolate shell filled with creamy peanut butter, raspberry jam, and gooey marshmallow creme. They look disturbing, but taste like a sweet PB&J dessert.
Makes: 6 brains
Ingredients
● 12 oz Ghirardelli White Vanilla Flavored Melting Wafers
● Red gel food coloring
● Approximately ½ cup creamy peanut butter
● Approximately ⅓ cup red raspberry jam
● Approximately ½ cup marshmallow creme
● 1 silicone brain mold with 6 cavities
Directions
1.Melt the candy wafers according to the package directions. Add 1 drop of red gel food coloring and stir until the coating becomes a pale, fleshy pink.
2.Make the brain shells. Spoon some of the melted candy coating into each cavity of the silicone brain mold. Using the back of a spoon, spread the coating evenly across the bottom and up the sides of each cavity. As the coating begins to cool and thicken, continue pushing it up the sides to create a sturdy shell.
3.Freeze until the candy coating is completely firm.
4.Add the peanut butter. Spoon creamy peanut butter into the center of each frozen brain shell.
5.Add the jam. Spoon raspberry jam over the peanut butter.
6.Add the marshmallow creme. Spoon marshmallow creme over the raspberry jam, filling each cavity almost to the top while leaving enough room to seal the brains. The marshmallow creme will be sticky at first, but allow it to rest for a few moments and it will naturally settle and spread.
7.Seal the brains. Spoon the remaining melted pink candy coating over each cavity. Spread it completely to the edges so it connects with the original shell and fully seals the filling inside.
8.Freeze again until completely firm.
9.Carefully peel the silicone mold away from each brain to release them.
10.Add the bloody splatter. Dip a small food-safe brush into red gel food coloring and lightly flick it over the brains to create a bloody splatter effect.
Chef’s Tip
Don’t make the first layer of candy coating too thin. A slightly thicker shell makes the brains much easier to remove from the mold without cracking.
Storage
Store the PB&J Brain Surprises in an airtight container in the refrigerator until ready to serve.
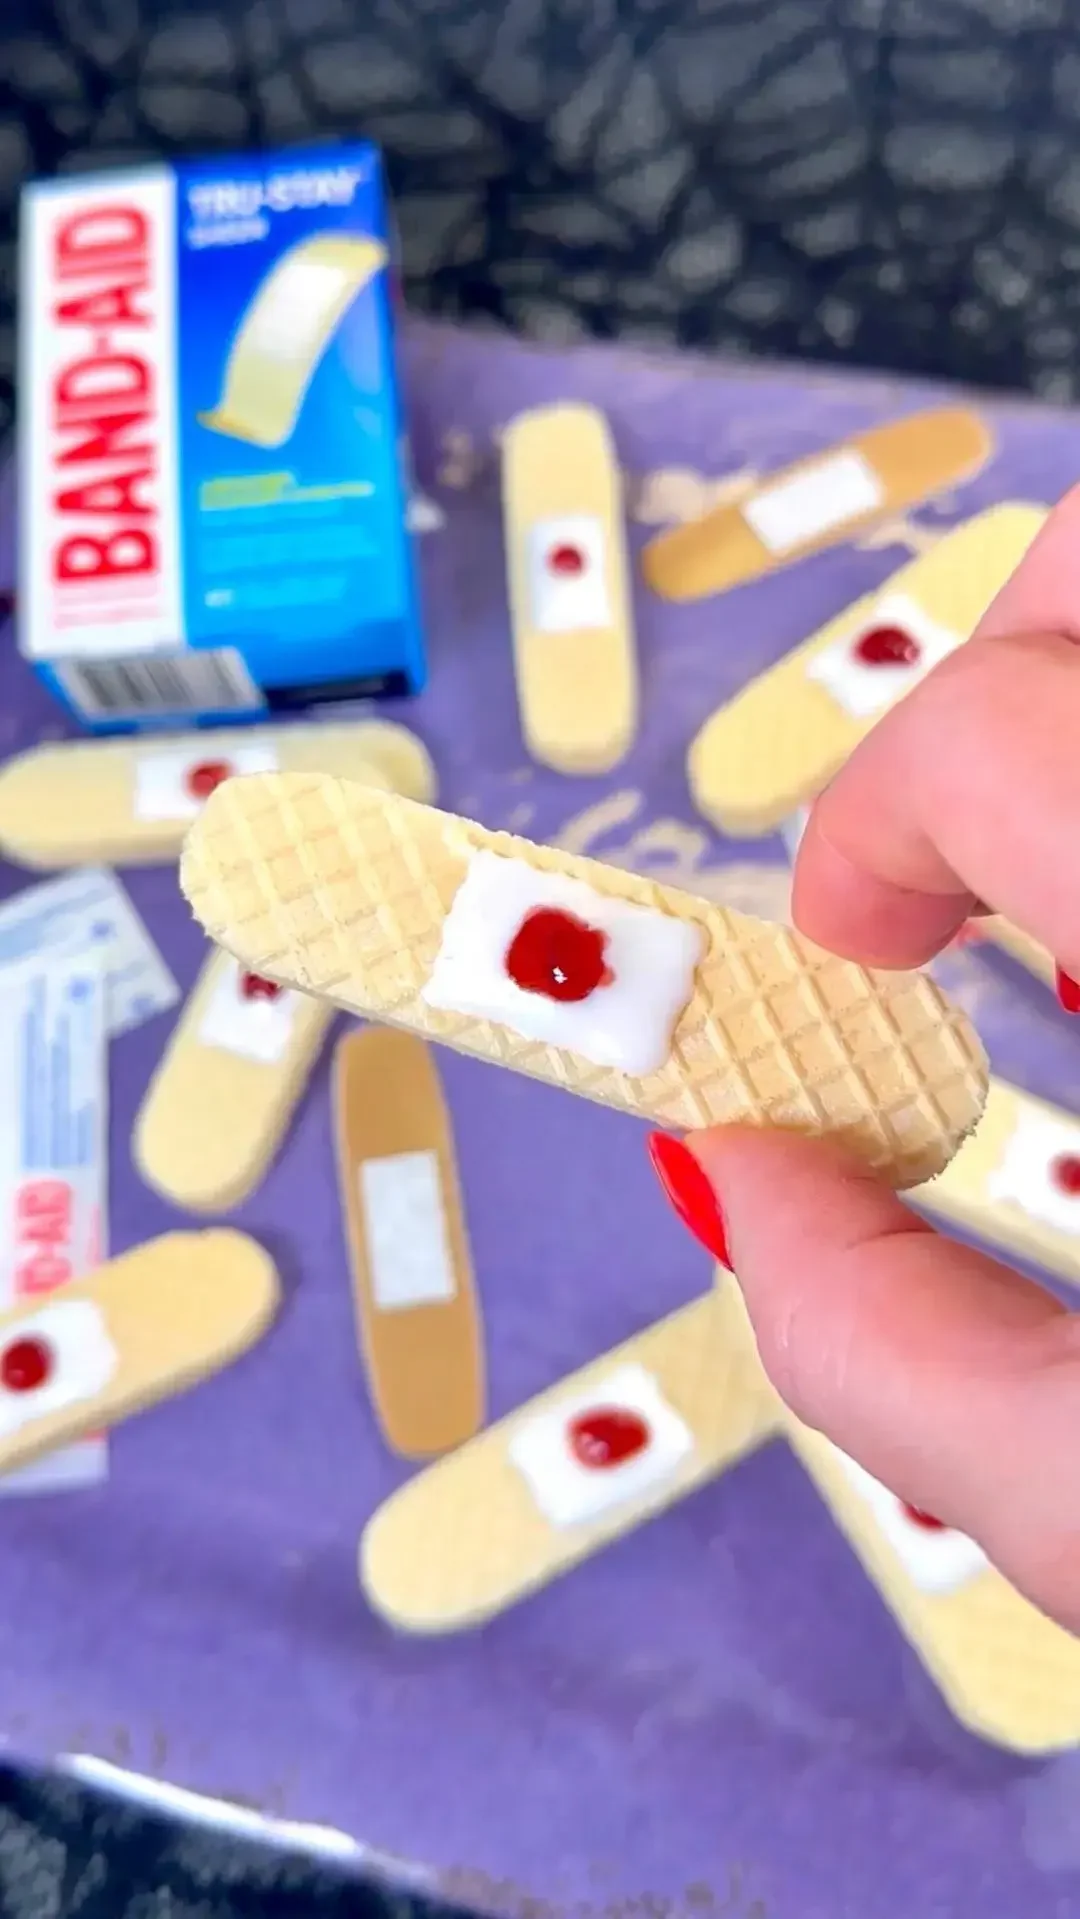
Creepy, gross, and ridiculously easy to make. These edible “bloody” Band-Aids are the perfect little Halloween snack - and they’re made with just 3 ingredients. 🩹👻
🛒 Ingredients
20 vanilla wafers
White cookie icing
Seedless raspberry jam
🔪 Directions
Use a microplane to gently file down the corners of each vanilla wafer so they look more like little Band-Aids.
Pipe a small square of white cookie icing in the center of each wafer.
Let the icing dry completely.
Add a small dollop of seedless raspberry jam in the center for the “blood.” 🩸
👻 Halloween Tip
For an extra-creepy look, let a tiny bit of the raspberry jam drip slightly over the icing.
Makes 20 edible Band-Aids 🩹🩸
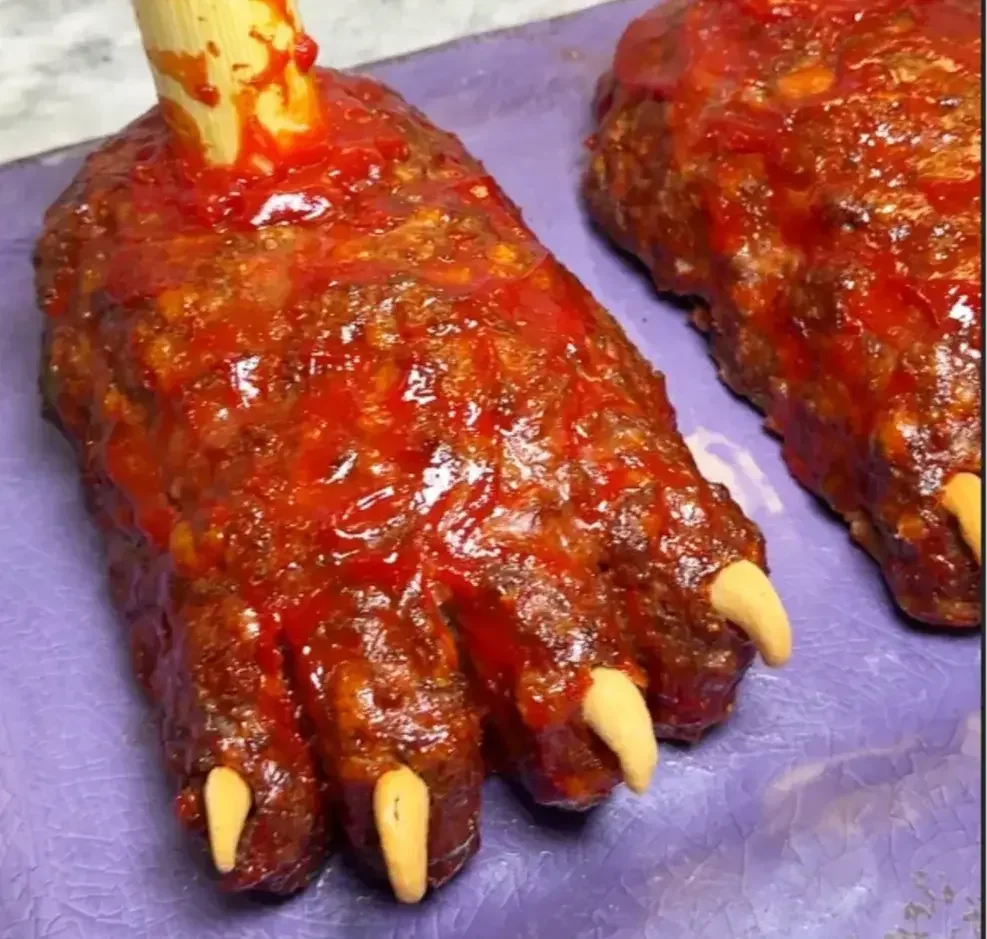
A gruesomely delicious meatloaf shaped like severed feet, complete with leek “bones,” cashew toenails, and a bloody glaze. Perfect for a creepy Halloween dinner! 👻
Ingredients
Feetloaf 🦶
4 lbs Extra lean ground beef, excess liquid patted dry with paper towels
1½ cups Italian breadcrumbs
1½ cups milk
1 onion, finely diced and sautéed
2 eggs
1 tbsp Worcestershire sauce
4 tsp salt
2 tsp black pepper
2 large leeks, bottom white/light green portions only
10 roasted cashews
Bloody Glaze 🩸
1 cup ketchup
¼ cup brown sugar
1 tbsp apple cider vinegar
½ tsp garlic salt
Directions
1. Prepare the breadcrumbs 🥛
Combine the Italian breadcrumbs and milk. Stir together and set aside to allow the breadcrumbs to absorb the milk.
2. Sauté the onion 🧅
Finely dice the onion and sauté until softened. Set aside to cool slightly.
3. Make the meatloaf mixture 🥩
In a large bowl, combine the ground beef, breadcrumb mixture, sautéed onion, eggs, Worcestershire sauce, salt, and pepper. Gently mix until evenly combined.
4. Create the bones 🦴
Line a sheet pan with parchment paper. Arrange the two leeks on the pan to act as the exposed “bones” of each severed foot.
5. Shape the feet 🦶
Divide the meatloaf mixture in half and form each portion around a leek, leaving part of the leek exposed as the bone. Shape each portion into a foot, then use a knife to separate and define five toes.
6. Add the toenails 😈
Press one roasted cashew into the end of each toe to create creepy toenails.
7. Protect the bones 🦴
Lightly spray the exposed leeks with cooking oil and cover them with aluminum foil to prevent them from burning.
8. Bake 🔥
Bake at 350°F for 25 minutes.
9. Make the bloody glaze 🩸
While the feetloaf bakes, combine the ketchup, brown sugar, apple cider vinegar, and garlic salt. Mix until smooth.
10. Glaze the feet 🩸
Remove the feetloaf from the oven. Generously brush with the glaze, making sure to get between and around the toesand around the base of the exposed leek bones.
11. Finish baking 🔥
Cover the exposed leeks again with foil and return to the oven for approximately 25 more minutes, or until the center reaches a safe internal temperature of 160°F for ground beef. The temperature may continue to rise slightly while resting.
12. Make it gruesome 🩸🦴
Allow the feetloaf to rest before carefully transferring it to a serving platter. Pipe additional glaze or ketchup around the exposed “bones” for an extra-bloody severed-foot effect.
Serves 8 👻🎃
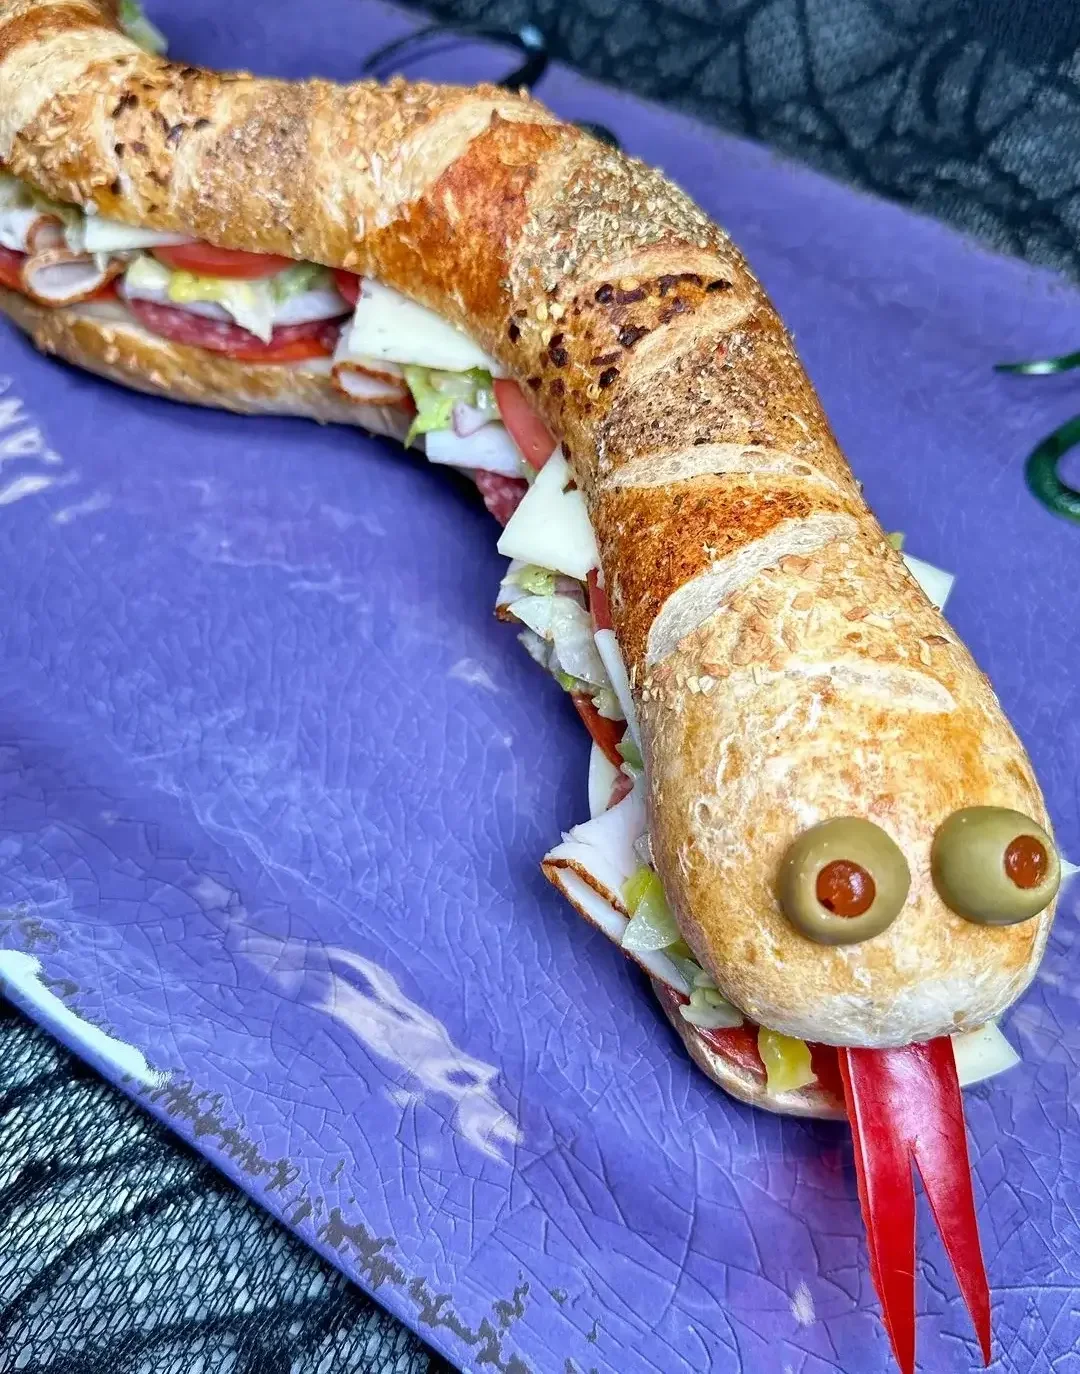
Ingredients
Snake Bread 🐍
1 can Pillsbury French Bread Dough
Egg Wash: 1 egg + 1 tsp water
Paprika
Cracked black pepper
Red pepper flakes
Dried oregano
Dehydrated onions
Snake Details 👀👅
Red bell pepper, cut into the shape of a snake tongue
2 pimento-stuffed olives, cut in half
Sandwich Fillings 🥪
3 slices provolone, cut in half
9 slices pepperoni
9 slices salami
5 slices deli turkey, cut in half
8 slices Roma tomato
Grinder salad (recipe below)
2½ slices Havarti cheese
Grinder Salad 🥬
¼ head iceberg lettuce, shredded
¼ cup red onion, diced
¼ cup banana peppers, diced
¼ cup mayonnaise
1 tbsp red wine vinegar
Dried oregano, to taste
Salt, to taste
Black pepper, to taste
Directions
1. Shape the snake 🐍
Stretch the French bread dough to approximately 14 inches long on a parchment-lined sheet pan. Taper one end to create the tail and shape the opposite end into the snake's head. Curve the dough into a slithering snake shape.
2. Add the markings 🎨
Brush the entire snake with egg wash. Create serpent-like markings using the paprika, cracked black pepper, red pepper flakes, oregano, and dehydrated onions. I used pieces of parchment paper as guides while sprinkling on the seasonings to create the pattern.
3. Bake 🔥
Cut a few small slits across the top of the dough. Bake at 350°F for approximately 25 minutes, or until golden brown and cooked through. Allow the bread to cool completely.
4. Make the grinder salad 🥬
Mix together the mayonnaise, red wine vinegar, oregano, salt, and pepper. Add the shredded iceberg lettuce, diced red onion, and banana peppers and toss until evenly coated.
5. Build the sandwich 🥪
Once the snake bread has cooled, carefully slice it in half lengthwise. Layer with provolone, pepperoni, salami, turkey, Roma tomatoes, Havarti, and the grinder salad.
6. Bring your snake to life 👀🐍
Finish by adding the pimento-stuffed olive eyes and red bell pepper tongue.
Serves 6 🎃
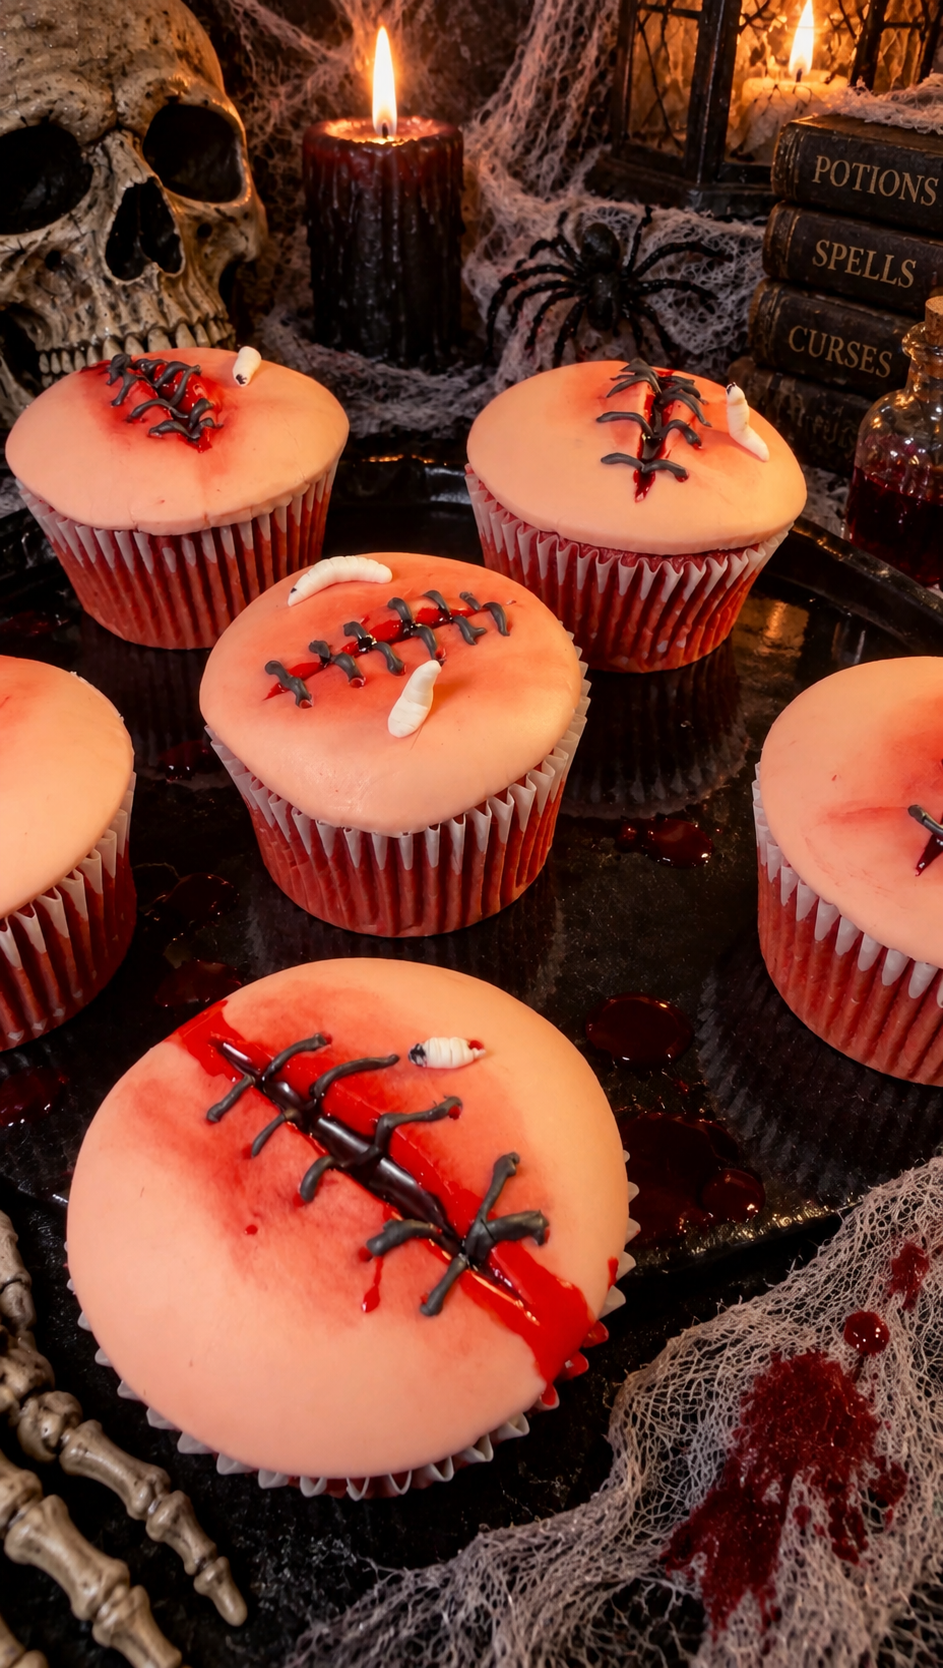
These gruesome red velvet cupcakes are topped with edible fondant “skin,” open wounds, stitches, blood, and tiny fondant maggots. Disgusting in the best possible way - and perfect for Halloween.
Makes 6
Ingredients
Cupcakes
●1 box red velvet cake mix
●3 eggs
●1 cup milk
●1/2 cup melted butter
●6 Tbsp cherry preserves
●Vanilla frosting
Edible Skin
●4.4oz pack fondant (I used a peach petal color)
●Red edible dust (Chefmaster red dry powder candy color)
Edible Blood
●1 tbsp chocolate syrup
●1 tbsp light corn syrup
●2 drops deep red gel food coloring
Black Royal Icing
●Powdered sugar
●Water
●Black gel food coloring
Maggots
●1 tsp white fondant
Directions
1. Make the cupcakes.
Prepare the red velvet cake mix according to the package directions, but substitute the water with milk and the vegetable oil with melted butter. Add the eggs as directed and bake according to the package instructions.
2. Cool, fill and frost.
Allow the cupcakes to cool completely. Using the wide end of a piping tip, hollow out the center of each cupcake, reserving the piece of cake you remove. Fill the center with cherry preserves, then place the reserved piece of cupcake back on top to seal in the filling. Spread a thin, smooth layer of vanilla frosting over each cupcake.
3. Make the edible skin.
Roll the peach-colored fondant to approximately 1/8-inch thick. Using a round cutter approximately the same size as the top of your cupcakes, cut out circles of fondant. Place one over each frosted cupcake and gently smooth it into place.
4. Create the wound.
Using a sharp knife, cut a slit down the center of the fondant. Use the tip of the knife to gently lift and flick the cut edges upward and outward, creating the appearance of torn, open skin.
5. Add the stitch holes.
Using a toothpick, skewer, or other pointed tool, make small holes along both sides of the wound where the stitches will go.
6. Make it look infected.
Lightly brush red edible dust around the wound, concentrating the color around the torn edges and stitch holes to create an irritated, inflamed skin effect.
7. Make the edible blood.
Combine the chocolate syrup, corn syrup, and deep red gel food coloring. Stir until smooth. Spoon the blood inside the open wound and around the edges, allowing a little to drip naturally.
8. Add the stitches.
Mix a small amount of powdered sugar with a few drops of water until you have a thick, pipeable consistency. Tint with black gel food coloring. Transfer to a piping bag with a very small opening and pipe stitches across the wound, connecting the holes on either side.
9. Make the maggots.
Pinch off tiny pieces of white fondant and roll them into short, slightly tapered worm shapes. Use the edge of a toothpick or knife to make tiny indentations across each one for a segmented appearance.
10. Finish the cupcakes.
Place a few fondant maggots inside and around the wound. Add additional edible blood wherever needed for an extra gruesome finish.
Serve and enjoy - if you can stomach them. 🩸🪱
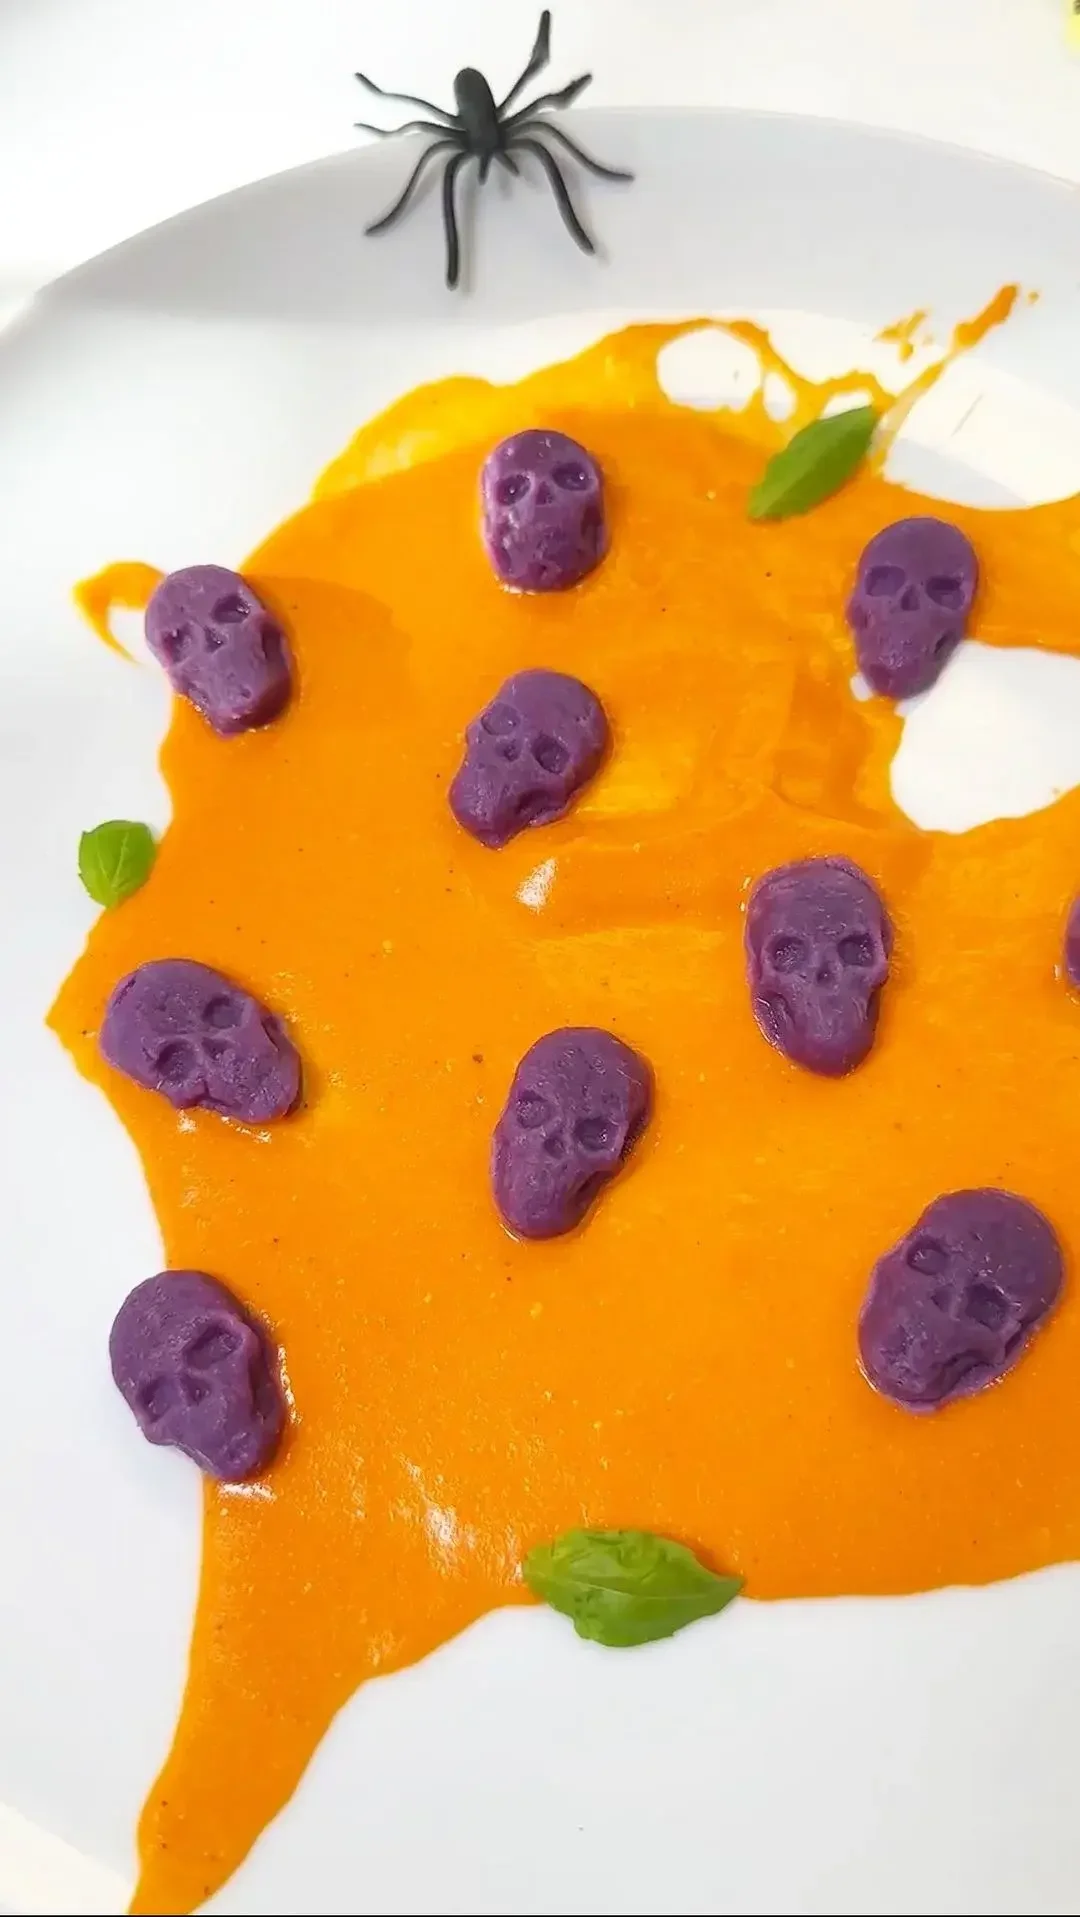
Ingredients
2 large purple sweet potatoes (need 300g cooked)
100g 00 flour (about 3/4 cup)
1 egg yolk
¼ tsp salt
Directions
1. Boil purple potatoes until fork tender (about 30-35 min) Allow to cool slightly then peel off the skin. Pass through a potato ricer.
2. Create a dome in the center of the riced potatoes and add the flour around the perimeter.
3. Add egg yolk in the dome then use a fork to mix in the rice potatoes.
4. Use a dough scraper to start incorporating the flour. Once you have a crumble use your hands to form together until you have a smooth ball.
5. Cut into 4 sections then roll each section into a log.
6. Cut into smaller sections then press the sections into your skeleton silicone molds.
7. Freeze for 10 minutes to harden then they should pop right out.
8. Cook gnochhi in salted boiling water. You know it’s cooked once they float to the top.
9. Remove and serve with your favorite sauce (I used a spicy vodka sauce for the orange color and added fresh basil to add pops of green)
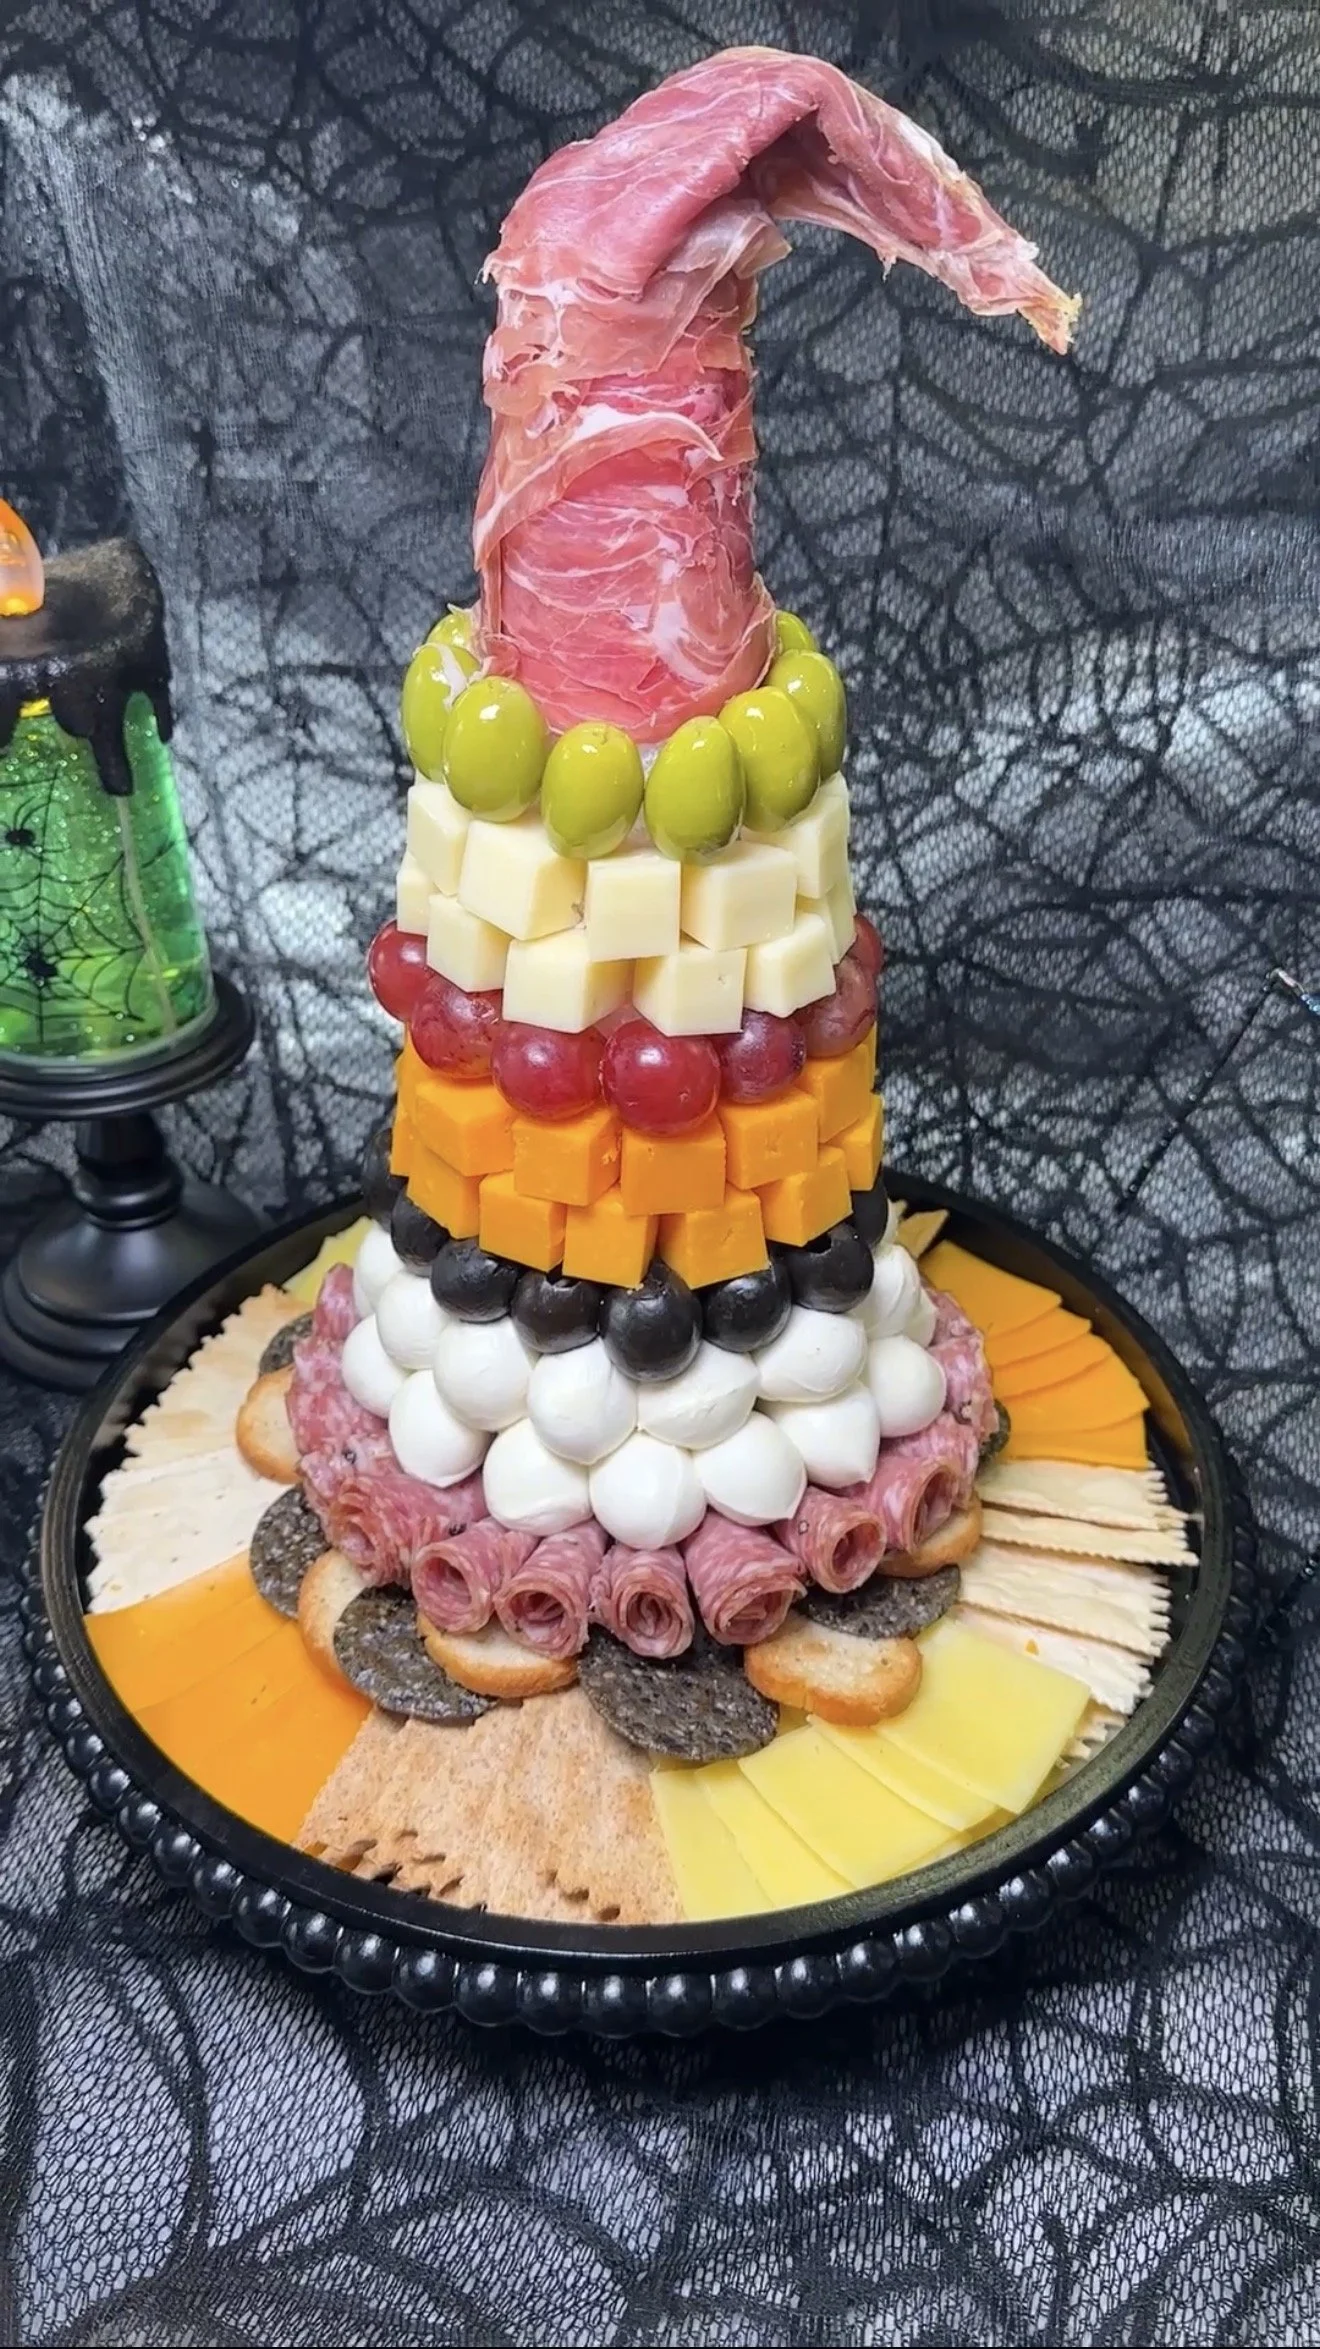
Turn an ordinary charcuterie board into a spooky 3D Witch Hat Charcuterie Board! Layers of meats, cheeses, olives, and grapes are stacked around a cone, then topped with prosciutto to create the perfect crooked witch hat. Surround it with crackers and cheese for an impressive Halloween party centerpiece!
Ingredients
1 large foam cone (I found mine at Hobby Lobby)
Plastic wrap, for covering the cone
Rectangular artisan crackers (look for these in the deli section)
Assorted sliced cheeses, cut into rectangles
Assorted round crackers (I used bagel chips and black sesame rice crackers)
Soppressata, salami, or another thinly sliced cured meat
Mini fresh mozzarella balls
Black olives
Cheddar cheese block, cut into cubes
Red grapes
Mozzarella cheese, cut into cubes
Green pitted olives
2 (3 oz) packages sliced prosciutto
Toothpicks — a lot!
Instructions
1. Prepare the base.
Place the foam cone upright in the center of a large serving platter. Completely cover the cone with plastic wrap so none of the food comes into contact with the foam.
2. Fill the platter.
Arrange the crackers and sliced cheeses around the outside of the platter, alternating the different varieties to create a colorful border around the base of the hat.
3. Start building the hat.
Beginning at the bottom of the cone, fold each slice of salami in half, then roll it slightly to create a small cone shape. Secure each piece to the foam cone with a toothpick, continuing all the way around to create the first layer.
4. Add the mozzarella.
Directly above the meat, add two rows of mini mozzarella balls, securing each one to the cone with a toothpick.
5. Build the colorful layers.
Continue working your way up the cone, creating individual rows of black olives, cubed cheddar cheese, red grapes, cubed mozzarella, and green olives. Keep each ingredient grouped into its own layer to create the striped witch-hat effect.
6. Make the top of the witch hat.
Once you reach the narrow portion of the cone, use one full 3 oz package of prosciutto to wrap around the tip of the cone. Use the second package to drape over the remaining exposed portion, slightly overlapping the first layer. Gently shape the prosciutto toward one side to create that signature crooked witch-hat point.
7. Finish and serve.
Serve immediately, or loosely cover with plastic wrap and refrigerate until you're ready to serve.
Tip
Use plenty of toothpicks to keep everything secure, especially the heavier olives, grapes, and cheese cubes. Most importantly, make sure the entire foam cone is completely covered with plastic wrap before adding any food.
Perfect for: Halloween parties, spooky movie nights, grazing tables, or an edible Halloween centerpiece. 🎃
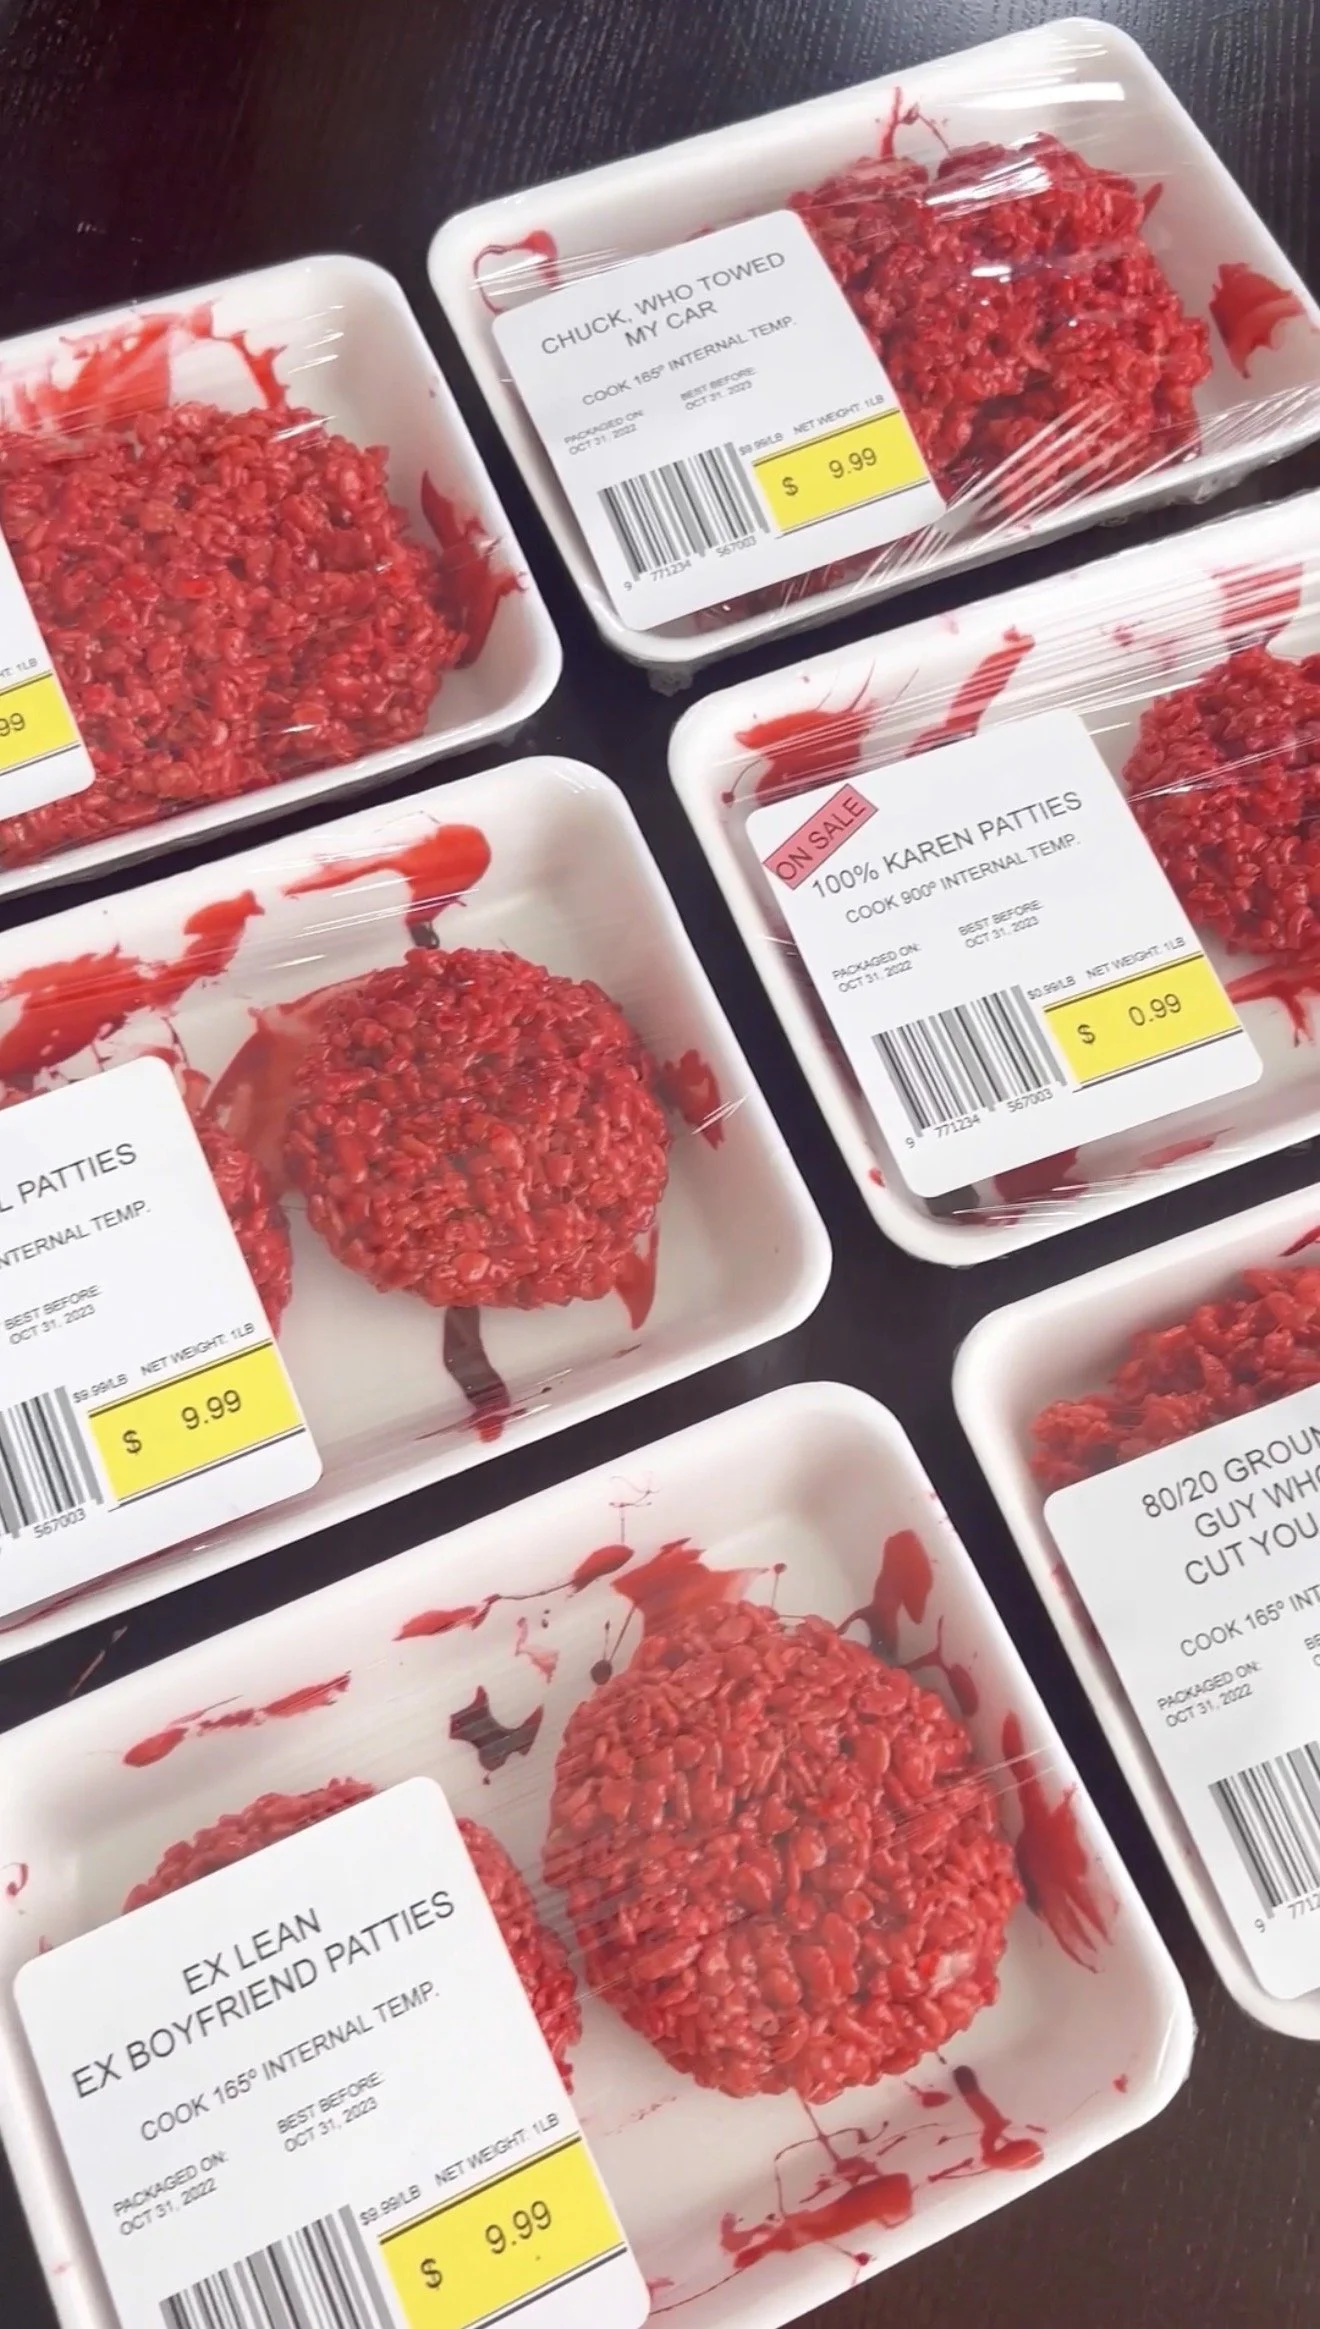
Ingredients
Fake Blood:
1 T corn syrup
1 T chocolate syrup
2 drops deep red gel food coloring
Meat:
5 T butter
1 lb mini marshmallows
9 cups Rice Krispies
1 cup Red velvet cake mix (I used Duncan)
Super red gel food coloring as needed
Trays and labels:
8 foam meat trays (6” x 8”) - (purchase these on amazon or you can nicely ask your local butcher)
Plastic wrap
3 1/3” x 4 “ Avery Shipping labels (product # 15264)
Directions
Blood:
1. Combine corn syrup with chocolate syrup and deep red gel food coloring.
2. Brush the fake blood on the foam trays
Ground ‘Meat’:
1. To a large pot melt butter with marshmallows
2. Stir until fully melted then pour in red velvet cake mix
3. Once incorporated add a few drops of deep red gel food coloring
4. Shut off the heat then mix in Rice Krispies
5. While still warm, form into patties or simply place into your foam trays. If the rice Krispies start to harden just move back to stove on low heat until pliable again.
6. Cover your ground beef tightly with plastic wrap then add your labels
Shipping Labels:
You can design these on Avery.com. Here are some fun names:
-100% Karen patties
-Road kill patties
-Extra fatty Billy the bully
-Chuck who towed my car
-80/20 Guy who cut you off
-Ex Lean ex boyfriend patties
-First Date, never frozen
-80% lean, 20 % cheating husband
-Bad neighbor, locally sourced
Serves 6
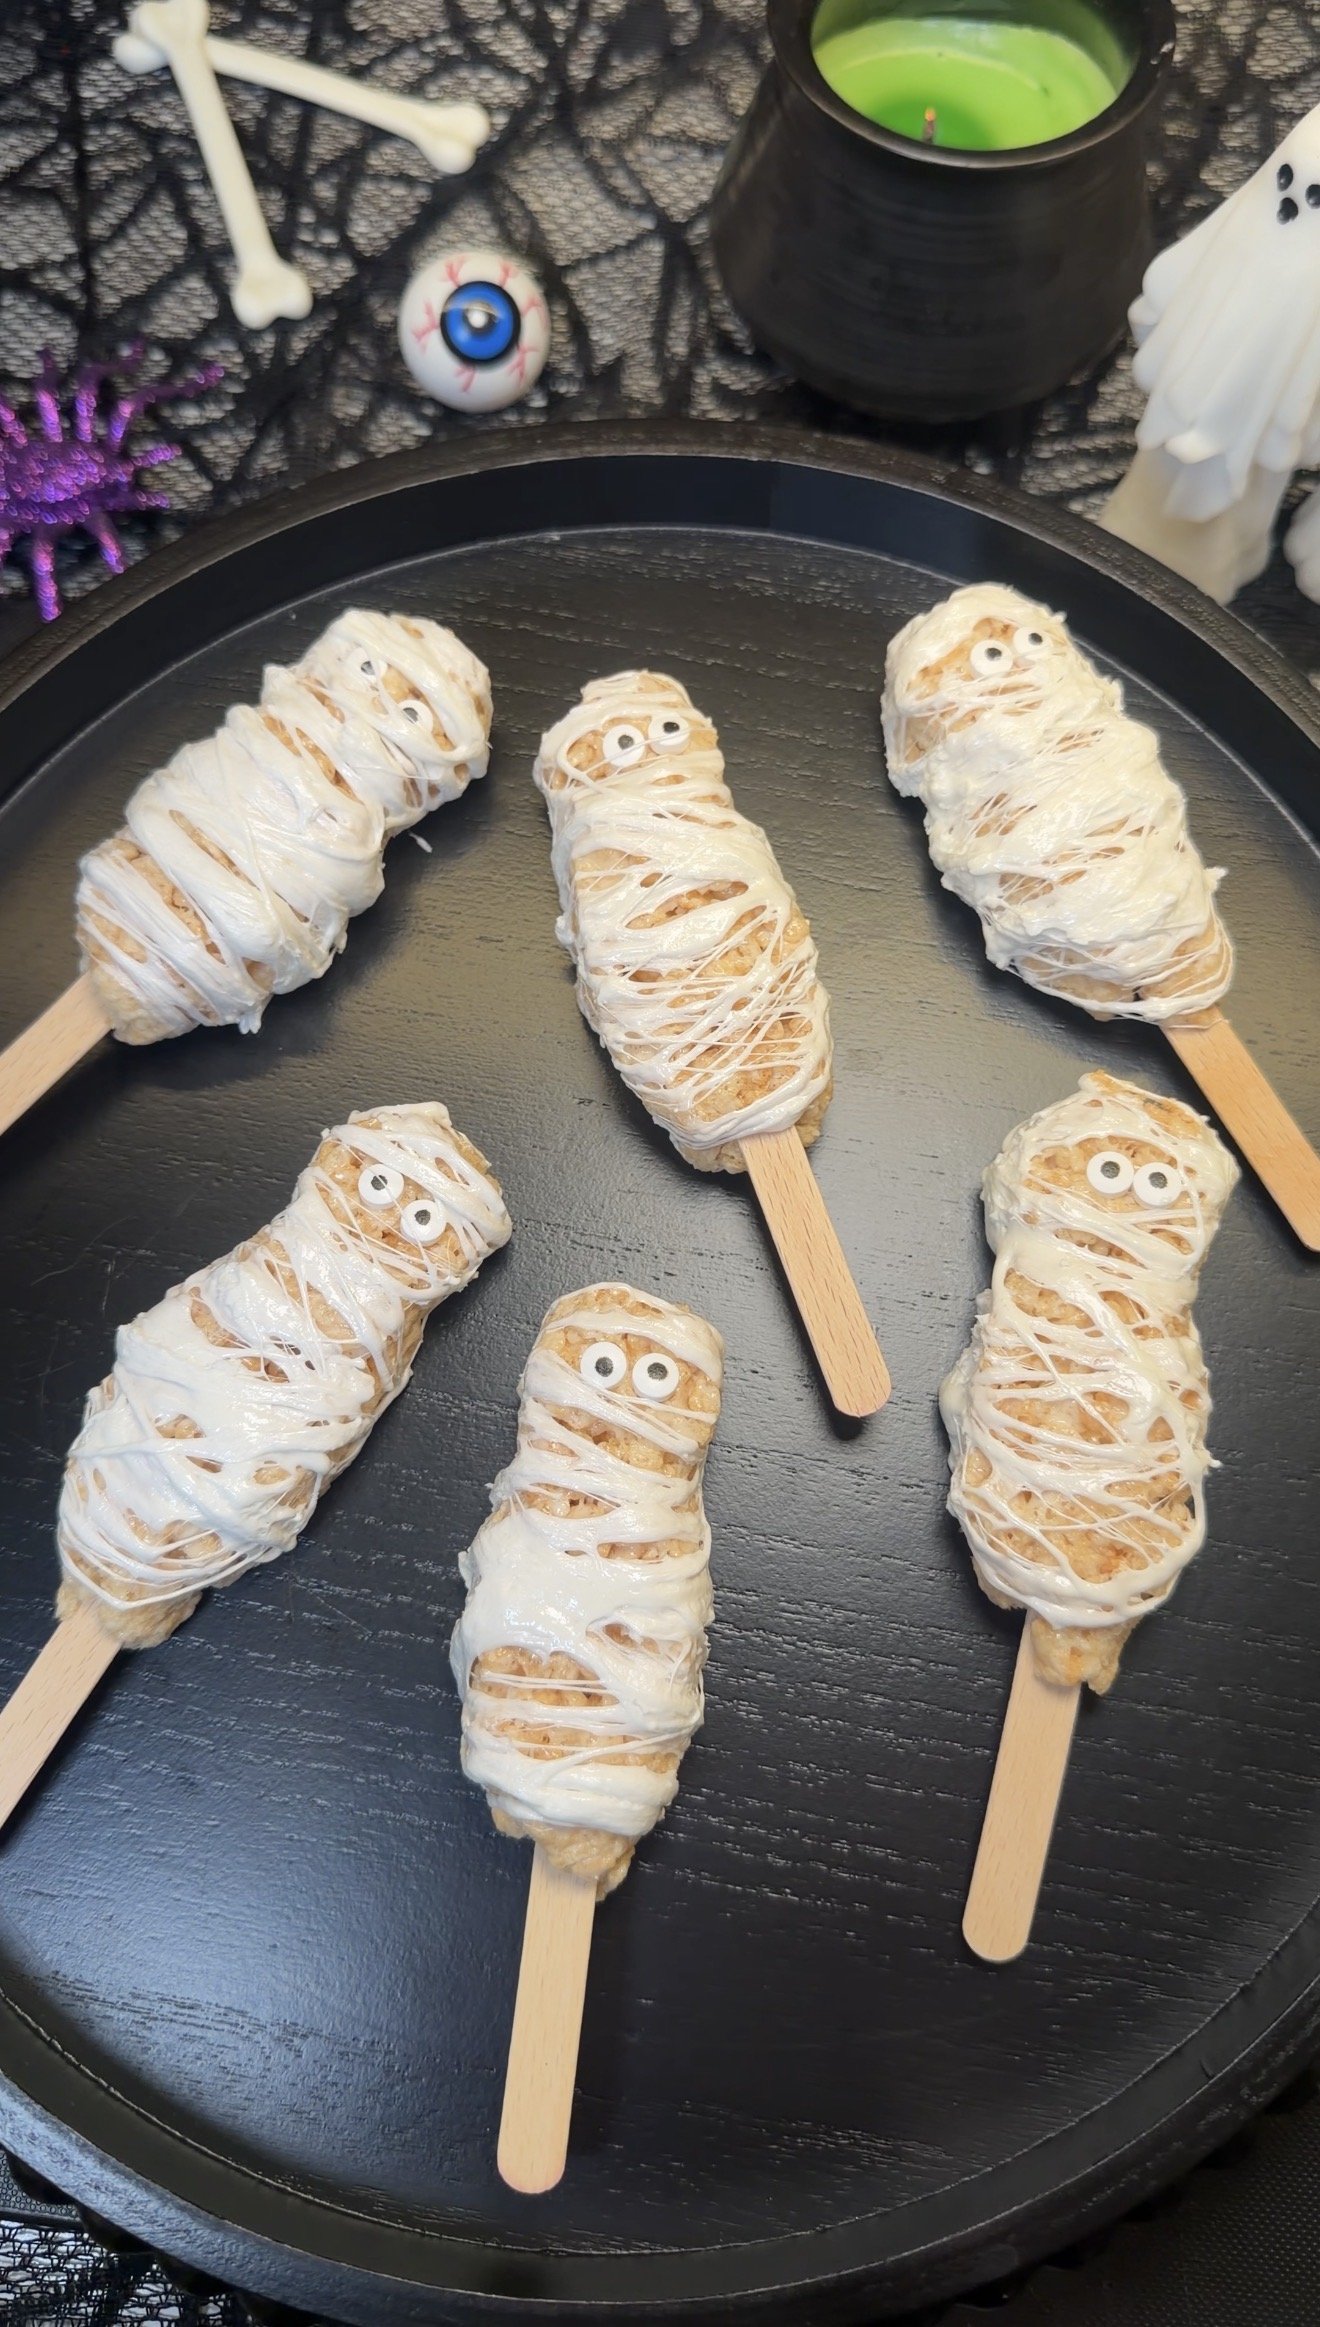
These Marshmallow Mummies are an easy and adorable Halloween treat made with just 3 ingredients. Rice Krispies Treats are wrapped in gooey, stretchy marshmallow to create spooky mummy bandages and finished with candy eyeballs. Perfect for Halloween parties, kids, or a quick spooky-season treat!
Ingredients
8 Rice Krispies Treats (22 g each)
4 jumbo marshmallows
16 candy eyeballs
8 popsicle sticks
Directions
1. Unwrap the Rice Krispies Treats and insert a popsicle stick into the bottom of each one. Gently press and shape the treats around the sticks in the shape of a mummy’s body and head.
2. Press 2 candy eyeballs into the front of each Rice Krispies Treat near the top. Refrigerate for 1 hour to allow the treats to firm up on the popsicle stick.
3. Place a jumbo marshmallow on a microwave-safe plate and microwave for 10 seconds, or until softened and very stretchy. Allow it to cool just enough to safely handle.
4. Using your fingers, pull and stretch the softened marshmallow into thin strands. Wrap the strands around the Rice Krispies Treat leaving the candy eyes visible to create the mummy bandages.
5. Repeat with the remaining treats, reheating the marshmallow or using a fresh marshmallow as needed.
6. Place the finished mummies on parchment or wax paper and refrigerate until the marshmallow has set and is no longer sticky.
Makes 8 Marshmallow Mummies
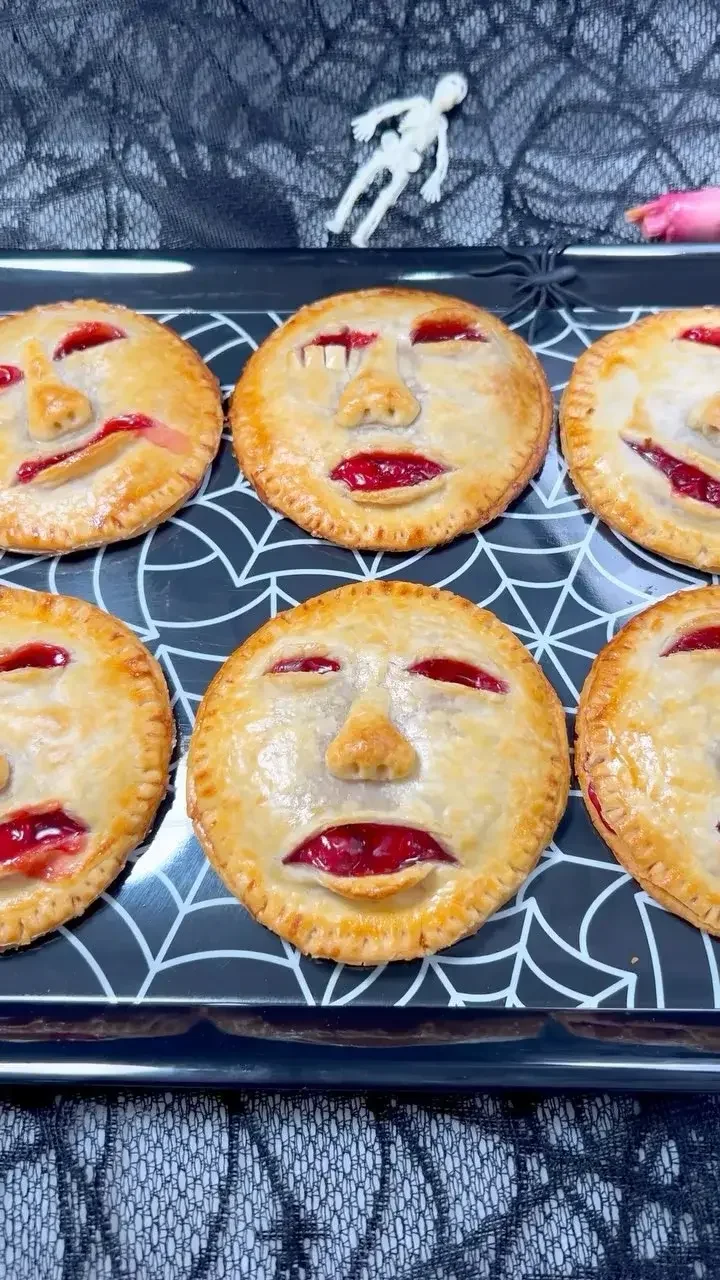
Ingredients
3 sheets refrigerated pie dough
1 can cherry pie filling
1 large egg
1 teaspoon water
Directions
1. Prepare the pie dough.
Preheat oven to 450°F. Roll out the pie dough sheets and cut 4 rounds from each sheet, for a total of 12 rounds. Set aside 6 rounds for the bottoms and 6 for the faces.
2. Create the noses.
Use leftover pie dough scraps to shape small noses. Lightly brush the back of each nose with water and press onto the 6 face rounds. Use a chopstick or another pointed tool to create nostrils.
3. Make the faces.
Cut slits in the dough for the eyes and mouths, then gently stretch and shape the openings. Have fun creating different expressions and adding extra details to make each face unique.
4. Fill the pies.
Place a scoop of cherry pie filling in the center of each of the 6 bottom rounds, leaving enough space around the edges to seal the pies.
5. Assemble.
Lightly brush the exposed edges of the bottom rounds with water. Place a face round over each one and gently press the edges together. Crimp around the edges with a fork to seal.
6. Add the egg wash.
Whisk together the egg and 1 teaspoon water. Brush the egg wash over the faces.
7. Bake.
Place the pies on the lower rack of the oven and bake at 450°F for about 15 minutes, or until the pie dough is golden brown.
Makes 6 face pies.
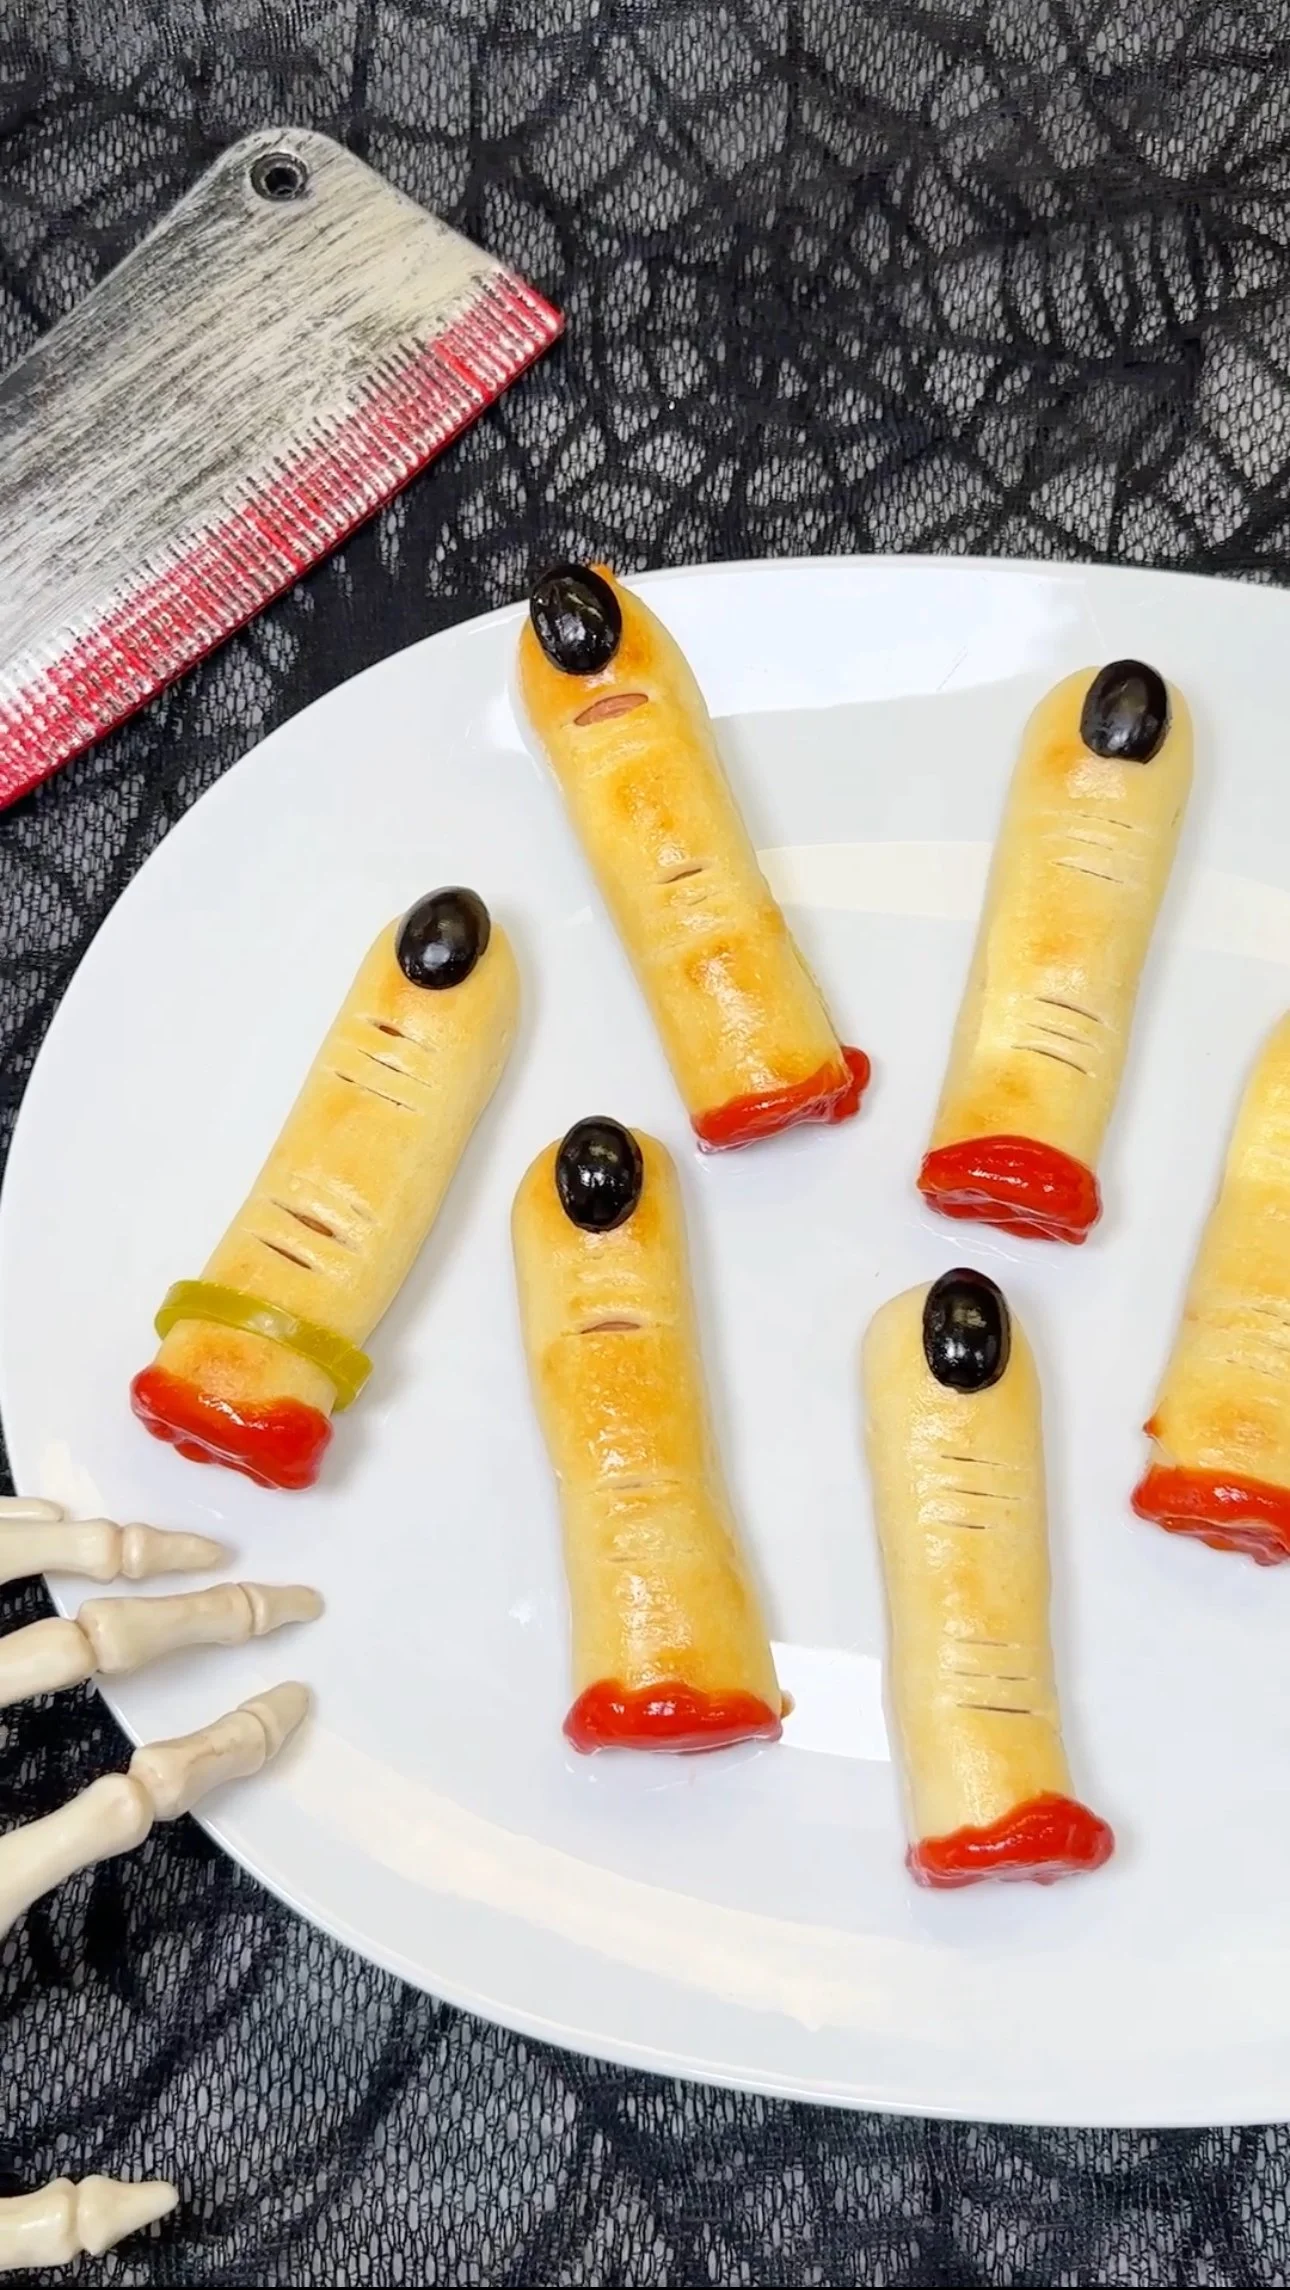
These creepy Savory Severed Fingers are an easy Halloween appetizer made with flaky dough, hot dogs, black olive fingernails and plenty of bloody ketchup. Disturbingly realistic and perfect for a Halloween party!
Ingredients:
4 Hotdogs dogs
1 sheet thin pizza crust dough
Egg wash (1 egg + 1 tsp water)
4 black olives (edges sliced off each end)
1 tsp cream cheese
4 sliced pickled jalapeños
Ketchup as needed
Directions:
Slice hot dogs in half lengthwise.
Divide thin crust pizza dough into 8 sections.
Wrap each halved hot dog with a section of pizza dough.
Pinch the top together around the rounded part of the hot dog. Fold under and cut off any excess dough.
Place wrapped hot dogs on a parchment lined sheet pan. Brush with egg wash then make knuckle markings.
Bake in 425°F oven for 12 minutes or until just golden.
For the severed look, cut off the ends of the hot dogs.
For the nails, secure sliced olives on with cream cheese.
For the rings, slide on sliced jarred pickled jalapeños.
Drizzle on ketchup for the bloody effect then place on your presentation platter.
Enjoy! 👻
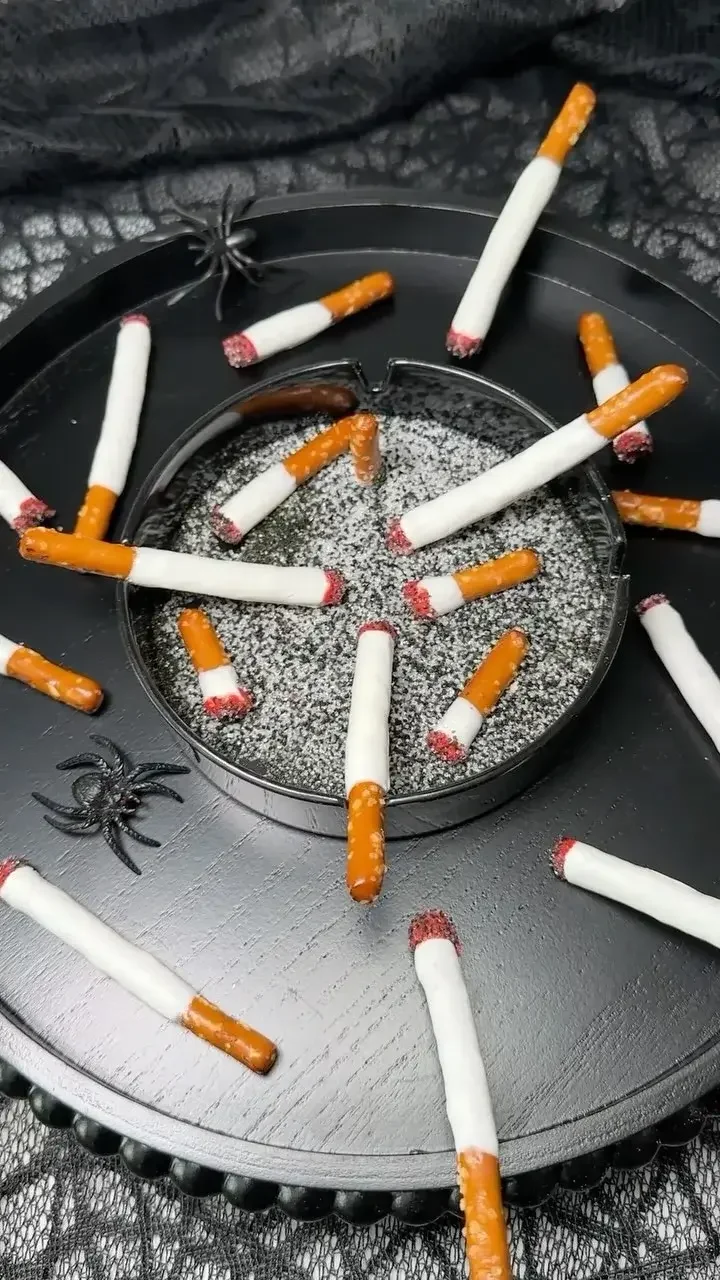
Ingredients
20 pretzel sticks, dipper size
8 oz white coating wafers
2 oz red coating wafers
¼ cup black sanding sugar
¼ cup white sanding sugar
🛒 SHOP THE PRODUCTS
Directions
Melt the white coating wafers according to package directions.
Dip each pretzel stick into the melted white coating about 3/4 of the way up, leaving one end of the pretzel exposed.
Shake off any excess chocolate then place on parchment paper and allow the coating to completely set.
Melt the red coating wafers according to package directions.
Combine equal parts black and white sanding sugar in a small bowl.
Dip the tip of each pretzel stick into the melted red coating, then immediately dip it into the black and white sanding sugar to create the look of burning ash.
Place on parchment paper and allow to set completely.
For a more realistic look, break some of the pretzel sticks into different lengths and repeat the same process. The variation in size makes them look even more convincing when piled together.
Serve them in a clean ashtray for an extra-realistic presentation!
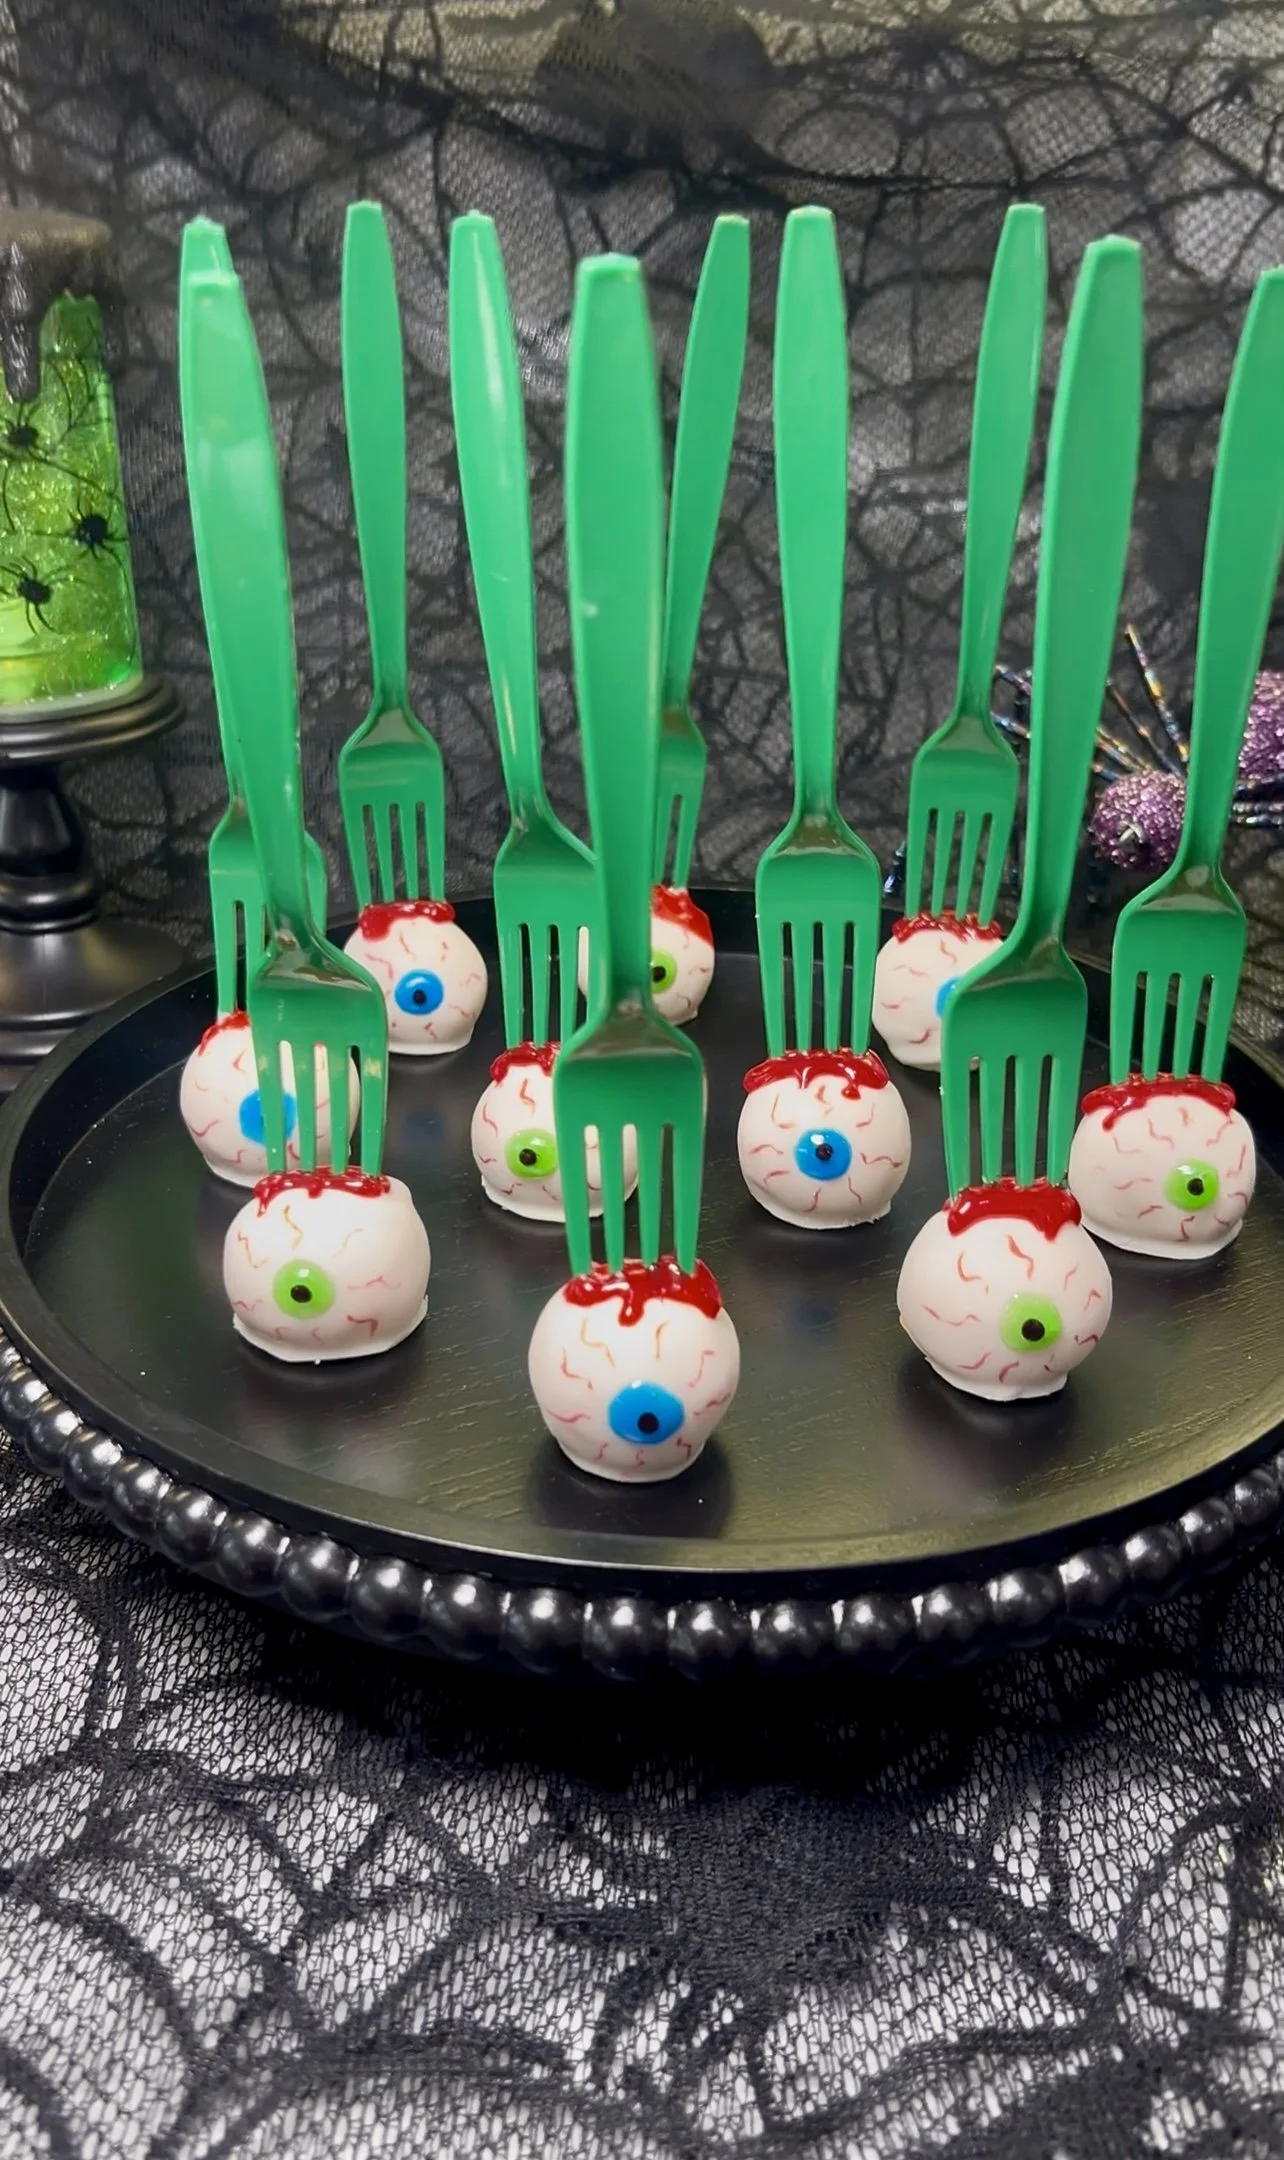
Fresh Bloody Eyeballs 🩸👀
Eye see you… 👁️ These bloody eyeball cake pops are watching your every bite. Would you take a bite? 👻
Ingredients:
8 frosted soft sugar cookies, store-bought
1 bag Ghirardelli White Melting Wafers
Blue, green, black and red decorating gel
Red food coloring marker
Green plastic forks
🛒 SHOP THE PRODUCTS
Directions:
Add the cookies to a tabletop mixer and mix until the mixture comes together. If it’s too dry, add 1 teaspoon of water at a time until a dough forms.
Roll the mixture into 1-ounce balls and freeze for 20 minutes, or until firm.
Meanwhile, melt the white coating wafers according to the package directions.
Once the cookie balls are chilled and firm, dip the tip of each green fork into the melted coating, then insert it into a cookie ball.
Chill until the coating around the fork has completely set.
Dip each eyeball completely into the melted white coating. Allow the excess to drip off, then let the coating set.
Once dry, decorate the eyeballs. I used green and blue decorating gel for the irises and black decorating gel for the pupils.
Use a red food coloring marker to draw thin blood vessels around each eyeball.
For an extra gruesome touch, add red decorating gel around the eyeballs for a fresh bloody effect. 🩸

Ingredients:
Cake:
1 box white cake mix (I used Betty Crocker)
1 cup water (or milk)
1/2 cup vegetable oil (or melted butter)
3 eggs
Green food coloring
Orange food coloring
Purple food coloring
Frosting:
2 cups butter, room temperature
7 cups confectioners sugar
1 cup cocoa powder
1 tbsp vanilla extract
Black food coloring
Spiderweb:
5 Jumbo marshmallows
Combine all cake ingredients. Divide batter evenly between three bowls and add food coloring to each bowl and mix well.
Spray and line bottom of three 6 inch cake pans with parchment paper. Pour batter into each pan. Bake in a 325°F oven for 26 minutes or until a toothpick comes out clean. Allow to cool to room temperature then slice off the tops to level.
Frosting:
Beat butter until light and fluffy then add sugar and cocoa powder. Mix together until fully incorporated then add vanilla and black food coloring. Mix until the color is fully incorporated. Add more food coloring as needed.
Stack and frost each layer of your cake then refrigerate to set the frosting.
Spiderweb effect:
Place marshmallows on a disposable plate and microwave for 25 seconds until soft. Using your hands (wearing gloves for easy cleanup) press marshmallows together, then spread your hands apart creating a web effect then spread around you cake.
Add optional decorative spiders.
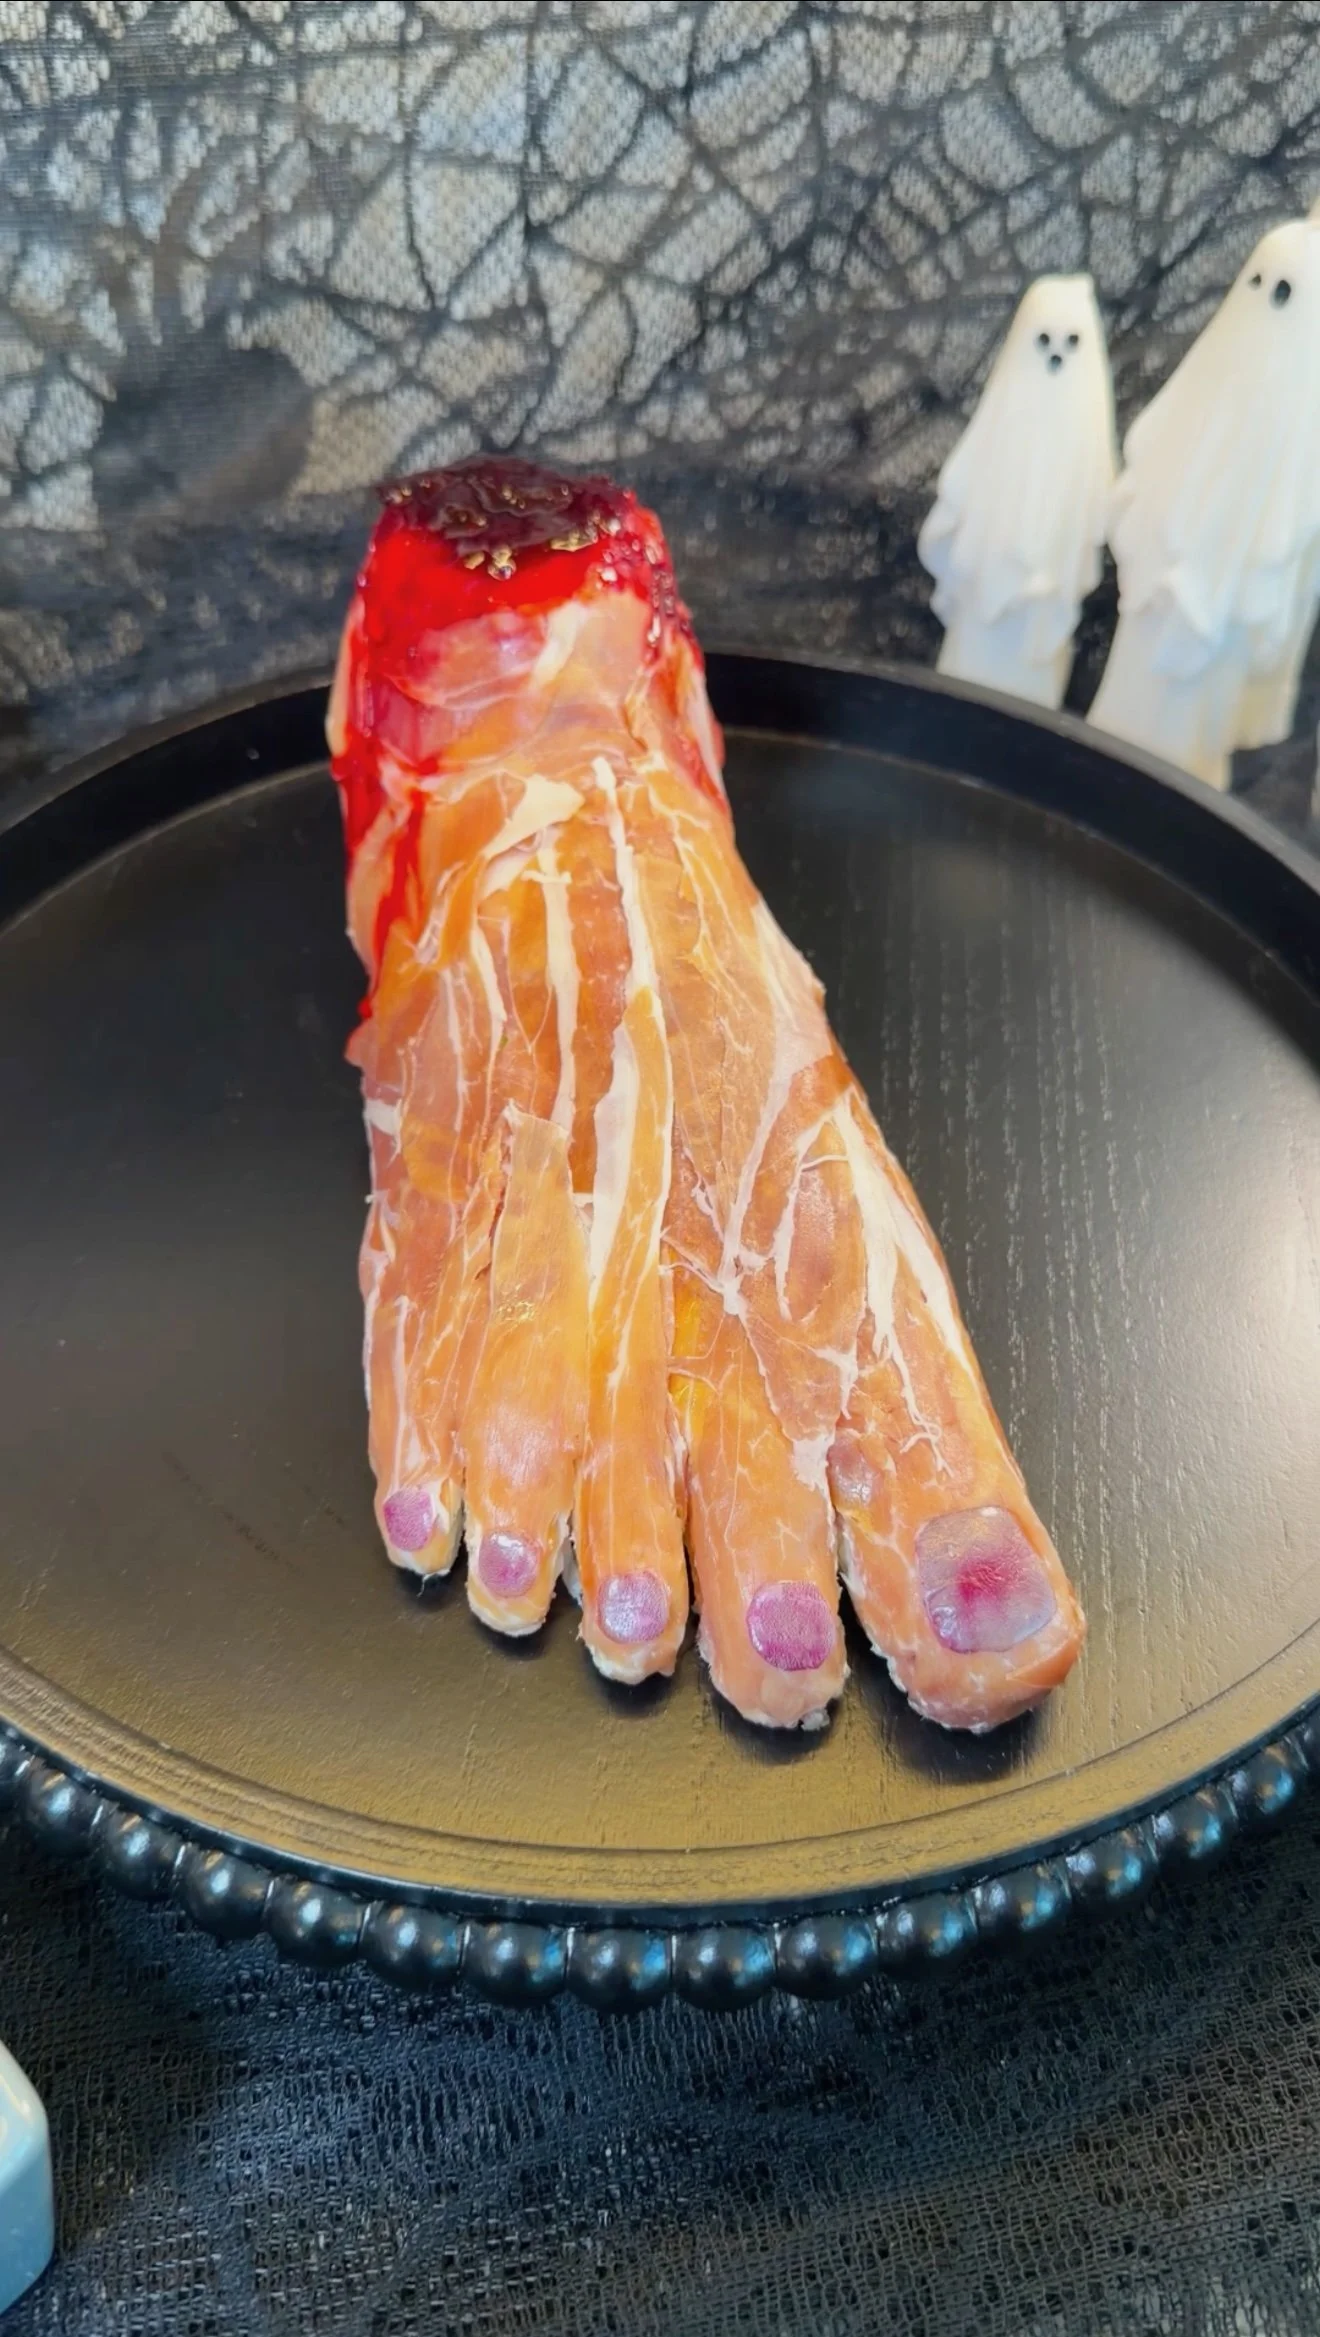
This horrifyingly realistic edible severed foot is made with mozzarella, herbed cream cheese and prosciutto, then finished with creepy red onion toenails and a bloody cherry-balsamic stump. It looks absolutely disgusting, but underneath all that gore is a delicious prosciutto-and-cheese appetizer perfect for Halloween.
Ingredients
1 mozzarella and prosciutto roll/log
3 mozzarella string cheese sticks
1 lb cream cheese, softened
1 tsp dried dill
1 tsp dried chives
1 tsp dried parsley
1/2 tsp garlic salt
8 thin slices prosciutto
1 layer red onion
3 Tbsp cherry preserves
1 Tbsp balsamic glaze
3 drops deep red gel food coloring, optional
Crackers, for serving
Instructions
1. Make the foot template
DOWNLOAD AND PRINT FOOT TEMPLATE
Download and print the foot template at 100% / Actual Size. Place a sheet of parchment paper over the template and trace the outline. Flip the parchment over before adding any food so the marker never comes into contact with the ingredients.
2. Build the toes
Using the template as your guide, place 1 whole mozzarella stick over the big toe.
Cut the second mozzarella stick in half lengthwise and use the two pieces for the next two toes.
Cut the third mozzarella stick lengthwise into four pieces. Use two of those pieces for the two smallest toes. Discard or eat the remaining two pieces. Chef's treat!
3. Create the ankle and heel
Cut the mozzarella and prosciutto log approximately 2/3 of the way down. Stand the larger piece upright to create the ankle.
Place the smaller portion between the ankle and mozzarella-stick toes. Arrange and shape the pieces until the overall structure follows the outline of the foot template.
4. Make the herbed cream cheese
In a bowl, combine the softened cream cheese, dill, chives, parsley and garlic salt. Mix until smooth and spreadable.
5. Sculpt the foot
Completely cover the mozzarella structure with the cream cheese mixture.
Using a small offset spatula or knife, smooth and sculpt the cream cheese to create the shape of the foot. Fill in the spaces between the mozzarella pieces while keeping each individual toe defined.
6. Add the "skin"
Lay thin slices of prosciutto over the entire foot, gently pressing and overlapping the pieces until the cream cheese is completely covered. Wrap the prosciutto around the sides and ankle as well.
Don't make it too perfect. The natural folds, wrinkles and variations in the prosciutto are what make the foot look disturbingly realistic.
7. Make the toenails
Cut small pieces from a layer of red onion into toenail shapes.
Add a tiny dab of cream cheese to the underside of each "nail" and press one onto the end of each toe.
8. Make the "blood"
Mix together the cherry preserves and balsamic glaze. If you want a deeper, bloodier red, stir in a few drops of deep red gel food coloring.
9. Create the severed stump
Generously spoon the cherry-balsamic mixture over the exposed top of the ankle, allowing some of the "blood" to drip naturally down the sides of the prosciutto.
10. Make ahead
Transfer the parchment paper with the finished foot onto a platter. Gently cover with plastic wrap and refrigerate until ready to serve.
The foot can be assembled and refrigerated for up to 3 days.
11. Serve
Once thoroughly chilled, the cream cheese will be firm and the foot will be much easier to move.
Use a large spatula underneath the foot to carefully transfer it from the parchment paper onto your presentation platter.
Serve with crackers and extra cherry-balsamic glaze on the side, if desired. Finish the presentation with cobwebs, spiders or your favorite Halloween props.
Chef Genevieve's Tips
Don't make it too perfect! Uneven prosciutto, bruised-looking toenails and messy drips of "blood" are exactly what make this appetizer look horrifyingly realistic.
As you're covering the foot, use the tip of a small knife to tuck the edges of the prosciutto underneath the foot instead of letting them lie flat against the parchment. This gives the foot a cleaner, rounded edge and makes the finished shape look much more realistic.
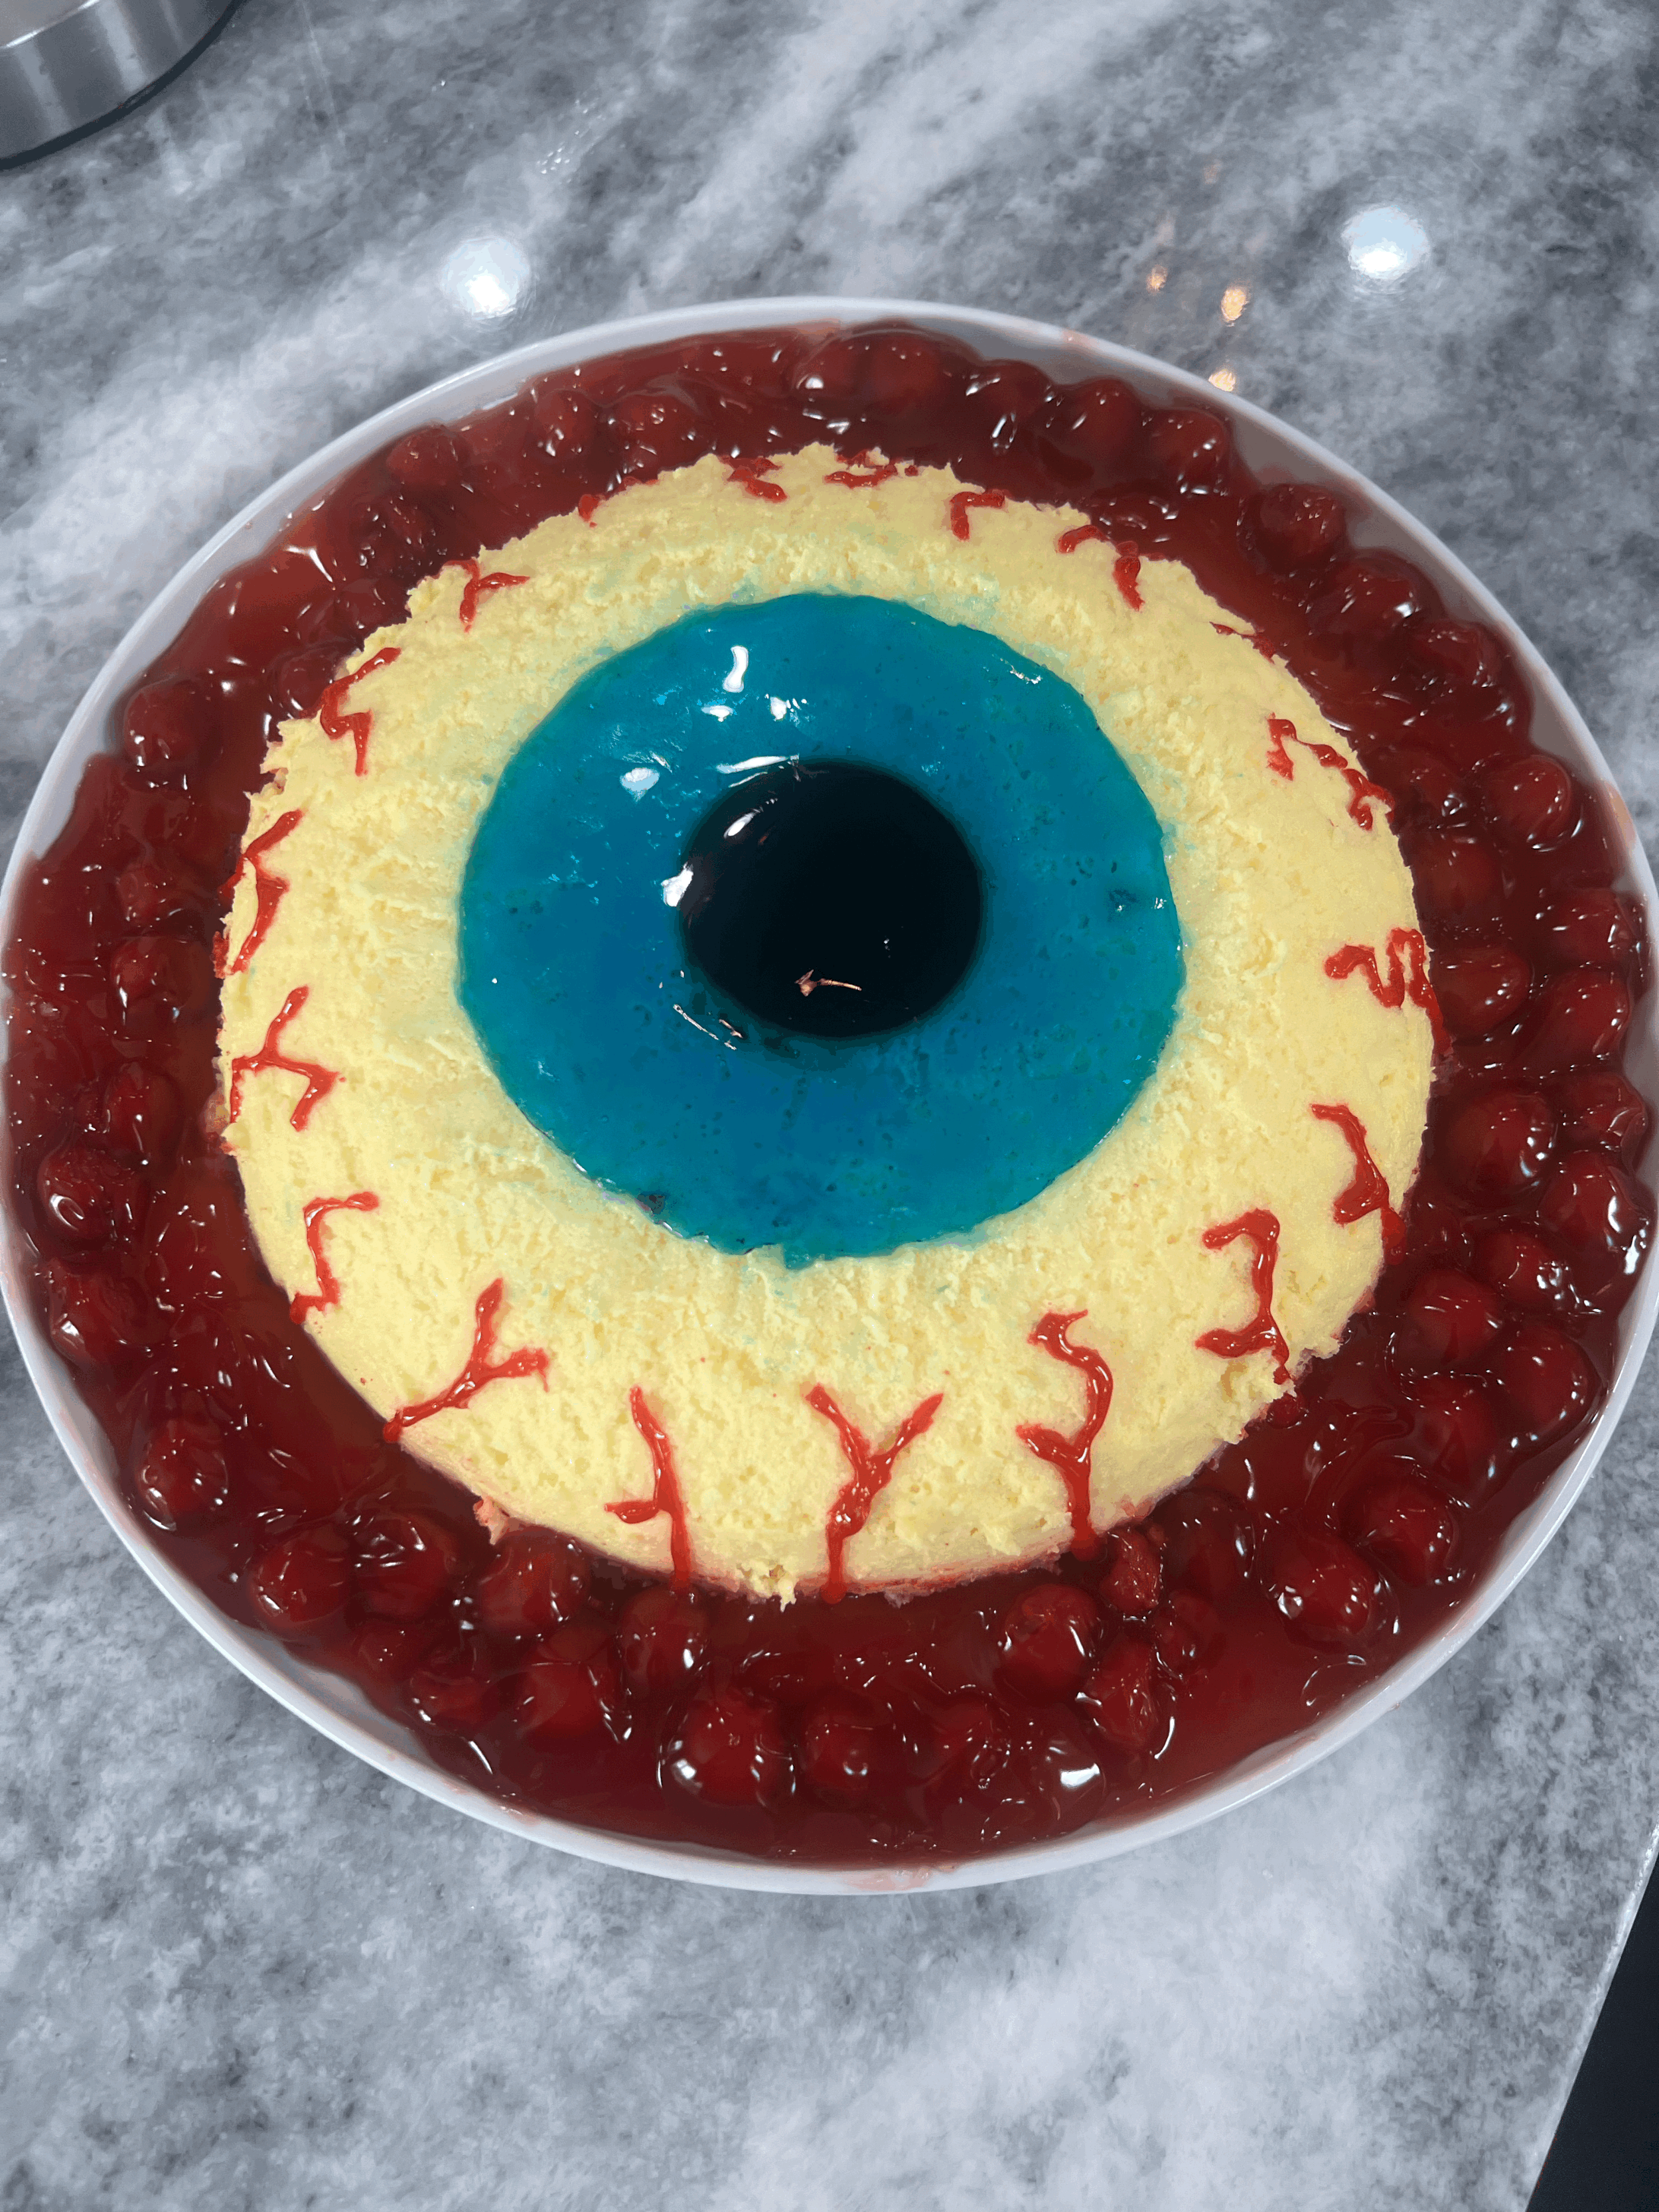
This creepy Giant Eyeball Cheesecake is the perfect Halloween dessert. A no-bake cheesecake is layered with blue and black Jell-O to create the iris and pupil, then finished with cherry pie filling and red decorating gel for a bloody eyeball effect.
Ingredients:
1 - 3oz box berry blue jello
2/3 cups water
1 drop black gel food coloring
4 boxes no-bake cheesecake (crust mix included)
4 cups whole milk
2 bags of crust fix (from boxes of cheesecake)
1/4 cup sugar
1 + 1/4 stick of butter
3 drops red gel food coloring
1 can cherry pie filling
1 squeeze bottle red decorating gel
Spray oil
Tools needed:
2.15 inch round cutter
3 quart stainless steel bowl
Directions:
Start by mixing 3 ounces of blue Jell-O with 2/3 cups of boiling water. Stir and tell all the Jell-O has dissolved.
Lightly spray stainless steel bowl with oil.
Mix a quarter cup of the Jell-O with 1 drop black food coloring then pour into bowl and chill until set (about 1 hour).
Use a round cutter in the center, remove the excess Jell-O making sure not to leave any black Jell-O in behind in the bowl. Spray bowl again lightly with oil.
Pour in 1/4 cup of the blue Jell-O into the bowl (if blue Jell-O has begun to set, simply heat again until loose) and return to fridge (about 30 minutes).
Meanwhile, mix four bags of the no bake cheesecake with 4 cups of milk and pour over the Jell-O. (Do not over mix - no more than two minutes) return to fridge for one hour.
Melt one and a quarter stick of butter then mix in three drops of red food coloring
Add two bags of the crust mix to a mixer, add sugar, then add the melted butter mixed with red food coloring. Mix together then place evenly over the cheesecake and refrigerate until set.
Place a large platter over the bowl and flip the bowl over. (if cheesecake is not releasing dip the bottom into hot water for 10 to 15 seconds).
Place cherry pie filling around the edges and use red decorating gel to make the blood vessels.
Enjoy!
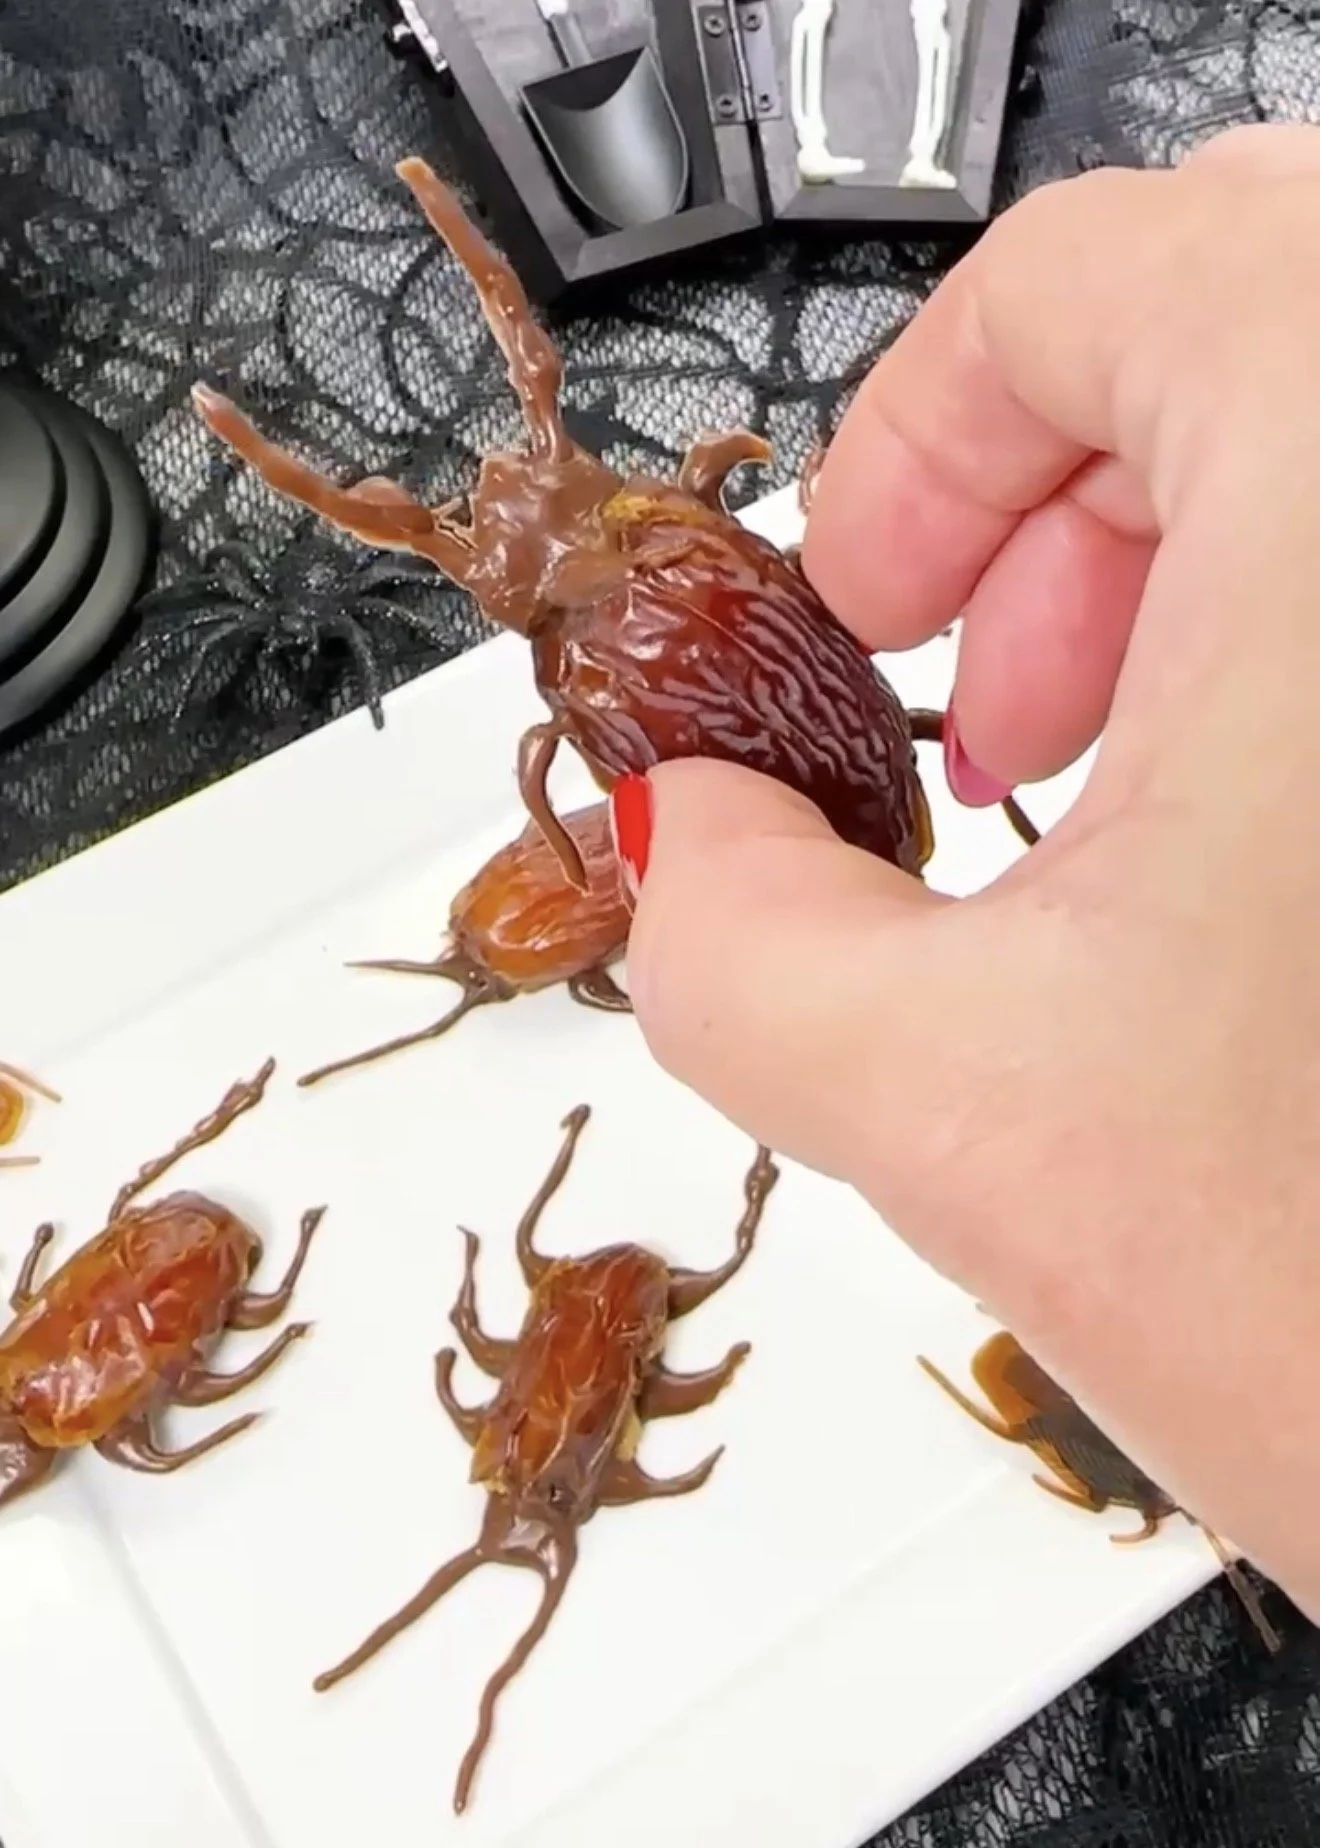
Ingredients
• Medjool dates
• Crunchy peanut butter
• Milk chocolate melting wafers (Ghirardelli brand is best)
Directions
Split the Medjool dates in half lengthwise and remove the pits.
Fill each date half with crunchy peanut butter, leveling off any excess.
Add the milk chocolate melting wafers to a piping or resealable bag and microwave until melted. Snip a very small amount off the tip.
Cover the peanut butter side with melted chocolate, then flip and place down on parchment paper.
Pipe a small head onto each cockroach, followed by the antennas and legs.
If needed, make a second pass over the legs and antennas with chocolate to strengthen them.
Allow the chocolate to fully dry on parchment paper to set before serving.
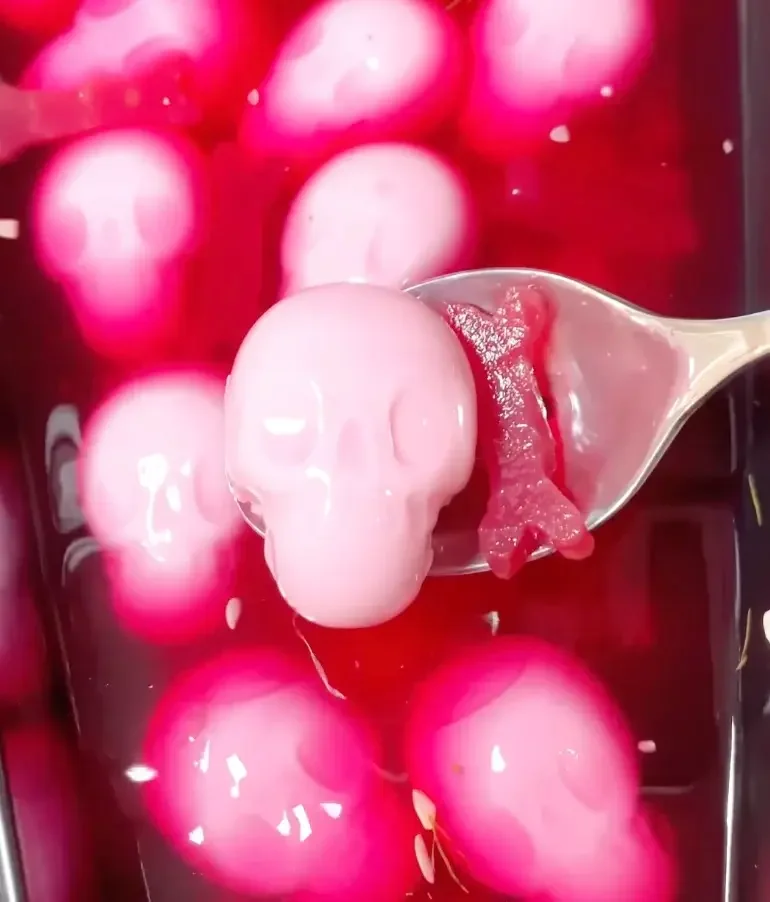
74 hr
Ingredients
12 medium sized eggs
1 red beet (roasted 400° for 1 hr)
2 cups Pickle juice
Directions
1. Gently lower eggs in to a pot of boiling water, boil 10 minutes then gently lower into ice cold water
2. After 3 minutes of cooling, transfer eggs to a bowl covered with warm water. While your eggs are keeping warm peel your eggs then start to gently form into as skull shape while the protein bonds are still flexible.
3. Place your egg into the skull mold (these are found at target for $3/ pack) then gently press down.
4. Place on a sheet of plastic wrap down, place skull face up, bring the plastic up, bundle and twist tightly. Wrap the excess plastic around the jaw to help press the egg in even more.
5. Refrigerate minimum 2 hours .
6. Meanwhile slice roasted beets (wrap with foil and bake in the oven at 400° for one hour) and use a cookie cutter of your choice to create Halloween shapes.
7. After the eggs have chilled snip off the plastic and tap to release
8. Place in a jar with your beets and fill with pickling liquid (I simply used the leftover brine from my last storebought jar of pickles)
9. Give it a few flips then refrigerate a minimum of 3 days and up to 3 months.
10. To serve at a party pour contents into bowl - I found my coffin shaped one on amazon or serve in specimen jars as appetizers to your guests.
Serves 12
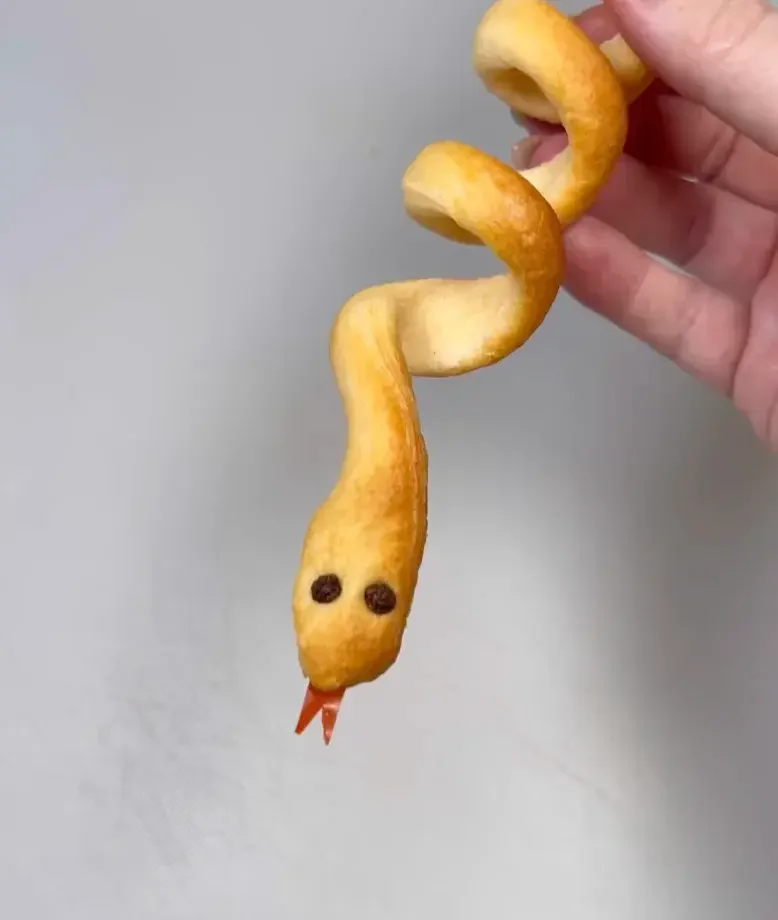
35 min
Ingredients
1 can Pillsbury Crescent Dough
16 black peppercorns
1 red bell pepper
4 wooden dowels (Home Depot)
2 tbsp Olive oil
Directions
1. Roll out sheet of dough. Cut into 8 long strips.
2. Fold strip in half lengthwise then roll together making sure to leave 1 inch at the end undisturbed (for the head)
3. Use wooden dowel As your mold, lightly coat with oil then gently wrap your dough around it.
4. Press in black peppercorns as the eyes then place on a parchment lined sheet pan and bake according to package directions or until until golden brown.
5. Gently release each section from the dowel before sliding out the snake.
6. Cut red bell pepper into the shape of a tongue. Pierce a hole in the mouth and insert the tongue.
7. Serve as a halloween appetizer, a side dish or over a bowl of spooky soup
8. Enjoy!
Serves 8
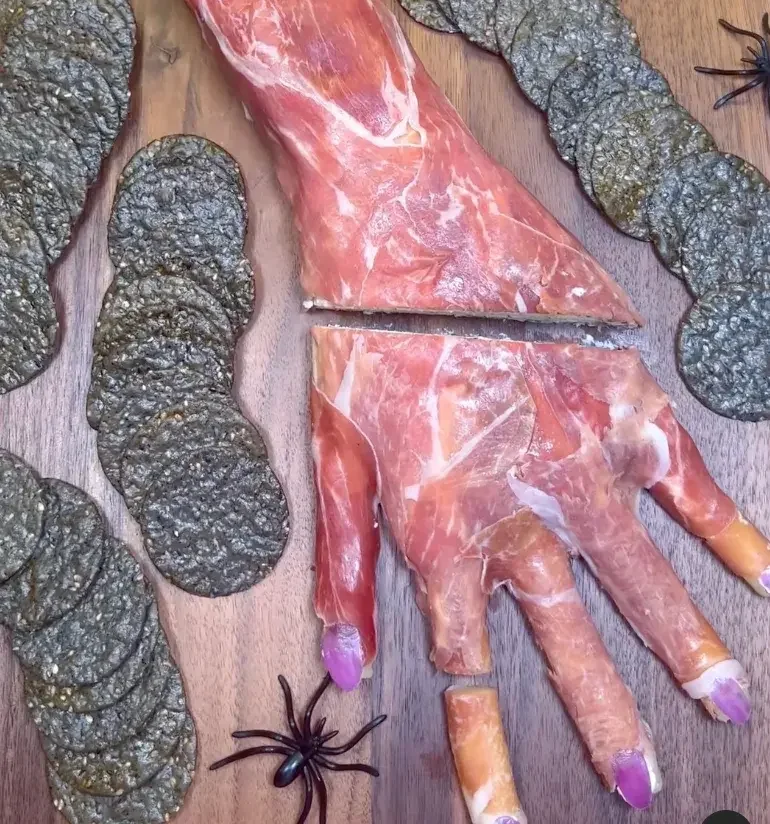
5 hr
Ingredients
16 oz cream cheese (room temp)
1 T fresh minced chive
1 T fresh minced parsley
1 T fresh minced dill
½ tsp salt
½ tsp pepper
½ tsp garlic powder
½ tsp onion powder
5 prosciutto panini rolls
2 prosciutto wrapped mozarella rolls
6 slices prosciutto
Red onion (use thinnest outer section)
Directions
1. In a bowl combine cream cheese along herbs and spices, mix and set aside.
2. Lay a sheet of parchment paper down, trace out your hand and lower arm then place another sheet of parchment on top (to prevent cross contamination to the marker)
3. Lay down 5 panino rolls to match with your finger tracings and two prosciutto wrapped mozzarella logs to match your arm
4. Add in your herbed cream cheese to fill the gaps then smooth out the imperfections.
5. Place prosciutto slices over covering all cream cheese including between the fingers
6. For the nails, using the thinnest slice of red onion available, cut to the shape of five nails and glue on your fingers using extra cream cheese
7. Cover with plastic wrap and refrigerate 4-5 hours. Once firm, (I used a bench scraper to loosen the cream cheese from the parchment paper) transfer to your presentation platter
8. Serve with some crackers and halloween props
Hand 1
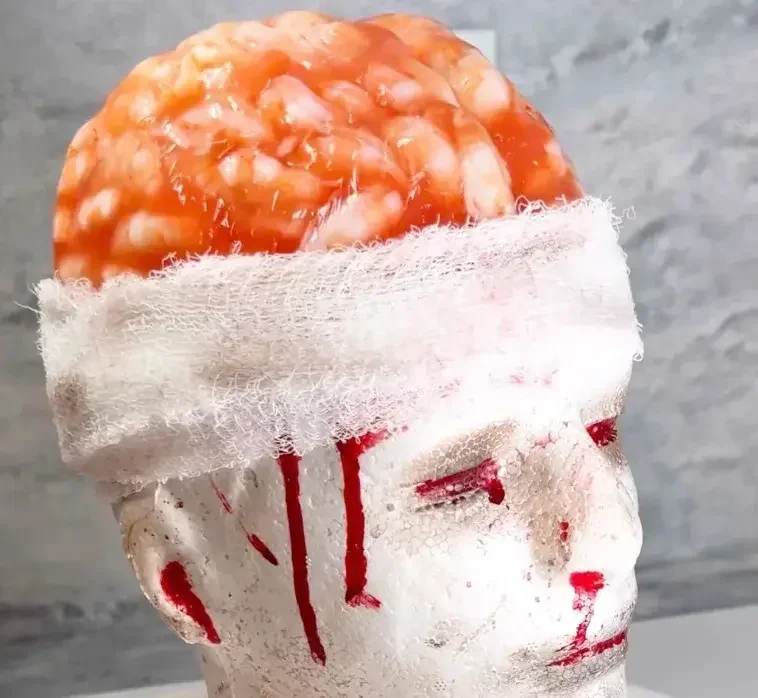
6 hr
Ingredients
¾ cup Clamato juice
¾ cup water
1 packet Knox geletin
2 lbs deveined and shelled cooked shrimp
½ lemon juiced
⅓ tsp salt
Directions
1. Combine Clamato juice and water in a pot and sprinkle on 1 packet ok Knox gelatin. Allow to sit five minutes at room temperature to allow the gelatin to bloom.
2. Place pot with liquid over stove and bring up to a simmmer. Add 1/2 lemon juiced and 1/2 tsp salt
3. Once gelatin is dissolved set aside to cool.
4. Line a plastic brain mold with plastic wrap.
5. Layer shrimp with the rounded part facing down and tail facing up. Continue layering until you’ve reached the top
6. Using a piece of cardboard cut to fit the top of the mold then wrap with plastic wrap.
7. Poor your cooled gelatin mixture on top then place on the cardboard cutout
8. Refrigerate 5 hours to allow gelatin to set, once set, flip over and remove brain mold and plastic wrap
9. Serve with a side of toothpicks and cocktail sauce.
Serves 8
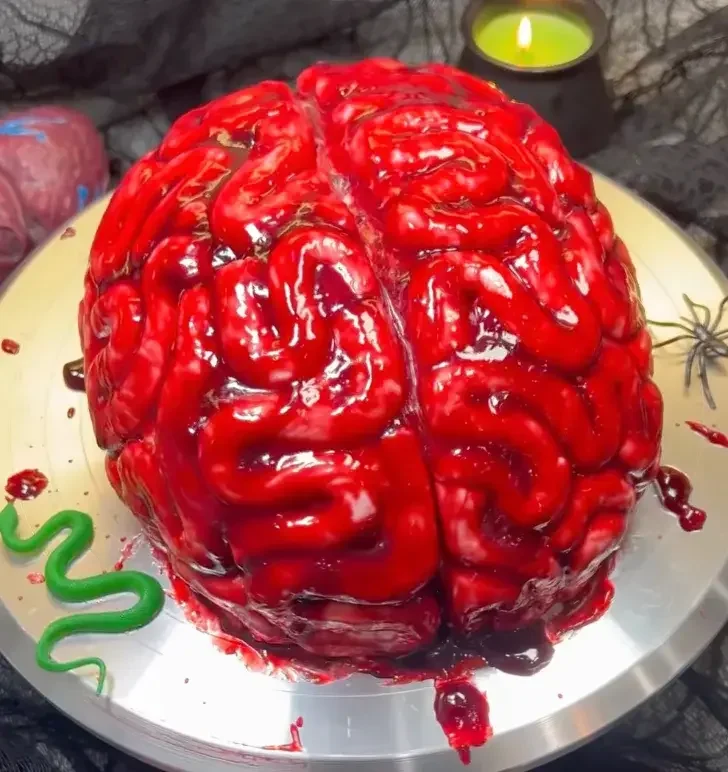
4 hr
Ingredients
1 box red velvet cake mix
3 eggs
½ cup vegetable oil or butter
1 cup water or milk
Nonstick spray
8oz salted butter room temperature
8oz cream cheese room temperature
4 cups confectioners sugar
2 tsp vanilla extract
2 lbs vanilla fondant
1 drop red food coloring
1 cup red seedless raspberry jam
Directions
1. Start by spraying an 8 inch stainless steel bowl with nonstick spray.
2. Cut 6 strips of parchment paper to line your bowl.
3. Pour in prepared red velvet cake mix.
4. Place on a sheet pan then bake 350 F oven for 1 hour or until a wooden skewers comes out clean.
5. Beat room temperate salted butter and cream cheese until light and fluffy then add powder sugar and vanilla extract. Mix on lowest speed then speed up after incorporated and beat 1 more minute.
6. Once you cake has cooled, remove from bowl and peel off the parchment
7. Trim off a little from the right and left side then cut a line down the middletrim further if needed to resemble shape of a brain.
8. Next add your frosting and spread on - coating the entire cake - this will be your crumb coat
9. Chill in fridge 30 minutes-Then add your second layer of frosting and make sure to keep the distinct line down the middle
10. Return to fridge
11. Meanwhile, add in 1 drop red food coloring to 2 lbs of vanilla fondant - knead together until color is fully incorporated
12. Roll fondant into logs then strategically place on your cake making squiggly lines while keeping the brain halves separate
13. Brush on raspberry jam
14. Chill until ready to serve
15. Enjoy!
Serves 8

Ingredients
For the Meatloaf Head
2 lbs extra lean ground beef, excess liquid patted dry
¾ cup Italian breadcrumbs
¾ cup milk
½ onion, finely diced and sautéed
1 egg
1½ tsp Worcestershire sauce
2 tsp salt
1 tsp black pepper
For the Bloody Glaze
½ cup ketchup
2 tbsp brown sugar
1½ tsp apple cider vinegar
¼ tsp garlic salt
For the Zombie Face
2 Spanish stuffed Queen olives, cut in half for the eyes
Thin strips of onion, for the teeth and eyebrows
For the Spaghetti Hair
About 4 oz spaghetti
1 tsp olive oil
1–2 tbsp reserved bloody glaze or marinara
For the Mashed Potato “Vomit”
1 cup prepared mashed potatoes
Parsley, finely chopped
Directions
1. Prepare the breadcrumbs 🥛
Combine the Italian breadcrumbs and milk. Stir together and set aside for a few minutes so the breadcrumbs can absorb the milk.
2. Sauté the onion 🧅
Finely dice the onion and sauté with oil until softened. Set aside to cool slightly.
3. Make the meatloaf mixture 🥩
In a large bowl, combine the ground beef, breadcrumb mixture, sautéed onion, egg, Worcestershire sauce, salt, and black pepper. Gently mix until evenly combined.
4. Shape the zombie head 🧟
Line a sheet pan with parchment paper. Shape the meatloaf mixture into a large oval head. Scoop beef out to create eye socket and a large opened mouth and use that meat to build up the eyebrows, nose and chin so the face has plenty of definition.
6. Bake 🔥
Bake at 350°F for 30 minutes.
7. Make the bloody glaze 🩸
While the meatloaf is baking, combine the ketchup, brown sugar, apple cider vinegar, and garlic salt. Stir until smooth.
8. Glaze the head 🩸
Remove the meatloaf from the oven and generously brush the entire head with the glaze, making sure to get in the eyes, mouth and edges.
9. Finish baking 🔥
Return the meatloaf to the oven and bake for another 30-40 minutes, or until the thickest part reaches an internal temperature of 160°F.
10. Make the spaghetti hair 🍝
While the meatloaf finishes baking, cook the spaghetti until tender. Drain well and toss with leftover glaze or marinara sauce.
11. Add the zombie face 🧟♂️
Once the meatloaf is fully cooked, allow it to rest for about 10 minutes. Place the green olives into the eye sockets. make a cut just underneath the upper lip and add onion strips in for the teeth. Add thin onion for the the eyebrows.
12. Add the spaghetti hair 🍝
Arrange the spaghetti loosely over the top and sides of the head.
13. Add the mashed potatoes 🥔
Spoon the mashed potatoes directly into the zombie’s open mouth and allow a large amount to spill out onto the platter so it looks like the zombie is spewing mashed potatoes. Add a sprinkle of parsley.
14. Serve 🩸