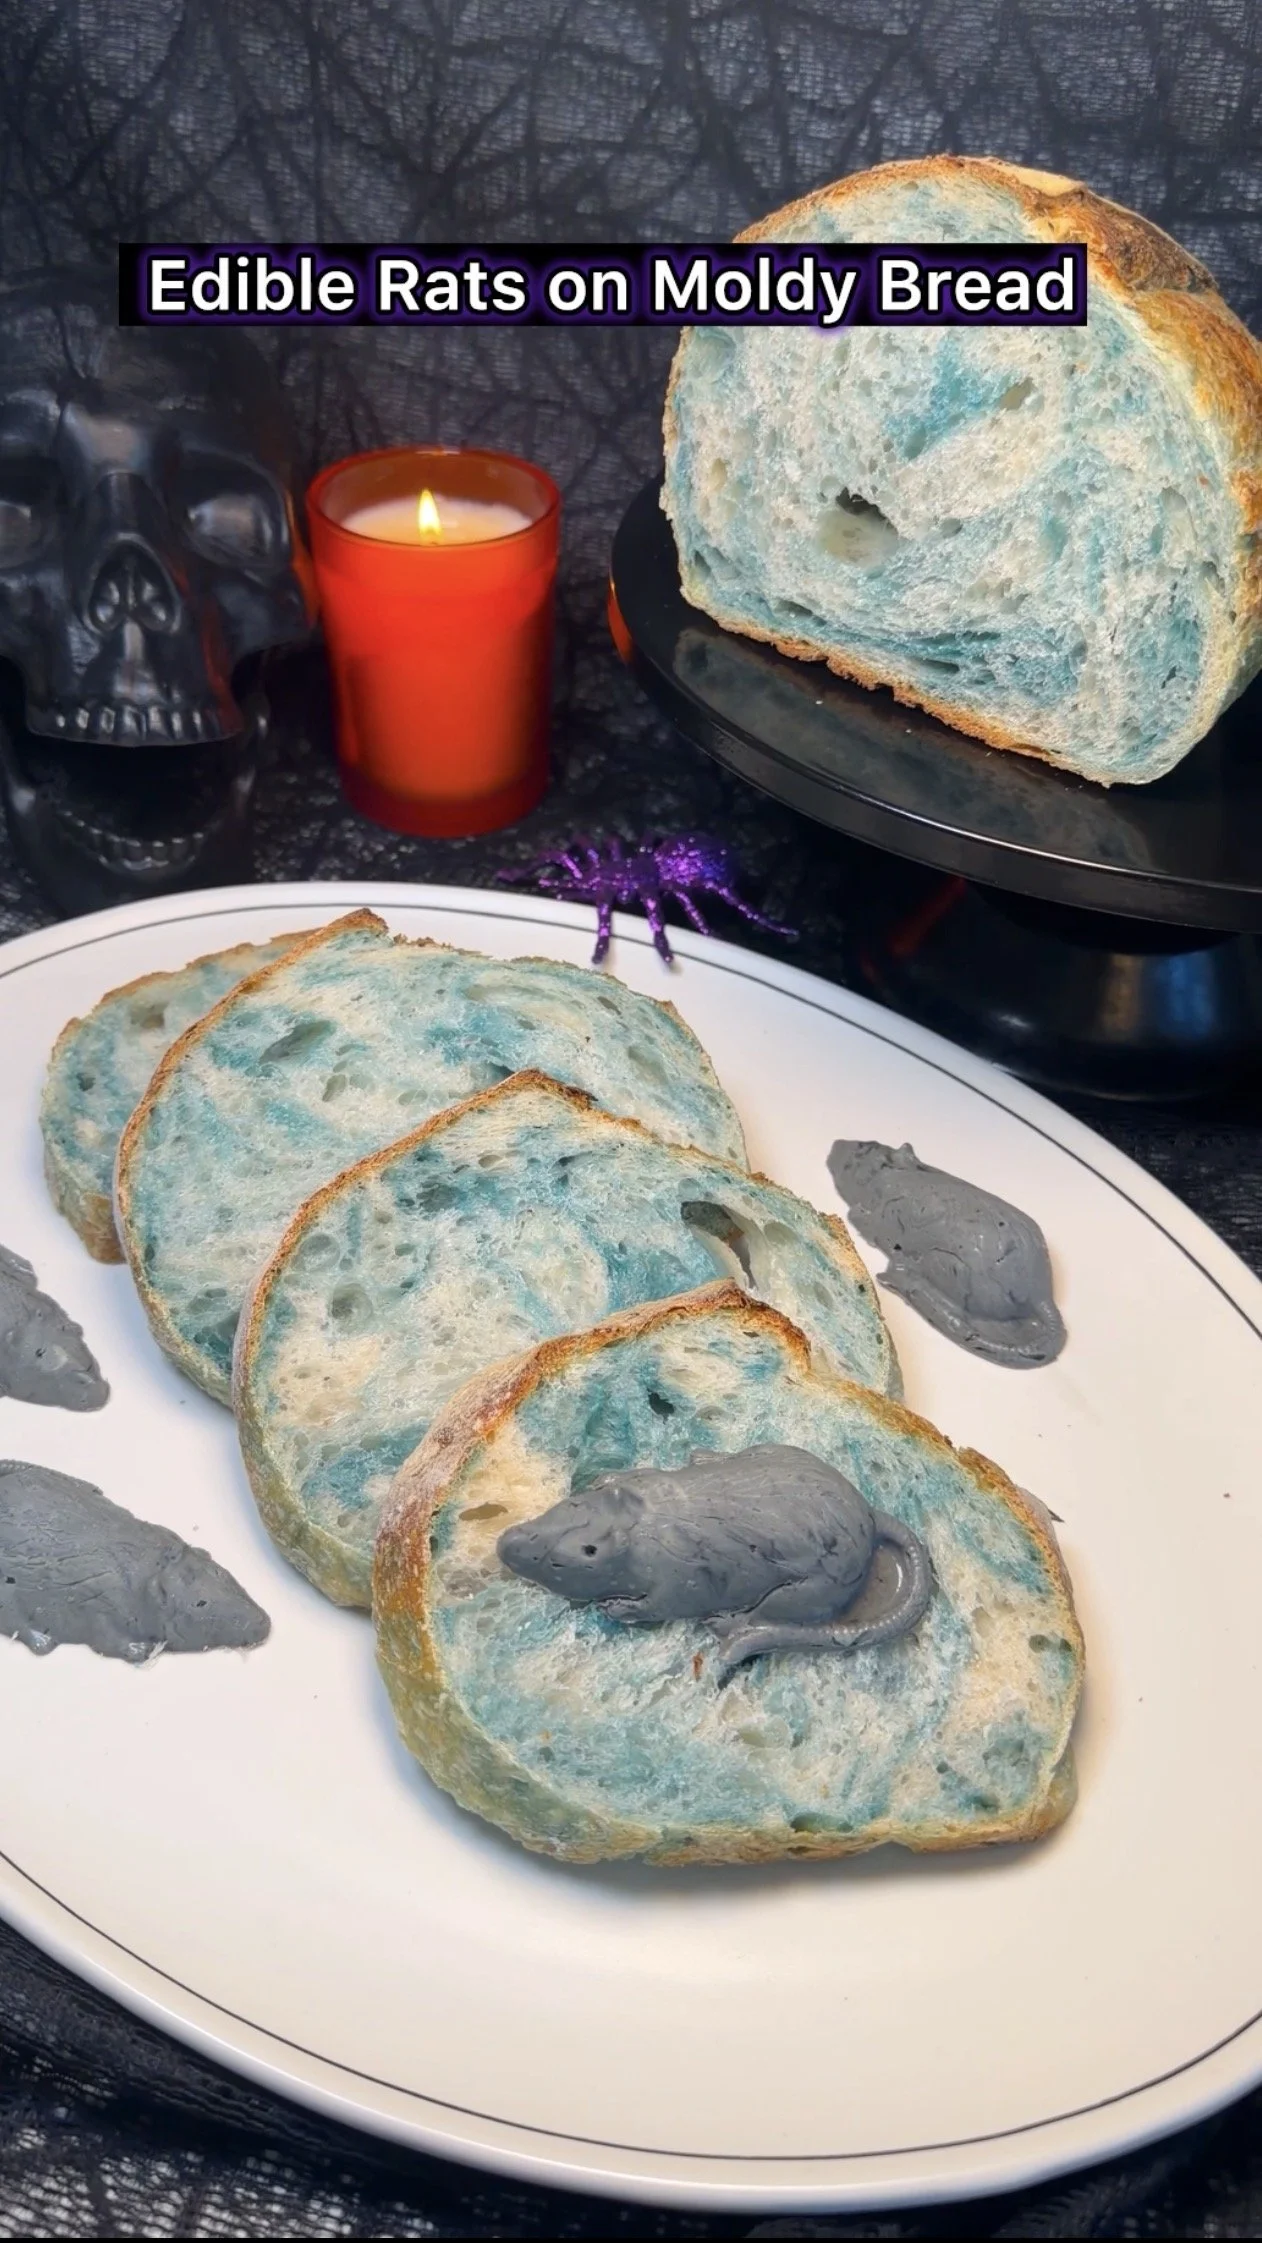
Moldy Sourdough with Edible Rat Butter
This creepy Halloween sourdough gets its moldy look from blue spirulina and is served with edible rat-shaped butter made with activated charcoal. For the full sourdough method, use my [Basic Sourdough Bread Recipe] and make the adjustments below.
Ingredients
For the moldy sourdough
1 batch of my Basic Sourdough Bread Recipe
Blue spirulina powder, as needed
For the rat butter
1 stick butter
¼ tsp activated charcoal
Rat-shaped mold
Directions
1. Make the sourdough
Prepare your sourdough according to my [Basic Sourdough Bread Recipe] through the folding process.
2. Add the blue spirulina
Just before your final coil fold, lightly sprinkle blue spirulina over the surface of the dough.
Perform the final coil fold, then sprinkle another light layer of blue spirulina over the top of the dough.
Cover and allow the dough to continue its final bulk ferment according to the original sourdough recipe.
A little spirulina goes a long way. You want irregular blue-green streaks and patches rather than completely coloring the dough.
3. Shape and add the final spirulina
Once the bulk ferment is complete, shape the dough according to the original sourdough recipe.
After the loaf is fully shaped, sprinkle one final light layer of blue spirulina over the outside of the dough.
Transfer the loaf to your prepared banneton and continue with the cold ferment according to the original recipe.
4. Make the rat butter
Melt 1 stick of butter and stir in ¼ teaspoon activated charcoal until fully combined.
Pour the butter into a rat-shaped mold and freeze until completely firm.
When ready to use, allow the mold to sit at room temperature for about 30 minutes, just until the butter softens slightly.
Turn the mold over and tap it firmly against the counter to release the rats.
Keep refrigerated until ready to serve.
5. Bake the moldy sourdough
Preheat your Dutch oven according to the original sourdough recipe.
Transfer the cold dough onto parchment paper and score the loaf as desired.
Carefully place the dough into the preheated Dutch oven and cover with the lid.
Place it on the middle rack of the oven, immediately reduce the temperature to 400°F, and bake for 40 minutes with the lid on for the entire baking time.
Keeping the loaf covered helps prevent excessive browning so the blue spirulina remains visible and gives the bread its creepy moldy appearance.
6. Cool and serve
Remove the bread from the Dutch oven and allow it to cool at room temperature for at least 1 hour before slicing.
Serve with the chilled rat-shaped charcoal butter.
Storage
Store the sourdough at room temperature in a paper bag or bread bag.
For the best texture, lightly toast individual slices before serving.
Keep the rat butter refrigerated until ready to use.
This creepy Halloween sourdough gets its moldy look from blue spirulina and is served with edible rat-shaped butter made with activated charcoal. For the full sourdough method, use my [Basic Sourdough Bread Recipe] and make the adjustments below.
Ingredients
For the moldy sourdough
1 batch of my Basic Sourdough Bread Recipe
Blue spirulina powder, as needed
For the rat butter
1 stick butter
¼ tsp activated charcoal
Rat-shaped mold
Directions
1. Make the sourdough
Prepare your sourdough according to my [Basic Sourdough Bread Recipe] through the folding process.
2. Add the blue spirulina
Just before your final coil fold, lightly sprinkle blue spirulina over the surface of the dough.
Perform the final coil fold, then sprinkle another light layer of blue spirulina over the top of the dough.
Cover and allow the dough to continue its final bulk ferment according to the original sourdough recipe.
A little spirulina goes a long way. You want irregular blue-green streaks and patches rather than completely coloring the dough.
3. Shape and add the final spirulina
Once the bulk ferment is complete, shape the dough according to the original sourdough recipe.
After the loaf is fully shaped, sprinkle one final light layer of blue spirulina over the outside of the dough.
Transfer the loaf to your prepared banneton and continue with the cold ferment according to the original recipe.
4. Make the rat butter
Melt 1 stick of butter and stir in ¼ teaspoon activated charcoal until fully combined.
Pour the butter into a rat-shaped mold and freeze until completely firm.
When ready to use, allow the mold to sit at room temperature for about 30 minutes, just until the butter softens slightly.
Turn the mold over and tap it firmly against the counter to release the rats.
Keep refrigerated until ready to serve.
5. Bake the moldy sourdough
Preheat your Dutch oven according to the original sourdough recipe.
Transfer the cold dough onto parchment paper and score the loaf as desired.
Carefully place the dough into the preheated Dutch oven and cover with the lid.
Place it on the middle rack of the oven, immediately reduce the temperature to 400°F, and bake for 40 minutes with the lid on for the entire baking time.
Keeping the loaf covered helps prevent excessive browning so the blue spirulina remains visible and gives the bread its creepy moldy appearance.
6. Cool and serve
Remove the bread from the Dutch oven and allow it to cool at room temperature for at least 1 hour before slicing.
Serve with the chilled rat-shaped charcoal butter.
Storage
Store the sourdough at room temperature in a paper bag or bread bag.
For the best texture, lightly toast individual slices before serving.
Keep the rat butter refrigerated until ready to use.